Create and manage Azure cost allocation rules
Large enterprises often centrally manage Azure services or resources. However, different internal departments or business units use them. Typically, the centrally managing team wants to reallocate the cost of the shared services back out to the internal departments or organizational business units who are actively using the services. This article helps you understand and use cost allocation in Cost Management.
With cost allocation, you can reassign or distribute the costs of shared services. Costs from subscriptions, resource groups, or tags get assigned to other subscriptions, resource groups or tags in your organization. Cost allocation shifts costs of the shared services to another subscription, resource groups, or tags owned by the consuming internal departments or business units. In other words, cost allocation helps to manage and show cost accountability from one place to another.
Cost allocation doesn't support purchases, including reservations and savings plans.
Cost allocation doesn't affect your billing invoice. Billing responsibilities don't change. The primary purpose of cost allocation is to help you charge back costs to others. All chargeback processes happen in your organization outside of Azure. Cost allocation helps you charge back costs by showing them as the get reassigned or distributed.
Allocated costs appear in cost analysis. They appear as other items associated with the targeted subscriptions, resource groups, or tags that you specify when you create a cost allocation rule.
Prerequisites
- Cost allocation currently only supports customers with:
- A Microsoft Customer Agreement (MCA) in the Enterprise motion where you buy Azure services through a Microsoft representative. Also called an MCA enterprise agreement.
- A Microsoft Customer Agreement that you bought through the Azure website. Also called an MCA individual agreement.
- An Enterprise Agreement (EA).
- To create or manage a cost allocation rule, you must use an Enterprise Administrator account for Enterprise Agreements. Or you must be a Billing account owner for Microsoft Customer Agreements.
Create a cost allocation rule
- Sign in to the Azure portal at https://portal.azure.com.
- Navigate to Cost Management + Billing > Cost Management.
- Under Settings > Configuration, select Cost allocation.
- Ensure that you select the correct EA enrollment or billing account.
- Select +Add.
- Enter descriptive text for the cost allocation rule name.
The rule's evaluation start date generates the cost allocation percentages and prefills them.
- Select Add sources and then select either subscriptions, resource groups, or tags to choose costs to distribute.
- Select Add targets and then select either subscriptions, resource groups, or tags to receive the allocated costs.
- If you need to create more cost allocation rules, repeat this process.
Configure the allocation percentage
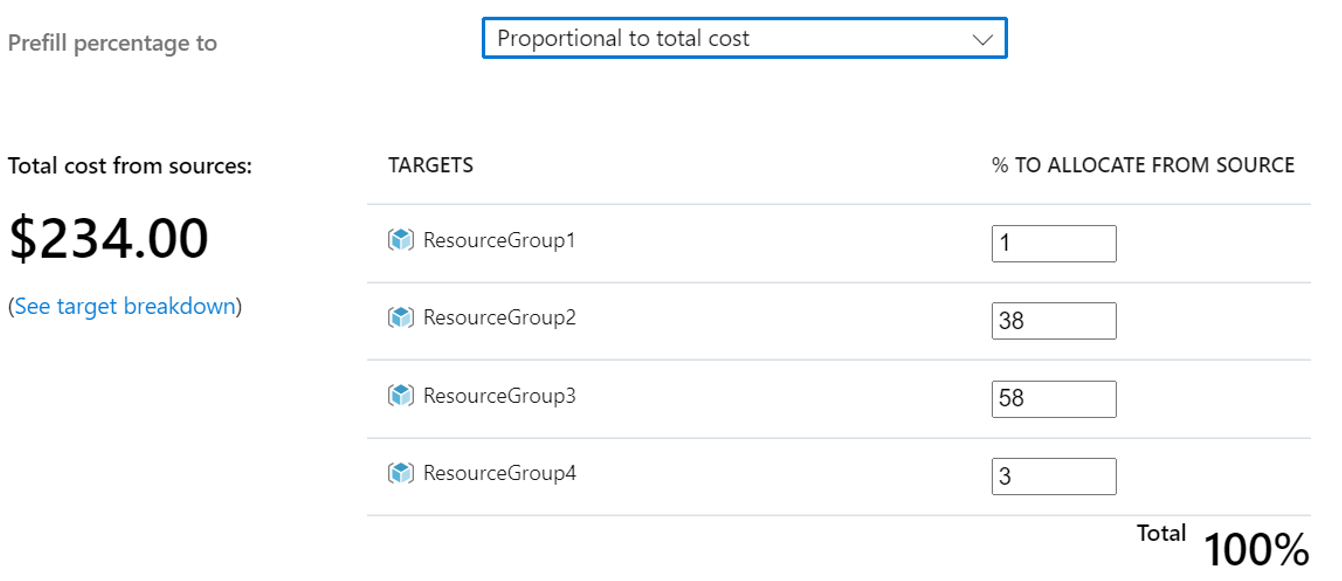
Configure the allocation percentage to define how costs proportionally divide between the specified targets. You can manually define whole number percentages to create an allocation rule. Or you can split the costs proportionally based on the current usage of the compute, storage, or network across the specified targets.
When you distribute costs by compute cost, storage cost, or network cost, the proportional percentage is derived by evaluating the selected target's costs. The costs are associated with the resource type for the current billing month.
When you distribute costs proportional to total cost, the proportional percentage allocates by the sum or total cost of the selected targets for the current billing month.
Once set, the prefilled percentages defined don't change. All ongoing allocations use them. The percentages change only when you manually update the rule.
- Select one of the following options in the Prefill percentage to list.
- Distribute evenly – Each of the targets receives an even percentage proportion of the total cost.
- Total cost – Creates a ratio proportional to the targets based on their total cost. It uses the ratio to distribute costs from the selected sources.
- Compute cost - Creates a ratio proportional to the targets based on their Azure compute cost (resource types in the Microsoft.Compute namespace. It uses the ratio to distribute costs from the selected sources.
- Storage cost - Creates a ratio proportional to the targets based on their Azure storage cost (resource types in the Microsoft.Storage namespace). It uses the ratio to distribute costs from the selected sources.
- Network cost - Creates a ratio proportional to the targets based on their Azure network cost (resource types in the Microsoft.Network namespace). It uses the ratio to distribute costs from the selected sources.
- Custom – Allows you to manually specify a whole number percentage. The specified total must equal 100%.
- When done, select Create.
The allocation rule starts processing. When the rule is active, all the selected source's costs allocate to the specified targets.
Here's a video that demonstrates how to create a cost allocation rule.
Rules processing
Rules are processed in the order in which they're created and can take up to 24 hours to take effect.
Let's look at an example. Assume that an active rule, Rule CA-1, allocates costs from subscription A (the source) to subscription B (the target).
Later, a new rule, Rule CA-2 gets created. Its source is subscription A and its target is subscription C. So, the rule has no effect because costs for subscription A are zero. The costs are zero because Rule CA-1 is active. It already allocated all the costs from subscription A to subscription B.
Verify the cost allocation rule
When the cost allocation rule is active, costs from the selected sources distribute to the specified allocation targets. Use the following information to verify proper cost allocation to targets.
View cost allocation for a subscription
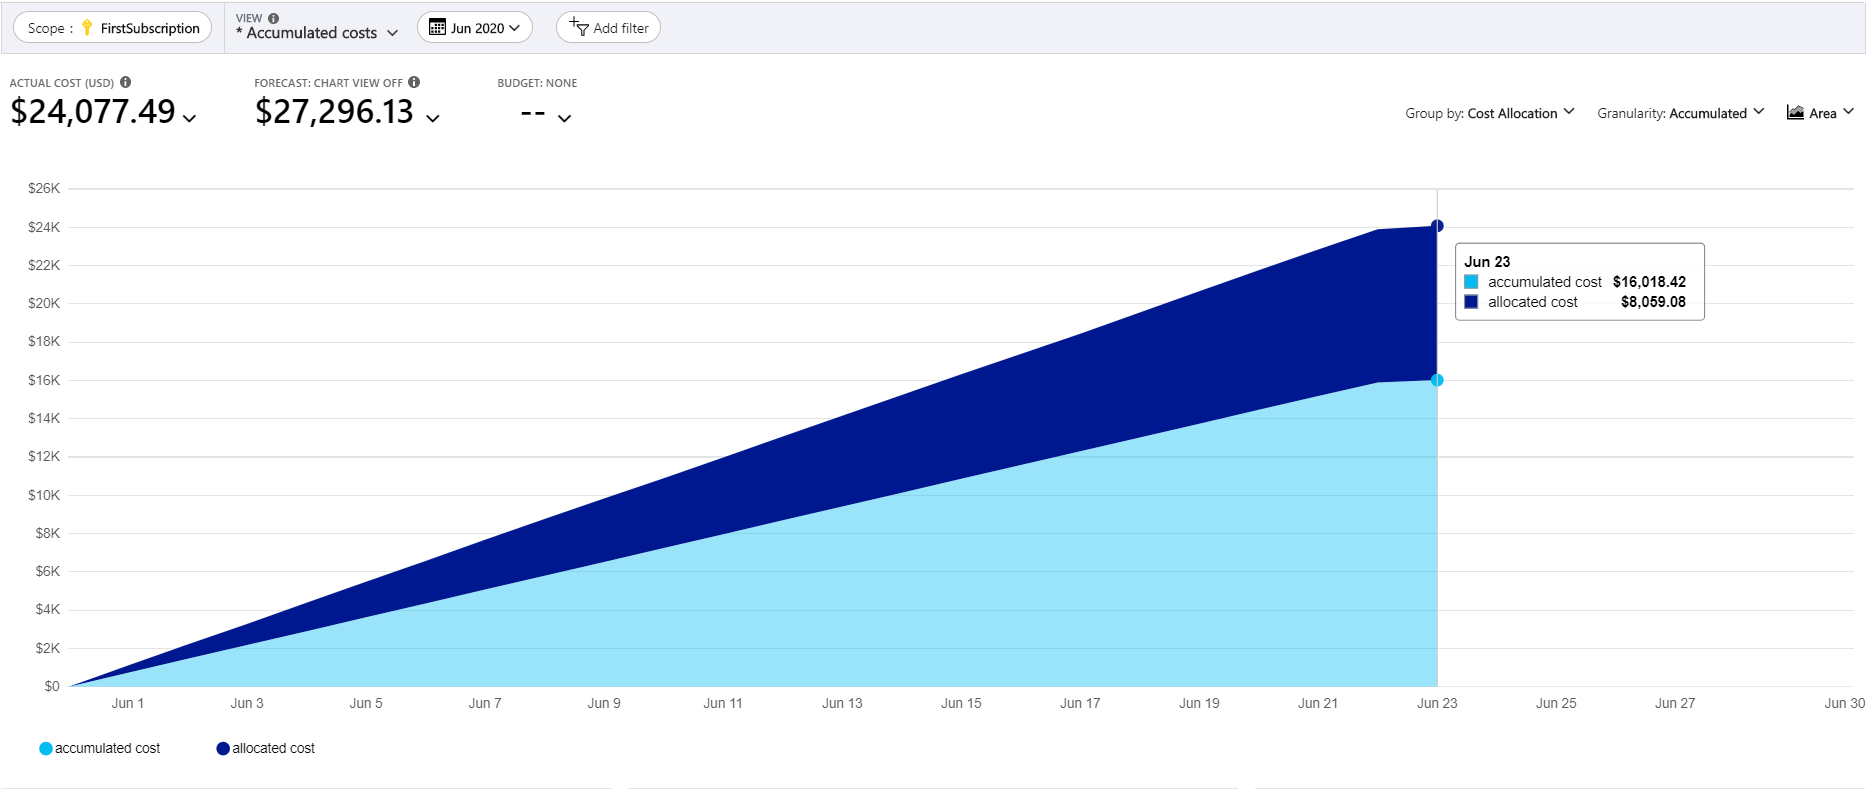
You view the effect of the allocation rule in cost analysis. In the Azure portal, go to Subscriptions. Select a subscription in the list that is the target of an active cost allocation rule. Then select Cost analysis in the menu. In Cost analysis, select Group by and then select Cost allocation. The resulting view shows a quick cost breakdown generated by the subscription. Costs allocated to the subscription appear, similar to the following image.
View cost allocation for a resource group
Use a similar process to assess the effect of a cost allocation rule for a resource group. In the Azure portal, go to Resource groups. Select a resource group in the list that an active cost allocation rule targets. Then select Cost analysis in the menu. In Cost analysis, select Group by and then select Cost allocation. The view shows you a quick cost breakdown generated by the resource group. It also shows cost allocated to the resource group.
View cost allocation for tags
In the Azure portal, navigate to Cost Management + Billing > Cost Management > Cost analysis. In Cost analysis, select Add filter. Select Tag, choose the tag key, and tag values with allocated costs.
View cost allocation in the downloaded Usage Details and in Exports CSV files
Cost allocation rules are also available in the downloaded Usage Details file and in the exported data. The data files have the column name costAllocationRuleName. If a Cost allocation rule is applicable to an entry in Usage Details or Exports file, it populates the row with the Cost allocation rule name. The following example image shows a negative charge with an entry for the source subscription. It's the charge getting allocated cost from. There's also a positive charge for the Cost allocation rule's target.
Azure invoice reconciliation
Azure invoice reconciliation also uses the Usage Details file. Showing any internal allocated costs during reconciliation could be confusing. To reduce any potential confusion and to align to the data shown on the invoice, you can filter out any Cost allocation rules. After you remove the cost allocation rules, your Usage Details file should match the cost shown by the billed subscription invoice.
Edit an existing cost allocation rule
You can edit a cost allocation rule to change the source or the target or if you want to update the prefilled percentage for either compute, storage, or network options. Edit the rules in the same way you create them. Modifying existing rules can take up to two hours to reprocess.
Current limitations
Currently, Cost Management supports cost allocation in Cost analysis, budgets, and forecast views. Allocated costs appear in the subscriptions list and on the Subscriptions overview page.
The following items are currently unsupported by cost allocation:
- Billing subscriptions area
- Cost Management Power BI App
- Power BI Desktop connector
The Usage Details API version 2021-10-01 and later supports cost allocation data.
However, cost allocation data results might be empty if you're using an unsupported API or if you don't have any cost allocation rules.
If you have cost allocation rule(s) enabled, the unit price for the reserved instance (RI) purchase will show up as 0 in the usage details file. To work around this limitation, you could use the pricesheet data.
Cost allocation to a target doesn't happen if that target doesn't have any costs associated with it.
Next steps
- Read the Cost Management + Billing FAQ for questions and answers about cost allocation.
- Create or update allocation rules using the Cost allocation REST API
- Learn more about How to optimize your cloud investment with Cost Management
Feedback
Coming soon: Throughout 2024 we will be phasing out GitHub Issues as the feedback mechanism for content and replacing it with a new feedback system. For more information see: https://aka.ms/ContentUserFeedback.
Submit and view feedback for


