Use an alert to trigger an Azure Automation runbook
You can use Azure Monitor to monitor base-level metrics and logs for most services in Azure. You can call Azure Automation runbooks by using action groups to automate tasks based on alerts. This article shows you how to configure and run a runbook by using alerts.
Prerequisites
- An Azure Automation account with at least one user-assigned managed identity. For more information, see Using a user-assigned managed identity for an Azure Automation account.
- Az modules:
Az.AccountsandAz.Computeimported into the Automation account. For more information, see Import Az modules. - An Azure virtual machine.
- The Azure Az PowerShell module installed on your machine. To install or upgrade, see How to install the Azure Az PowerShell module.
- A general familiarity with Automation runbooks.
Alert types
You can use automation runbooks with three alert types:
- Common alerts
- Activity log alerts
- Near-real-time metric alerts
Note
The common alert schema standardizes the consumption experience for alert notifications in Azure. Historically, the three alert types in Azure (metric, log, and activity log) have had their own email templates, webhook schemas, etc. To learn more, see Common alert schema.
When an alert calls a runbook, the actual call is an HTTP POST request to the webhook. The body of the POST request contains a JSON-formated object that has useful properties that are related to the alert. The following table lists links to the payload schema for each alert type:
| Alert | Description | Payload schema |
|---|---|---|
| Common alert | The common alert schema that standardizes the consumption experience for alert notifications in Azure today. | Common alert payload schema. |
| Activity log alert | Sends a notification when any new event in the Azure activity log matches specific conditions. For example, when a Delete VM operation occurs in myProductionResourceGroup or when a new Azure Service Health event with an Active status appears. |
Activity log alert payload schema |
| Near real-time metric alert | Sends a notification faster than metric alerts when one or more platform-level metrics meet specified conditions. For example, when the value for CPU % on a VM is greater than 90, and the value for Network In is greater than 500 MB for the past 5 minutes. | Near real-time metric alert payload schema |
Because the data that's provided by each type of alert is different, each alert type is handled differently. In the next section, you learn how to create a runbook to handle different types of alerts.
Assign permissions to managed identities
Assign permissions to the appropriate managed identity to allow it to stop a virtual machine. The runbook can use either the Automation account's system-assigned managed identity or a user-assigned managed identity. Steps are provided to assign permissions to each identity. The steps below use PowerShell. If you prefer using the Portal, see Assign Azure roles using the Azure portal.
Sign in to Azure interactively using the Connect-AzAccount cmdlet and follow the instructions.
# Sign in to your Azure subscription
$sub = Get-AzSubscription -ErrorAction SilentlyContinue
if(-not($sub))
{
    Connect-AzAccount
}

# If you have multiple subscriptions, set the one to use
# Select-AzSubscription -SubscriptionId <SUBSCRIPTIONID>
Provide an appropriate value for the variables below and then execute the script.
$resourceGroup = "resourceGroup"
$automationAccount = "AutomationAccount"
$userAssignedManagedIdentity = "userAssignedManagedIdentity"
Use PowerShell cmdlet New-AzRoleAssignment to assign a role to the system-assigned managed identity.
$SAMI = (Get-AzAutomationAccount -ResourceGroupName $resourceGroup -Name $automationAccount).Identity.PrincipalId
New-AzRoleAssignment `
    -ObjectId $SAMI `
    -ResourceGroupName $resourceGroup `
    -RoleDefinitionName "DevTest Labs User"
Assign a role to a user-assigned managed identity.
$UAMI = (Get-AzUserAssignedIdentity -ResourceGroupName $resourceGroup -Name $userAssignedManagedIdentity)
New-AzRoleAssignment `
    -ObjectId $UAMI.PrincipalId `
    -ResourceGroupName $resourceGroup `
    -RoleDefinitionName "DevTest Labs User"
For the system-assigned managed identity, show
ClientIdand record the value for later use.$UAMI.ClientId
Create a runbook to handle alerts
To use Automation with alerts, you need a runbook that manages the alert JSON payload that's passed to the runbook. The following example runbook must be called from an Azure alert.
As described in the preceding section, each type of alert has a different schema. The script takes the webhook data from an alert in the WebhookData runbook input parameter. Then, the script evaluates the JSON payload to determine which alert type is being used.
This example uses an alert from an Azure virtual machine (VM). It retrieves the VM data from the payload, and then uses that information to stop the VM. The connection must be set up in the Automation account where the runbook is run. When using alerts to trigger runbooks, it's important to check the alert status in the runbook that is triggered. The runbook triggers each time the alert changes state. Alerts have multiple states, with the two most common being Activated and Resolved. Check for state in your runbook logic to ensure the runbook doesn't run more than once. The example in this article shows how to look for alerts with state Activated only.
The runbook uses the Automation account system-assigned managed identity to authenticate with Azure to perform the management action against the VM. The runbook can be easily modified to use a user-assigned managed identity.
Note
We recommend that you use public network access as it isn't possible to use an Azure alert (metric, log, and activity log) to trigger an Automation webhook when the Automation account is using private links and configured with Public access set to Disable.
Use this example to create a runbook called Stop-AzureVmInResponsetoVMAlert. You can modify the PowerShell script, and use it with many different resources.
Sign in to the Azure portal, and navigate to your Automation account.
Under Process Automation, select Runbooks.
Select + Create a runbook.
- Name the runbook
Stop-AzureVmInResponsetoVMAlert. - From the Runbook type drop-down list, select PowerShell.
- Select Create.
- Name the runbook
In the runbook editor, paste the following code:
[OutputType("PSAzureOperationResponse")]
param
(
    [Parameter (Mandatory=$false)]
    [object] $WebhookData
)
$ErrorActionPreference = "stop"

if ($WebhookData)
{
    # Get the data object from WebhookData
    $WebhookBody = (ConvertFrom-Json -InputObject $WebhookData.RequestBody)

    # Get the info needed to identify the VM (depends on the payload schema)
    $schemaId = $WebhookBody.schemaId
    Write-Verbose "schemaId: $schemaId" -Verbose
    if ($schemaId -eq "azureMonitorCommonAlertSchema") {
        # This is the common Metric Alert schema (released March 2019)
        $Essentials = [object] ($WebhookBody.data).essentials
        # Get the first target only as this script doesn't handle multiple
        $alertTargetIdArray = (($Essentials.alertTargetIds)[0]).Split("/")
        $SubId = ($alertTargetIdArray)[2]
        $ResourceGroupName = ($alertTargetIdArray)[4]
        $ResourceType = ($alertTargetIdArray)[6] + "/" + ($alertTargetIdArray)[7]
        $ResourceName = ($alertTargetIdArray)[-1]
        $status = $Essentials.monitorCondition
    }
    elseif ($schemaId -eq "AzureMonitorMetricAlert") {
        # This is the near-real-time Metric Alert schema
        $AlertContext = [object] ($WebhookBody.data).context
        $SubId = $AlertContext.subscriptionId
        $ResourceGroupName = $AlertContext.resourceGroupName
        $ResourceType = $AlertContext.resourceType
        $ResourceName = $AlertContext.resourceName
        $status = ($WebhookBody.data).status
    }
    elseif ($schemaId -eq "Microsoft.Insights/activityLogs") {
        # This is the Activity Log Alert schema
        $AlertContext = [object] (($WebhookBody.data).context).activityLog
        $SubId = $AlertContext.subscriptionId
        $ResourceGroupName = $AlertContext.resourceGroupName
        $ResourceType = $AlertContext.resourceType
        $ResourceName = (($AlertContext.resourceId).Split("/"))[-1]
        $status = ($WebhookBody.data).status
    }
    elseif ($schemaId -eq $null) {
        # This is the original Metric Alert schema
        $AlertContext = [object] $WebhookBody.context
        $SubId = $AlertContext.subscriptionId
        $ResourceGroupName = $AlertContext.resourceGroupName
        $ResourceType = $AlertContext.resourceType
        $ResourceName = $AlertContext.resourceName
        $status = $WebhookBody.status
    }
    else {
        # Schema not supported
        Write-Error "The alert data schema - $schemaId - is not supported."
    }

    Write-Verbose "status: $status" -Verbose
    if (($status -eq "Activated") -or ($status -eq "Fired"))
    {
        Write-Verbose "resourceType: $ResourceType" -Verbose
        Write-Verbose "resourceName: $ResourceName" -Verbose
        Write-Verbose "resourceGroupName: $ResourceGroupName" -Verbose
        Write-Verbose "subscriptionId: $SubId" -Verbose

        # Determine code path depending on the resourceType
        if ($ResourceType -eq "Microsoft.Compute/virtualMachines")
        {
            # This is an Resource Manager VM
            Write-Verbose "This is an Resource Manager VM." -Verbose

            # Ensures you do not inherit an AzContext in your runbook
            Disable-AzContextAutosave -Scope Process

            # Connect to Azure with system-assigned managed identity
            $AzureContext = (Connect-AzAccount -Identity).context

            # set and store context
            $AzureContext = Set-AzContext -SubscriptionName $AzureContext.Subscription -DefaultProfile $AzureContext

            # Stop the Resource Manager VM
            Write-Verbose "Stopping the VM - $ResourceName - in resource group - $ResourceGroupName -" -Verbose
            Stop-AzVM -Name $ResourceName -ResourceGroupName $ResourceGroupName -DefaultProfile $AzureContext -Force
            # [OutputType(PSAzureOperationResponse")]
        }
        else {
            # ResourceType not supported
            Write-Error "$ResourceType is not a supported resource type for this runbook."
        }
    }
    else {
        # The alert status was not 'Activated' or 'Fired' so no action taken
        Write-Verbose ("No action taken. Alert status: " + $status) -Verbose
    }
}
else {
    # Error
    Write-Error "This runbook is meant to be started from an Azure alert webhook only."
}
If you want the runbook to execute with the system-assigned managed identity, leave the code as-is. If you prefer to use a user-assigned managed identity, then:
- From line 78, remove
$AzureContext = (Connect-AzAccount -Identity).context, - Replace it with
$AzureContext = (Connect-AzAccount -Identity -AccountId <ClientId>).context, and - Enter the Client ID you obtained earlier.
- From line 78, remove
Select Save, Publish and then Yes when prompted.
Close the Runbook page to return to the Automation Account page.
Create the alert
Alerts use action groups, which are collections of actions that are triggered by the alert. Runbooks are just one of the many actions that you can use with action groups.
In your Automation account, under Monitoring, select Alerts.
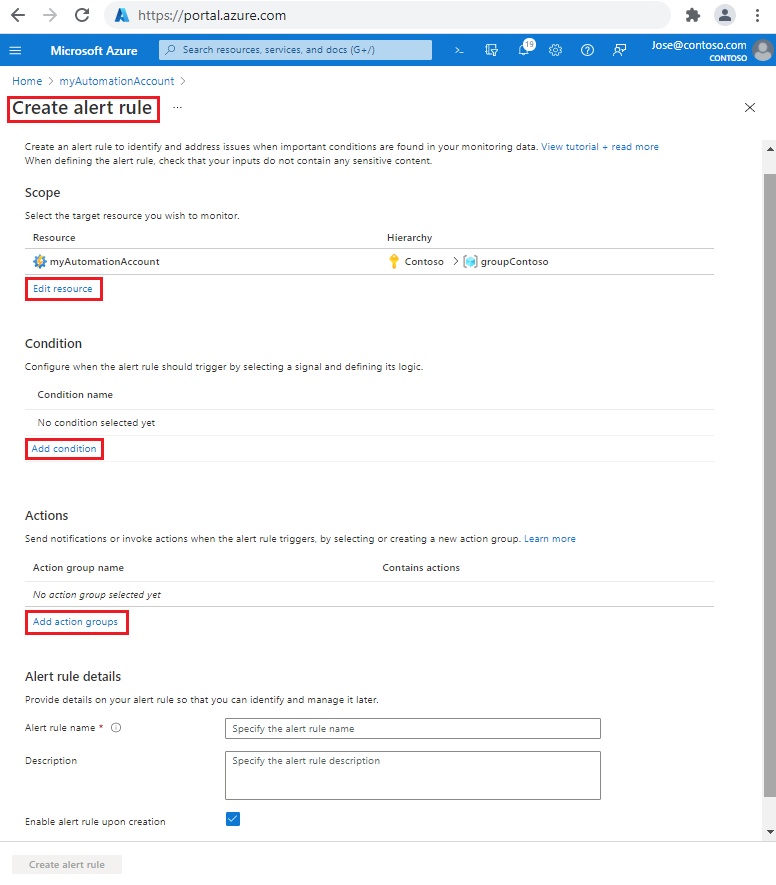
Select + New Alert Rule to open the Create alert rule page.

Under Scope, select Edit resource.
On the Select a resource page, from the Filter by resource type drop-down list, select Virtual machines.
Check the box next to the virtual machine(s) you want monitored. Then select Done to return to the Create alert rule page.
Under Condition, select Add condition.
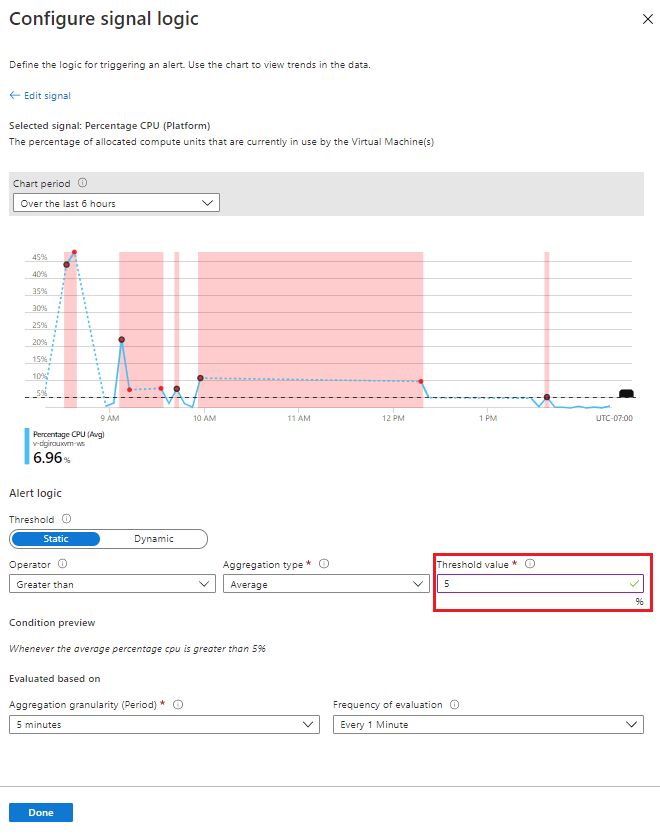
On the Select a signal page, enter
Percentage CPUin the search text box, and then select Percentage CPU from the results.On the Configure signal logic page, under Threshold value enter an initial low value for testing purposes, such as
5. You can go back and update this value once you've confirmed the alert works as expected. Then select Done to return to the Create alert rule page.
Under Actions, select Add action groups, and then +Create action group.

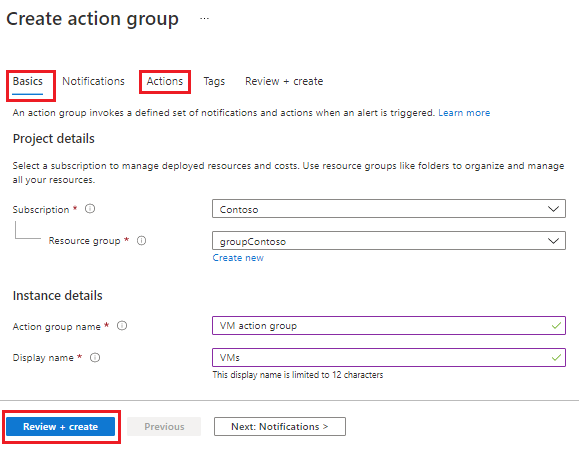
On the Create action group page:
On the Basics tab, enter an Action group name and Display name.
On the Actions tab, in the Name text box, enter a name. Then from the Action type drop-down list, select Automation Runbook to open the Configure Runbook page.
For the Runbook source item, select User.
From the Subscription drop-down list, select your subscription.
From the Automation account drop-down list, select your Automation account.
From the Runbook drop-down list, select Stop-AzureVmInResponsetoVMAlert.
For the Enable the common alert schema item, select Yes.
Select OK to return to the Create action group page.

Select Review + create and then Create to return to the Create alert rule page.
Under Alert rule details, for the Alert rule name text box.
Select Create alert rule. You can use the action group in the activity log alerts and near real-time alerts that you create.
Verification
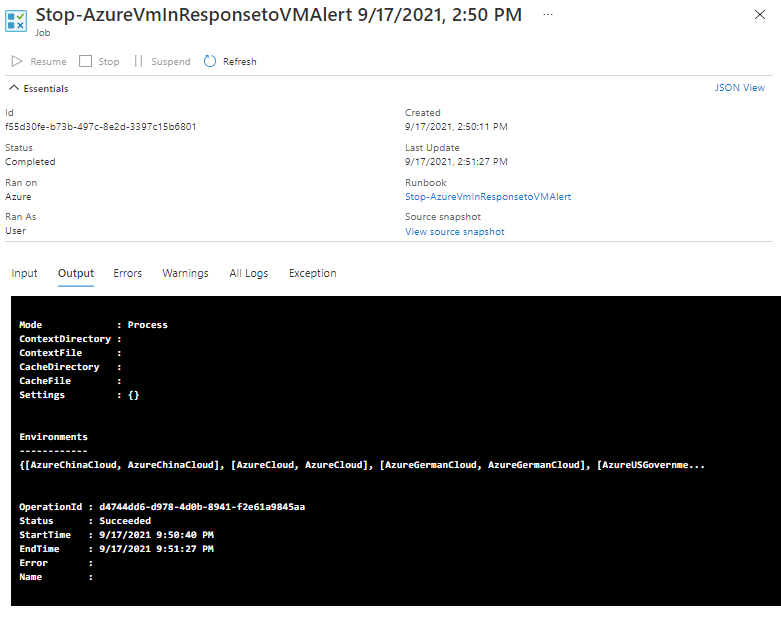
Ensure your VM is running. Navigate to the runbook Stop-AzureVmInResponsetoVMAlert and watch for the Recent Jobs list to populate. Once a completed job appears, select the job and review the output. Also check to see if your VM stopped.

Common Azure VM management operations
Azure Automation provides scripts for common Azure VM management operations like restart VM, stop VM, delete VM, scale up and down scenarios in Runbook gallery. The scripts can also be found in the Azure Automation GitHub repository You can also use these scripts as mentioned in the above steps.
| Azure VM management operations | Details |
|---|---|
| Stop-Azure-VM-On-Alert | This runbook will stop an Azure Resource Manager VM in response to an Azure alert trigger. Input is alert data with information needed to identify which VM to stop. The runbook must be called from an Azure alert via a webhook. Latest version of Az module should be added to the automation account. Managed Identity should be enabled and contributor access to the automation account should be given. |
| Restart-Azure-VM-On-Alert | This runbook will stop an Azure Resource Manager VM in response to an Azure alert trigger. Input is alert data with information needed to identify which VM to stop. The runbook must be called from an Azure alert via a webhook. Latest version of Az module should be added to the automation account. Managed Identity should be enabled and contributor access to the automation account should be given. |
| Delete-Azure-VM-On-Alert | This runbook will stop an Azure Resource Manager VM in response to an Azure alert trigger. Input is alert data with information needed to identify which VM to stop. The runbook must be called from an Azure alert via a webhook. Latest version of Az module should be added to the automation account. Managed Identity should be enabled and contributor access to the automation account should be given. |
| ScaleDown-Azure-VM-On-Alert | This runbook will stop an Azure Resource Manager VM in response to an Azure alert trigger. Input is alert data with information needed to identify which VM to stop. The runbook must be called from an Azure alert via a webhook. Latest version of Az module should be added to the automation account. Managed Identity should be enabled and contributor access to the automation account should be given. |
| ScaleUp-Azure-VM-On-Alert | This runbook will stop an Azure Resource Manager VM in response to an Azure alert trigger. Input is alert data with information needed to identify which VM to stop. The runbook must be called from an Azure alert via a webhook. Latest version of Az module should be added to the automation account. Managed Identity should be enabled and contributor access to the automation account should be given. |
Next steps
- Discover different ways to start a runbook, see Start a runbook.
- Create an activity log alert, see Create activity log alerts.
- Learn how to create a near real-time alert, see Create an alert rule in the Azure portal.
Feedback
Coming soon: Throughout 2024 we will be phasing out GitHub Issues as the feedback mechanism for content and replacing it with a new feedback system. For more information see: https://aka.ms/ContentUserFeedback.
Submit and view feedback for