Send an email from an Automation runbook
You can send an email from a runbook with SendGrid using PowerShell.
If you don't have an Azure subscription, create a free account before you begin.
Prerequisites
SendGrid sender verification. Either Domain or Single Sender
Your SendGrid API key.
An Azure Automation account with at least one user-assigned managed identity. For more information, see Enable managed identities.
Az modules:
Az.AccountsandAz.KeyVaultimported into the Automation account. For more information, see Import Az modules.The Azure Az PowerShell module installed on your machine. To install or upgrade, see How to install the Azure Az PowerShell module.
Create an Azure Key Vault
Create an Azure Key Vault and Key Vault access policy that allows the credential to get and set key vault secrets in the specified key vault.
Sign in to Azure interactively using the Connect-AzAccount cmdlet and follow the instructions.
# Sign in to your Azure subscription
$sub = Get-AzSubscription -ErrorAction SilentlyContinue
if(-not($sub))
{
    Connect-AzAccount
}

# If you have multiple subscriptions, set the one to use
# Select-AzSubscription -SubscriptionId <SUBSCRIPTIONID>
Provide an appropriate value for the variables below and then execute the script.
$resourceGroup = "<Resource group>"
$automationAccount = "<Automation account>"
$region = "<Region>"
$SendGridAPIKey = "<SendGrid API key>"
$VaultName = "<A universally unique vault name>"

$userAssignedManagedIdentity = "<User-assigned managed identity>"
Create Key Vault and assign permissions
# Create the new key vault
$newKeyVault = New-AzKeyVault `
    -VaultName $VaultName `
    -ResourceGroupName $resourceGroup `
    -Location $region

$resourceId = $newKeyVault.ResourceId

# Convert the SendGrid API key into a SecureString
$Secret = ConvertTo-SecureString -String $SendGridAPIKey `
    -AsPlainText -Force

Set-AzKeyVaultSecret -VaultName $VaultName `
    -Name 'SendGridAPIKey' `
    -SecretValue $Secret

# Grant Key Vault access to the Automation account's system-assigned managed identity.
$SA_PrincipalId = (Get-AzAutomationAccount `
    -ResourceGroupName $resourceGroup `
    -Name $automationAccount).Identity.PrincipalId

Set-AzKeyVaultAccessPolicy `
    -VaultName $vaultName `
    -ObjectId $SA_PrincipalId `
    -PermissionsToSecrets Set, Get

# Grant Key Vault access to the user-assigned managed identity.
$UAMI = Get-AzUserAssignedIdentity `
    -ResourceGroupName $resourceGroup `
    -Name $userAssignedManagedIdentity

Set-AzKeyVaultAccessPolicy `
    -VaultName $vaultName `
    -ObjectId $UAMI.PrincipalId `
    -PermissionsToSecrets Set, Get
For other ways to create an Azure Key Vault and store a secret, see Key Vault quickstarts.
Assign permissions to managed identities
Assign permissions to the appropriate managed identity. The runbook can use either the Automation account system-assigned managed identity or a user-assigned managed identity. Steps are provided to assign permissions to each identity. The steps below use PowerShell. If you prefer using the Portal, see Assign Azure roles using the Azure portal.
Use PowerShell cmdlet New-AzRoleAssignment to assign a role to the system-assigned managed identity.
New-AzRoleAssignment `
    -ObjectId $SA_PrincipalId `
    -ResourceGroupName $resourceGroup `
    -RoleDefinitionName "Reader"
Assign a role to a user-assigned managed identity.
New-AzRoleAssignment `
    -ObjectId $UAMI.PrincipalId`
    -ResourceGroupName $resourceGroup `
    -RoleDefinitionName "Reader"
For the system-assigned managed identity, show
ClientIdand record the value for later use.$UAMI.ClientId
Create the runbook to send an email
After you've created a Key Vault and stored your SendGrid API key, it's time to create the runbook that retrieves the API key and sends an email. Let's use a runbook that uses the system-assigned managed identity to
authenticate with Azure to retrieve the secret from Azure Key Vault. We'll call the runbook Send-GridMailMessage. You can modify the PowerShell script used for different scenarios.
Sign in to the Azure portal and navigate to your Automation account.
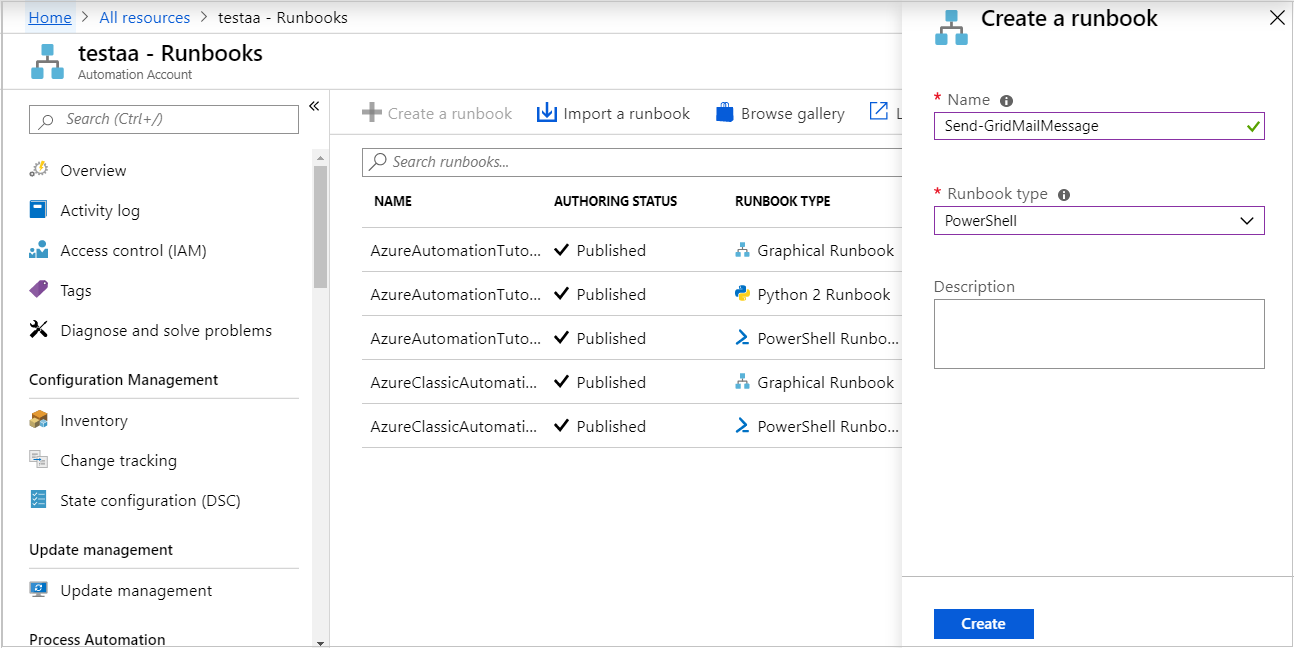
From your open Automation account page, under Process Automation, select Runbooks
Select + Create a runbook.
- Name the runbook
Send-GridMailMessage. - From the Runbook type drop-down list, select PowerShell.
- Select Create.

- Name the runbook
The runbook is created and the Edit PowerShell Runbook page opens.

Copy the following PowerShell example into the Edit page. Ensure that the
VaultNamespecifies the name you've chosen for your Key Vault.Param( [Parameter(Mandatory=$True)] [String] $destEmailAddress, [Parameter(Mandatory=$True)] [String] $fromEmailAddress, [Parameter(Mandatory=$True)] [String] $subject, [Parameter(Mandatory=$True)] [String] $content, [Parameter(Mandatory=$True)] [String] $ResourceGroupName ) # Ensures you do not inherit an AzContext in your runbook Disable-AzContextAutosave -Scope Process # Connect to Azure with system-assigned managed identity $AzureContext = (Connect-AzAccount -Identity).context # set and store context $AzureContext = Set-AzContext -SubscriptionName $AzureContext.Subscription -DefaultProfile $AzureContext $VaultName = "<Enter your vault name>" $SENDGRID_API_KEY = Get-AzKeyVaultSecret ` -VaultName $VaultName ` -Name "SendGridAPIKey" ` -AsPlainText -DefaultProfile $AzureContext $headers = New-Object "System.Collections.Generic.Dictionary[[String],[String]]" $headers.Add("Authorization", "Bearer " + $SENDGRID_API_KEY) $headers.Add("Content-Type", "application/json") $body = @{ personalizations = @( @{ to = @( @{ email = $destEmailAddress } ) } ) from = @{ email = $fromEmailAddress } subject = $subject content = @( @{ type = "text/plain" value = $content } ) } $bodyJson = $body | ConvertTo-Json -Depth 4 $response = Invoke-RestMethod -Uri https://api.sendgrid.com/v3/mail/send -Method Post -Headers $headers -Body $bodyJsonIf you want the runbook to execute with the system-assigned managed identity, leave the code as-is. If you prefer to use a user-assigned managed identity, then:
- From line 18, remove
$AzureContext = (Connect-AzAccount -Identity).context, - Replace it with
$AzureContext = (Connect-AzAccount -Identity -AccountId <ClientId>).context, and - Enter the Client ID you obtained earlier.
- From line 18, remove
Select Save, Publish and then Yes when prompted.
To verify that the runbook executes successfully, you can follow the steps under Test a runbook or Start a runbook.
If you don't initially see your test email, check your Junk and Spam folders.
Clean up resources
When the runbook is no longer needed, select it in the runbook list and select Delete.
Delete the Key Vault by using the Remove-AzKeyVault cmdlet.
$VaultName = "<your KeyVault name>"
$resourceGroup = "<your ResourceGroup name>"
Remove-AzKeyVault -VaultName $VaultName -ResourceGroupName $resourceGroup
Next steps
- To send runbook job data to your Log Analytics workspace, see Forward Azure Automation job data to Azure Monitor logs.
- To monitor base-level metrics and logs, see Use an alert to trigger an Azure Automation runbook.
Feedback
Coming soon: Throughout 2024 we will be phasing out GitHub Issues as the feedback mechanism for content and replacing it with a new feedback system. For more information see: https://aka.ms/ContentUserFeedback.
Submit and view feedback for