Get started with Key Vault certificates
This guideline helps you get started with certificate management in Key Vault.
List of scenarios covered here:
- Creating your first Key Vault certificate
- Creating a certificate with a Certificate Authority that is partnered with Key Vault
- Creating a certificate with a Certificate Authority that is not partnered with Key Vault
- Import a certificate
Certificates are complex objects
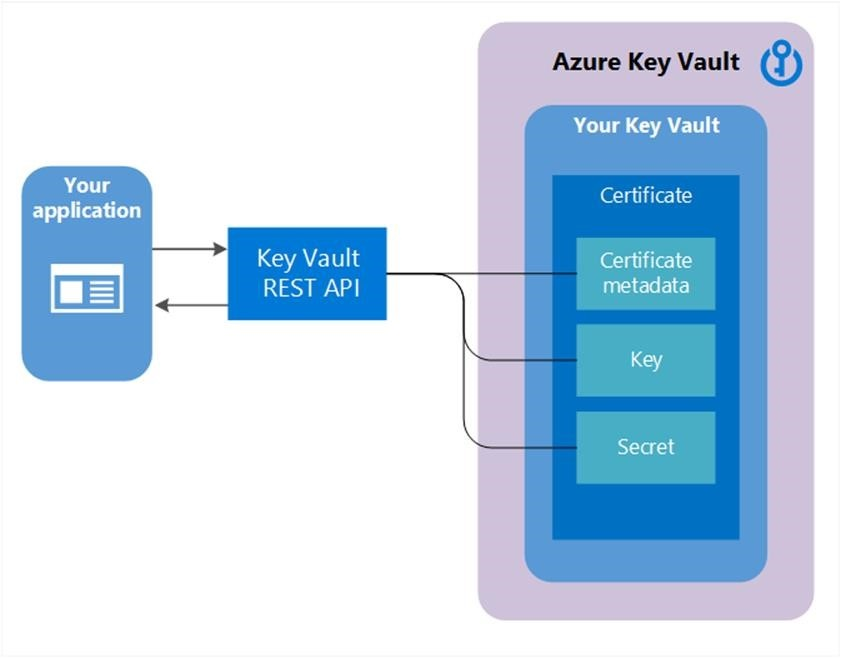
Certificates are composed of three interrelated resources linked together as a Key Vault certificate; certificate metadata, a key, and a secret.

Creating your first Key Vault certificate
Before a certificate can be created in a Key Vault (KV), prerequisite steps 1 and 2 must be successfully accomplished and a key vault must exist for this user / organization.
Step 1: Certificate Authority (CA) Providers
- On-boarding as the IT Admin, PKI Admin or anyone managing accounts with CAs, for a given company (ex. Contoso) is a prerequisite to using Key Vault certificates.
The following CAs are the current partnered providers with Key Vault. Learn more here- DigiCert - Key Vault offers OV TLS/SSL certificates with DigiCert.
- GlobalSign - Key Vault offers OV TLS/SSL certificates with GlobalSign.
Step 2: An account admin for a CA provider creates credentials to be used by Key Vault to enroll, renew, and use TLS/SSL certificates via Key Vault.
Step 3a: A Contoso admin, along with a Contoso employee (Key Vault user) who owns certificates, depending on the CA, can get a certificate from the admin or directly from the account with the CA.
- Begin an add credential operation to a key vault by setting a certificate issuer resource. A certificate issuer is an entity represented in Azure Key Vault (KV) as a CertificateIssuer resource. It is used to provide information about the source of a KV certificate; issuer name, provider, credentials, and other administrative details.
Ex. MyDigiCertIssuer
- Provider
- Credentials – CA account credentials. Each CA has its own specific data.
For more information on creating accounts with CA Providers, see the related post on the Key Vault blog.
Step 3b: Set up certificate contacts for notifications. This is the contact for the Key Vault user. Key Vault does not enforce this step.
Note - This process, through Step 3b, is a onetime operation.
Creating a certificate with a CA partnered with Key Vault

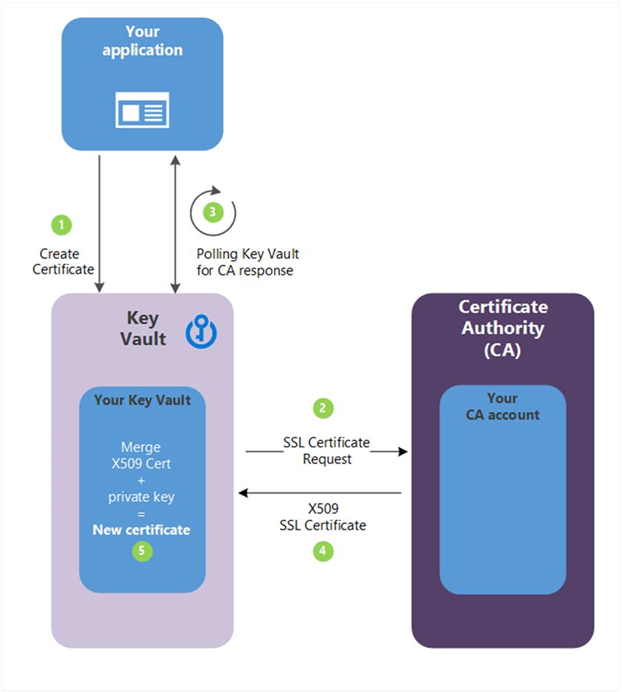
Step 4: The following descriptions correspond to the green numbered steps in the preceding diagram.
(1) - In the diagram above, your application is creating a certificate which internally begins by creating a key in your key vault.
(2) - Key Vault sends an TLS/SSL Certificate Request to the CA.
(3) - Your application polls, in a loop and wait process, for your Key Vault for certificate completion. The certificate creation is complete when Key Vault receives the CA’s response with x509 certificate.
(4) - The CA responds to Key Vault's TLS/SSL Certificate Request with an X509 TLS/SSL Certificate.
(5) - Your new certificate creation completes with the merger of the X509 Certificate for the CA.
Key Vault user – creates a certificate by specifying a policy
Repeat as needed
Policy constraints
- X509 properties
- Key properties
- Provider reference - > ex. MyDigiCertIssure
- Renewal information - > ex. 90 days before expiry
A certificate creation process is usually an asynchronous process and involves polling your key vault for the state of the create certificate operation.
Get certificate operation- Status: completed, failed with error information or, canceled
- Because of the delay to create, a cancel operation can be initiated. The cancel may or may not be effective.
Network security and access policies associated with integrated CA
Key Vault service sends requests to CA (outbound traffic). Therefore, it’s fully compatible with firewall enabled key vaults. The Key Vault does not share access policies with the CA. The CA must be configured to accept signing requests independently. Guide on integrating trusted CA
Import a certificate
Alternatively – a cert can be imported into Key Vault – PFX or PEM.
Import certificate – requires a PEM or PFX to be on disk and have a private key.
You must specify: vault name and certificate name (policy is optional)
PEM / PFX files contains attributes that KV can parse and use to populate the certificate policy. If a certificate policy is already specified, KV will try to match data from PFX / PEM file.
Once the import is final, subsequent operations will use the new policy (new versions).
If there are no further operations, the first thing the Key Vault does is send an expiration notice.
Also, the user can edit the policy, which is functional at the time of import but, contains defaults where no information was specified at import. Ex. no issuer info
Formats of Import we support
Azure Key Vault supports .pem and .pfx certificate files for importing Certificates into Key vault. We support the following type of Import for PEM file format. A single PEM encoded certificate along with a PKCS#8 encoded, unencrypted key which has the following format:
-----BEGIN CERTIFICATE-----
-----END CERTIFICATE-----
-----BEGIN PRIVATE KEY-----
-----END PRIVATE KEY-----
When you are importing the certificate, you need to ensure that the key is included in the file itself. If you have the private key separately in a different format, you would need to combine the key with the certificate. Some certificate authorities provide certificates in different formats, therefore before importing the certificate, make sure that they are either in .pem or .pfx format.
Note
Ensure that no other meta data is present in the certificate file and that the private key not showing as encrypted.
Formats of Merge CSR we support
Azure Key Vault supports PKCS#8 encoded certificate with below headers:
-----BEGIN CERTIFICATE-----
-----END CERTIFICATE-----
Note
P7B (PKCS#7) signed certificates chain, commonly used by Certificate Authorities (CAs), is supported as long as is base64 encoded. You may use certutil -encode to convert to supported format.
Creating a certificate with a CA not partnered with Key Vault
This method allows working with other CAs than Key Vault's partnered providers, meaning your organization can work with a CA of its choice.

The following step descriptions correspond to the green lettered steps in the preceding diagram.
(1) - In the diagram above, your application is creating a certificate, which internally begins by creating a key in your key vault.
(2) - Key Vault returns to your application a Certificate Signing Request (CSR).
(3) - Your application passes the CSR to your chosen CA.
(4) - Your chosen CA responds with an X509 Certificate.
(5) - Your application completes the new certificate creation with a merger of the X509 Certificate from your CA.
Feedback
Coming soon: Throughout 2024 we will be phasing out GitHub Issues as the feedback mechanism for content and replacing it with a new feedback system. For more information see: https://aka.ms/ContentUserFeedback.
Submit and view feedback for