Publish a Cloud Services (classic) project to Cloud Services (extended support) by using Visual Studio
Azure Cloud Services (extended support) helps simplify and modernize the way you maintain and manage your Azure resources. Starting with Visual Studio 2019 version 16.9, you can work with cloud services in Azure by using Azure Resource Manager templates (ARM templates) in Cloud Services (extended support).
This article shows you how to publish an existing instance of Azure Cloud Services (classic) to Azure Cloud Services (extended support). For more information about this Azure service, see the Cloud Services (extended support) documentation.
Note
This article applies to Azure Cloud Services (classic), which is now deprecated for new customers and will be retired on August 31, 2024. Existing services built with this technology are still supported through Azure Cloud Services (extended support). For new development, we recommend that you use a newer service type designed for your specific purpose, such as Azure App Service, Azure Functions, or Azure Container Apps. For the latest list of available services, see Directory of Azure products.
Publish to Cloud Services (extended support)
When you publish your existing Azure Cloud Services (classic) project to Azure Cloud Services (extended support), you still retain the capability to publish to an instance of Cloud Services (classic).
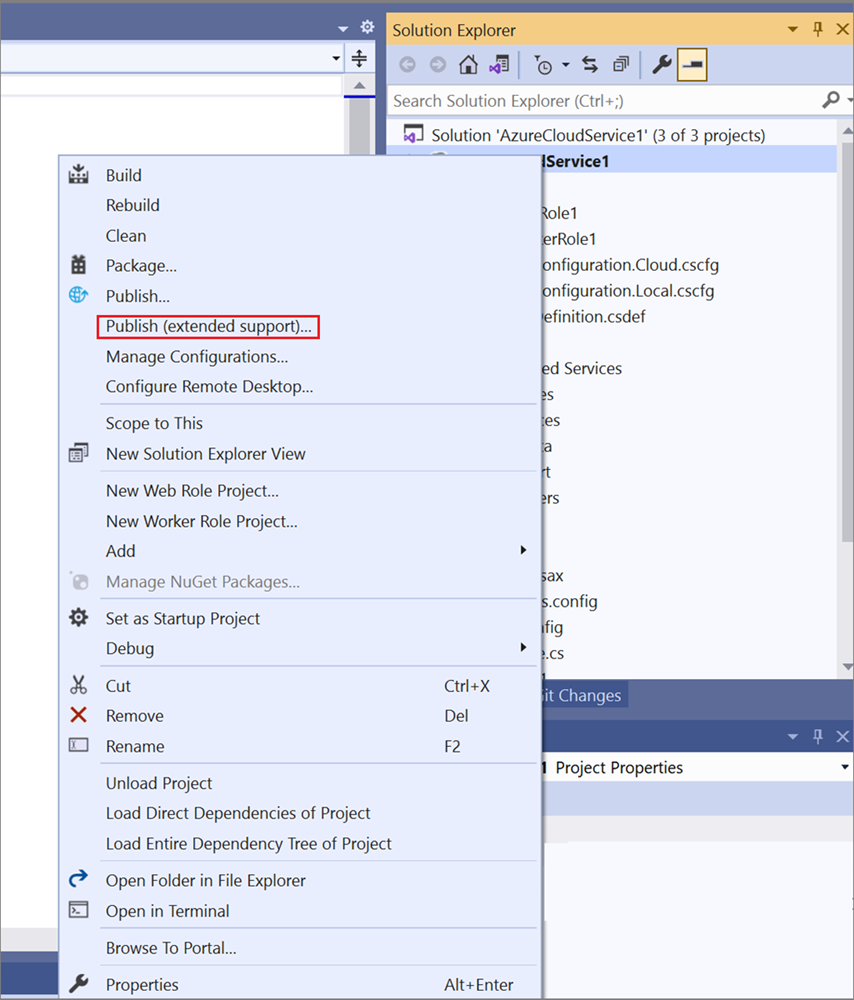
In Visual Studio 2019 version 16.9 and later, Cloud Services (classic) projects have a special version of the Publish command: Publish (extended support). This command appears on the shortcut menu in Solution Explorer in Visual Studio.
There are some differences when you publish to Cloud Services (extended support). For example, you don't select whether to publish to Staging or to Production, because these deployment slots aren't part of the extended support publishing model. Instead, with Cloud Services (extended support), you can set up multiple deployments, and you can swap deployments in the Azure portal. Although it's possible to use this setting in Visual Studio version 16.9, the swap feature isn't available until a later release of Cloud Services (extended support).
Before you publish an instance of Cloud Services (classic) to Cloud Services (extended support), check whether the Azure Storage accounts that your project uses are V1 or V2 accounts. The classic storage account types fail with an error message during deployment.
Also be sure to check the storage account that Azure Diagnostics uses. To check the Diagnostics storage account, see Set up diagnostics for Azure Cloud Services and virtual machines. If your service uses a classic storage account, you can upgrade it. For more information, see Upgrade to a general-purpose V2 storage account. For general information on types of storage accounts, see Storage account overview.
Note
If you target .NET 4.8 with Visual Studio 2022, be sure to open the ServiceConfiguration.Cloud.cscfg file and check the value of the osFamily attribute on the ServiceConfiguration element when you publish your Cloud Services (extended support) deployment. For a .NET 4.8 project, use the value osFamily="7".
Publish a Cloud Services (classic) project to Cloud Services (extended support)
In your Azure Cloud Services (classic) project, right-click the project node and select Publish (extended support).
The Publish Azure Application wizard opens.
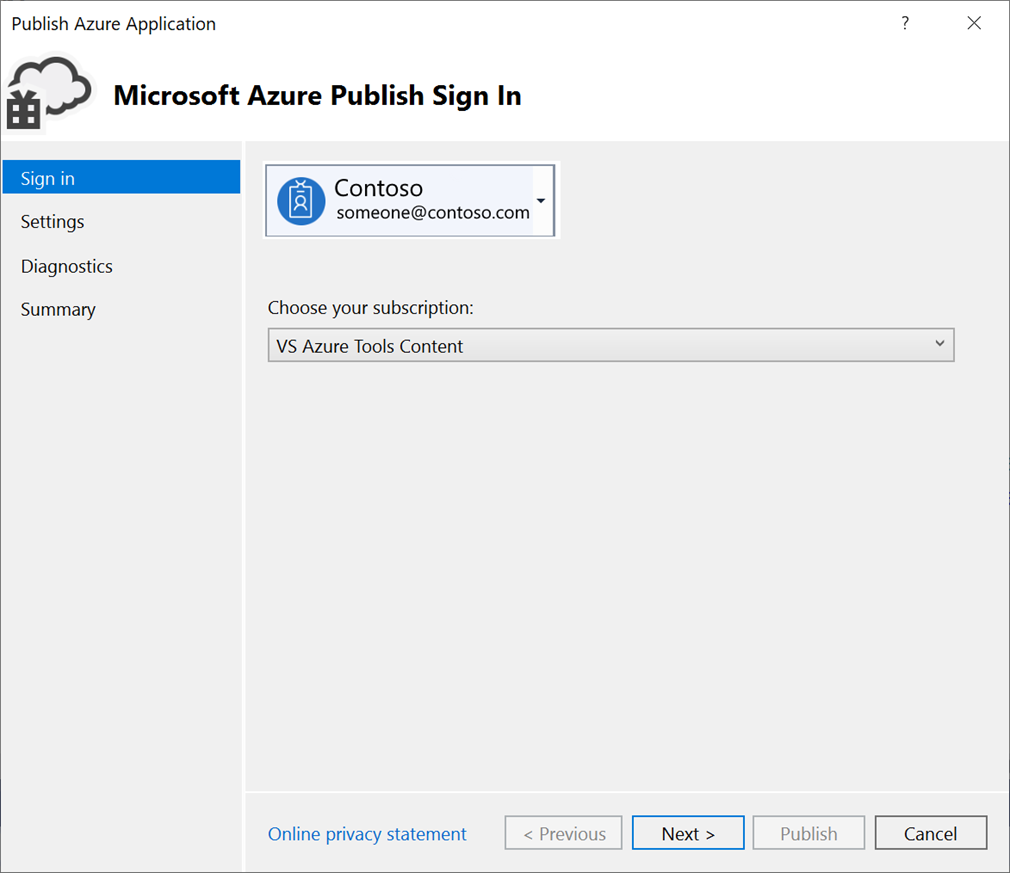
For Account, select an account, or select Add an account in the account dropdown list.
For Choose your subscription, select a subscription to use for your deployment.
Select Next to move to the Settings pane.
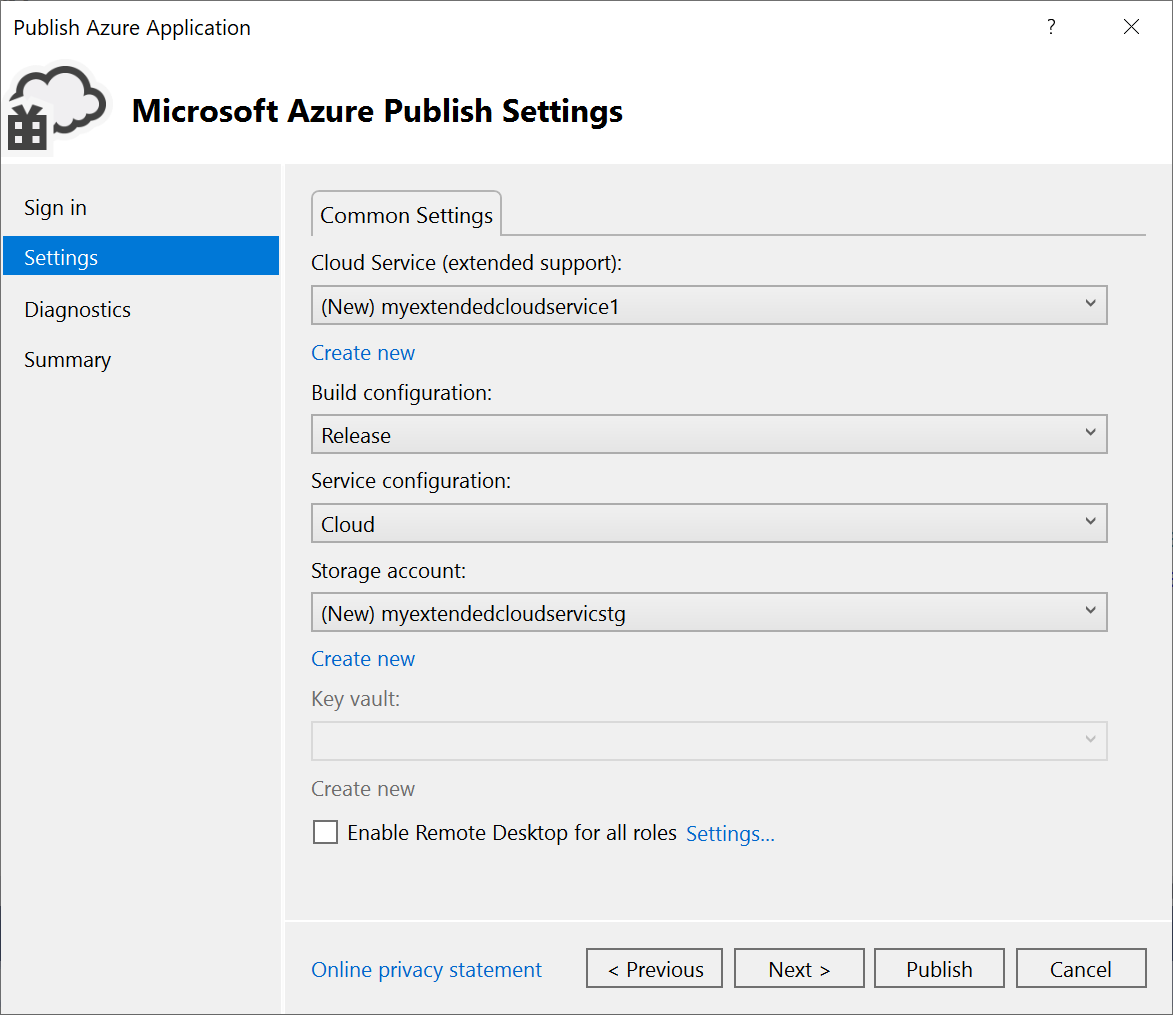
On Common Settings, in the dropdown list, either select an existing instance of Cloud Services (extended support) or select Create new, and then create a new instance. The datacenter displays in parentheses for each instance of Cloud Services (extended support). We recommend that the datacenter location for Cloud Services (extended support) be the same as the datacenter location of your storage account.
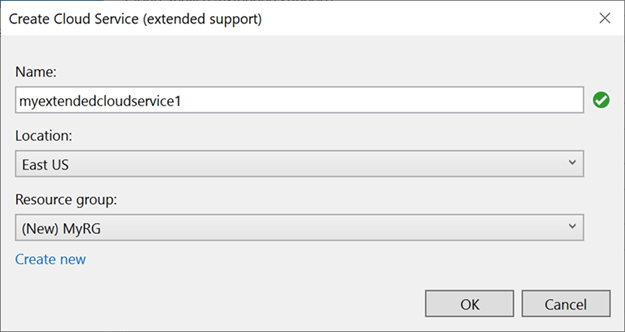
If you choose to create a new service, the Create Cloud Service (extended support) dialog appears. Specify the name, location, and resource group to use for your Cloud Services (extended support) deployment.
For Build configuration, select either Debug or Release.
For Service configuration, select either Cloud or Local.
For Storage account, select the storage account to use for this deployment, or select Create new to create a storage account. The region appears in parentheses for each storage account. We recommend that the datacenter location for the storage account be the same as the datacenter location for the cloud service (as set on Common Settings).
The Azure Storage account stores the package for the application deployment.
For Key vault, specify the key vault that contains the secrets for your Cloud Services (extended support) deployment. A key vault is enabled if remote desktop is enabled or if certificates are added to the configuration.
For Enable Remote Desktop for all roles, select this option if you want to be able to remotely connect to the service. Then, enter sign-in credentials for the remote desktop.
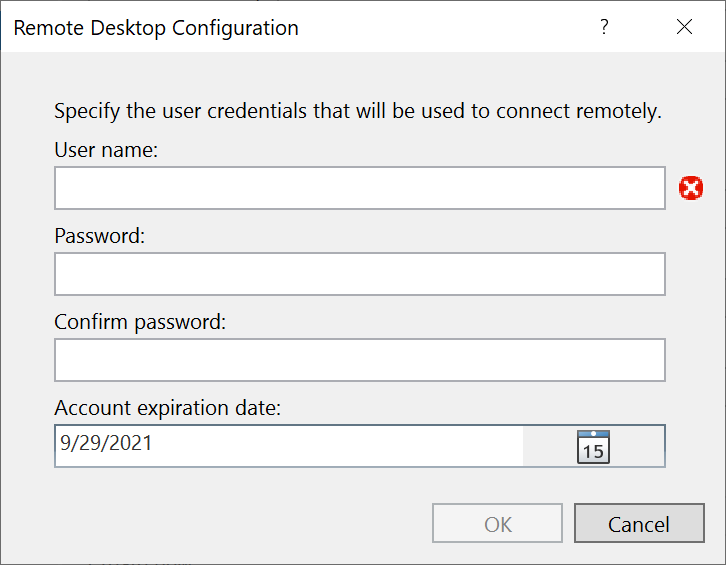
Select Next to move to the Diagnostics Settings pane.
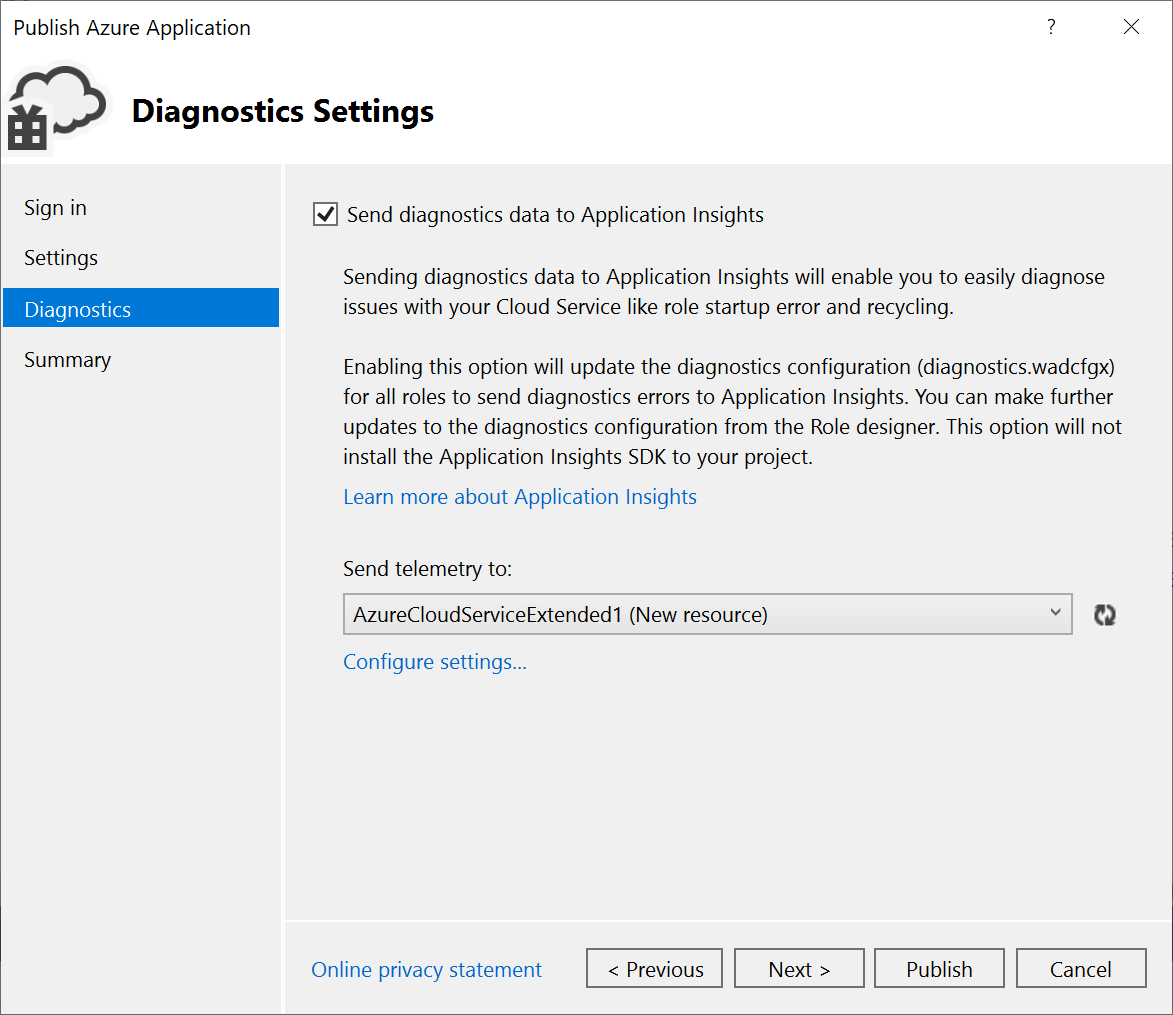
You can use Azure Diagnostics to troubleshoot an instance of Cloud Services (extended support). For information about using Diagnostics, see Set up diagnostics for Azure Cloud Services and virtual machines. For information about Application Insights, see What is Application Insights?.
Select Next to move to the Summary pane.
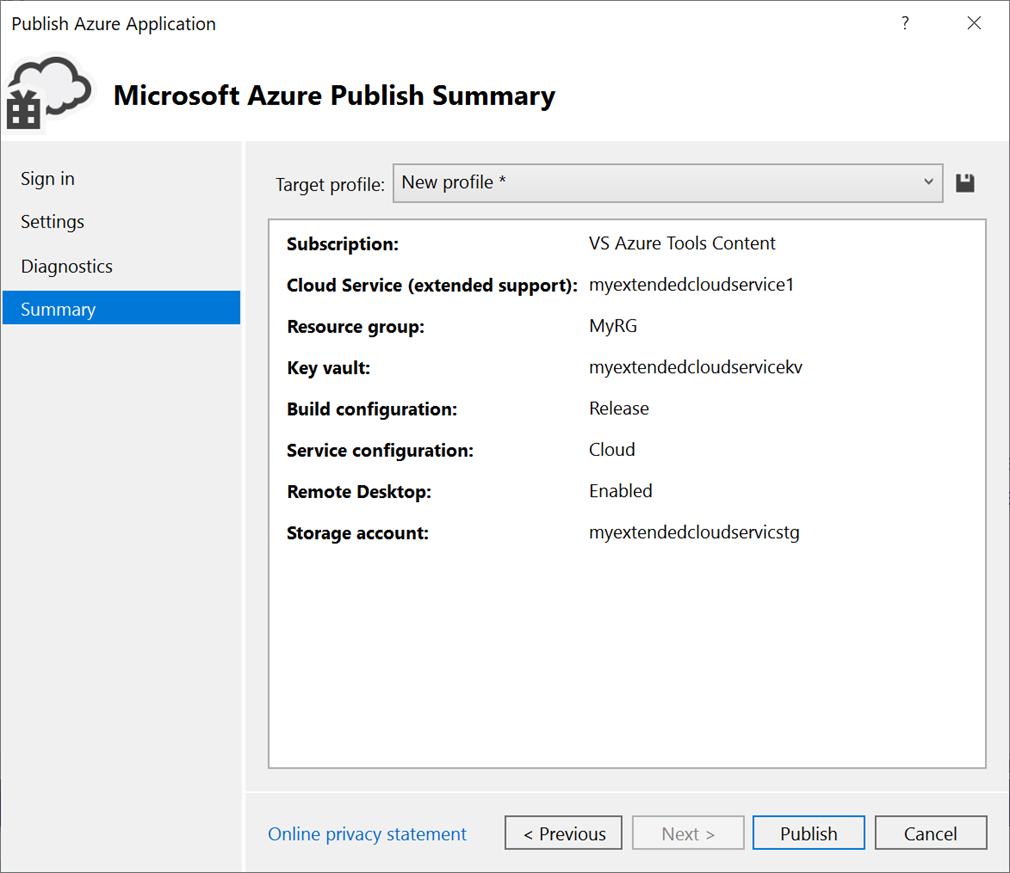
For Target profile, you can choose to create a publishing profile from the settings you selected. For example, you might create one profile for a test environment and another profile for production. To save this profile, select the Save icon. The wizard creates the profile and saves it in the Visual Studio project. To modify the profile name, open the Target profile list, and then select Manage.
Note
The publishing profile appears in Solution Explorer in Visual Studio, and the profile settings are written to a file that has an .azurePubxml extension. Settings are saved as attributes of XML tags.
Verify the settings that you selected for your project deployment, and then select Publish.
You can monitor the process status in the activity log output window in Visual Studio. Select the Open in portal link to view the activity log in the Azure portal.
Congratulations! You published your Cloud Services (extended support) project to Azure. To publish again by using the same settings, you can reuse the publishing profile, or repeat the steps described here to create a new publishing profile. The ARM template and parameters that are used for the deployment are saved in the bin/<configuration>/Publish folder.
Clean up Azure resources
Clean up Azure resources that you don't use for an actual deployment. In the Azure portal, select Resource groups. Find and open the resource group that you used to create an instance of Cloud Services (extended support), and then select Delete resource group.
Related content
- Set up continuous integration (CI) by using the Configure button on the Publish pane. For more information, see the Azure Pipelines documentation.
- Review frequently asked questions for Cloud Services (extended support).
Feedback
Coming soon: Throughout 2024 we will be phasing out GitHub Issues as the feedback mechanism for content and replacing it with a new feedback system. For more information see: https://aka.ms/ContentUserFeedback.
Submit and view feedback for