Face detection, attributes, and input data
Caution
Face service access is limited based on eligibility and usage criteria in order to support our Responsible AI principles. Face service is only available to Microsoft managed customers and partners. Use the Face Recognition intake form to apply for access. For more information, see the Face limited access page.
Important
Face attributes are predicted through the use of statistical algorithms. They might not always be accurate. Use caution when you make decisions based on attribute data. Please refrain from using these attributes for anti-spoofing. Instead, we recommend using Face Liveness detection. For more information, please refer to Tutorial: Detect liveness in faces.
This article explains the concepts of face detection and face attribute data. Face detection is the process of locating human faces in an image and optionally returning different kinds of face-related data.
You use the Detect API to detect faces in an image. To get started using the REST API or a client SDK, follow a quickstart. Or, for a more in-depth guide, see Call the detect API.
Face rectangle
Each detected face corresponds to a faceRectangle field in the response. This is a set of pixel coordinates for the left, top, width, and height of the detected face. Using these coordinates, you can get the location and size of the face. In the API response, faces are listed in size order from largest to smallest.
Try out the capabilities of face detection quickly and easily using Vision Studio.
Face ID
The face ID is a unique identifier string for each detected face in an image. Face ID requires limited access approval, which you can apply for by filling out the intake form. For more information, see the Face limited access page. You can request a face ID in your Detect API call.
Face landmarks
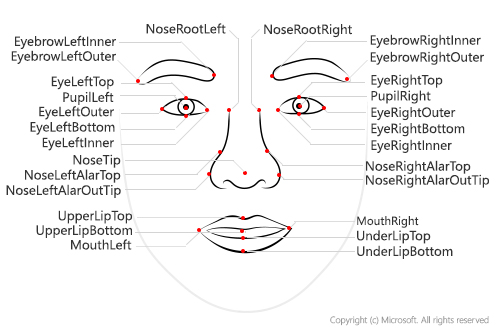
Face landmarks are a set of easy-to-find points on a face, such as the pupils or the tip of the nose. By default, there are 27 predefined landmark points. The following figure shows all 27 points:

The coordinates of the points are returned in units of pixels.
The Detection_03 model currently has the most accurate landmark detection. The eye and pupil landmarks it returns are precise enough to enable gaze tracking of the face.
Attributes
Caution
Microsoft has retired facial recognition capabilities that can be used to try to infer emotional states and identity attributes which, if misused, can subject people to stereotyping, discrimination or unfair denial of services. These include capabilities that predict emotion, gender, age, smile, facial hair, hair and makeup. Read more about this decision here.
Attributes are a set of features that can optionally be detected by the Detect API. The following attributes can be detected:
Accessories. Indicates whether the given face has accessories. This attribute returns possible accessories including headwear, glasses, and mask, with confidence score between zero and one for each accessory.
Blur. The blurriness of the face in the image. This attribute returns a value between zero and one and an informal rating of low, medium, or high.
Exposure. The exposure of the face in the image. This attribute returns a value between zero and one and an informal rating of underExposure, goodExposure, or overExposure.
Glasses. Whether the given face has eyeglasses. Possible values are NoGlasses, ReadingGlasses, Sunglasses, and Swimming Goggles.
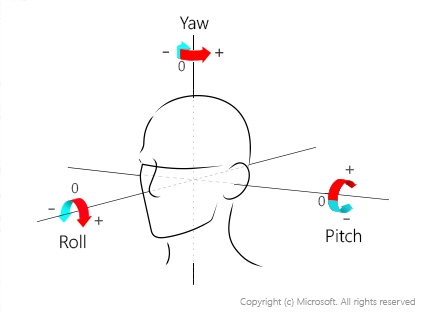
Head pose. The face's orientation in 3D space. This attribute is described by the roll, yaw, and pitch angles in degrees, which are defined according to the right-hand rule. The order of three angles is roll-yaw-pitch, and each angle's value range is from -180 degrees to 180 degrees. 3D orientation of the face is estimated by the roll, yaw, and pitch angles in order. See the following diagram for angle mappings:

For more information on how to use these values, see the Head pose how-to guide.
Mask. Indicates whether the face is wearing a mask. This attribute returns a possible mask type, and a Boolean value to indicate whether nose and mouth are covered.
Noise. The visual noise detected in the face image. This attribute returns a value between zero and one and an informal rating of low, medium, or high.
Occlusion. Indicates whether there are objects blocking parts of the face. This attribute returns a Boolean value for eyeOccluded, foreheadOccluded, and mouthOccluded.
QualityForRecognition The overall image quality regarding whether the image being used in the detection is of sufficient quality to attempt face recognition on. The value is an informal rating of low, medium, or high. Only "high" quality images are recommended for person enrollment, and quality at or above "medium" is recommended for identification scenarios.
Note
The availability of each attribute depends on the detection model specified. QualityForRecognition attribute also depends on the recognition model, as it is currently only available when using a combination of detection model detection_01 or detection_03, and recognition model recognition_03 or recognition_04.
Input requirements
Use the following tips to make sure that your input images give the most accurate detection results:
- The supported input image formats are JPEG, PNG, GIF (the first frame), BMP.
- The image file size should be no larger than 6 MB.
- The minimum detectable face size is 36 x 36 pixels in an image that is no larger than 1920 x 1080 pixels. Images with larger than 1920 x 1080 pixels have a proportionally larger minimum face size. Reducing the face size might cause some faces not to be detected, even if they're larger than the minimum detectable face size.
- The maximum detectable face size is 4096 x 4096 pixels.
- Faces outside the size range of 36 x 36 to 4096 x 4096 pixels will not be detected.
Input data with orientation information:
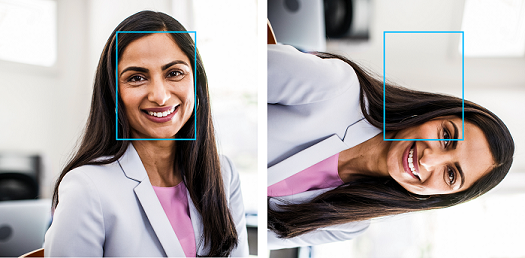
Some input images with JPEG format might contain orientation information in Exchangeable image file format (EXIF) metadata. If EXIF orientation is available, images are automatically rotated to the correct orientation before sending for face detection. The face rectangle, landmarks, and head pose for each detected face are estimated based on the rotated image.
To properly display the face rectangle and landmarks, you need to make sure the image is rotated correctly. Most of the image visualization tools automatically rotate the image according to its EXIF orientation by default. For other tools, you might need to apply the rotation using your own code. The following examples show a face rectangle on a rotated image (left) and a non-rotated image (right).

Video input
If you're detecting faces from a video feed, you may be able to improve performance by adjusting certain settings on your video camera:
Smoothing: Many video cameras apply a smoothing effect. You should turn this off if you can because it creates a blur between frames and reduces clarity.
Shutter Speed: A faster shutter speed reduces the amount of motion between frames and makes each frame clearer. We recommend shutter speeds of 1/60 second or faster.
Shutter Angle: Some cameras specify shutter angle instead of shutter speed. You should use a lower shutter angle if possible. This results in clearer video frames.
Note
A camera with a lower shutter angle will receive less light in each frame, so the image will be darker. You'll need to determine the right level to use.
Next steps
Now that you're familiar with face detection concepts, learn how to write a script that detects faces in a given image.
Feedback
Coming soon: Throughout 2024 we will be phasing out GitHub Issues as the feedback mechanism for content and replacing it with a new feedback system. For more information see: https://aka.ms/ContentUserFeedback.
Submit and view feedback for