Configure authentication in a sample single-page application by using Azure AD B2C
This article uses a sample JavaScript single-page application (SPA) to illustrate how to add Azure Active Directory B2C (Azure AD B2C) authentication to your SPAs.
Overview
OpenID Connect (OIDC) is an authentication protocol that's built on OAuth 2.0. You can use it to securely sign a user into an application. This SPA sample uses MSAL.js and the OIDC PKCE flow. MSAL.js is a Microsoft provided library that simplifies adding authentication and authorization support to SPAs.
Sign in flow
The sign-in flow involves the following steps:
- Users go to the web app and select Sign-in.
- The app initiates an authentication request and redirects users to Azure AD B2C.
- Users sign up or sign in and reset the password. Alternatively, they can sign in with a social account.
- After users sign in, Azure AD B2C returns an authorization code to the app.
- The single-page application validates the ID token, reads the claims, and in turn allows users to call protected resources and APIs.
App registration overview
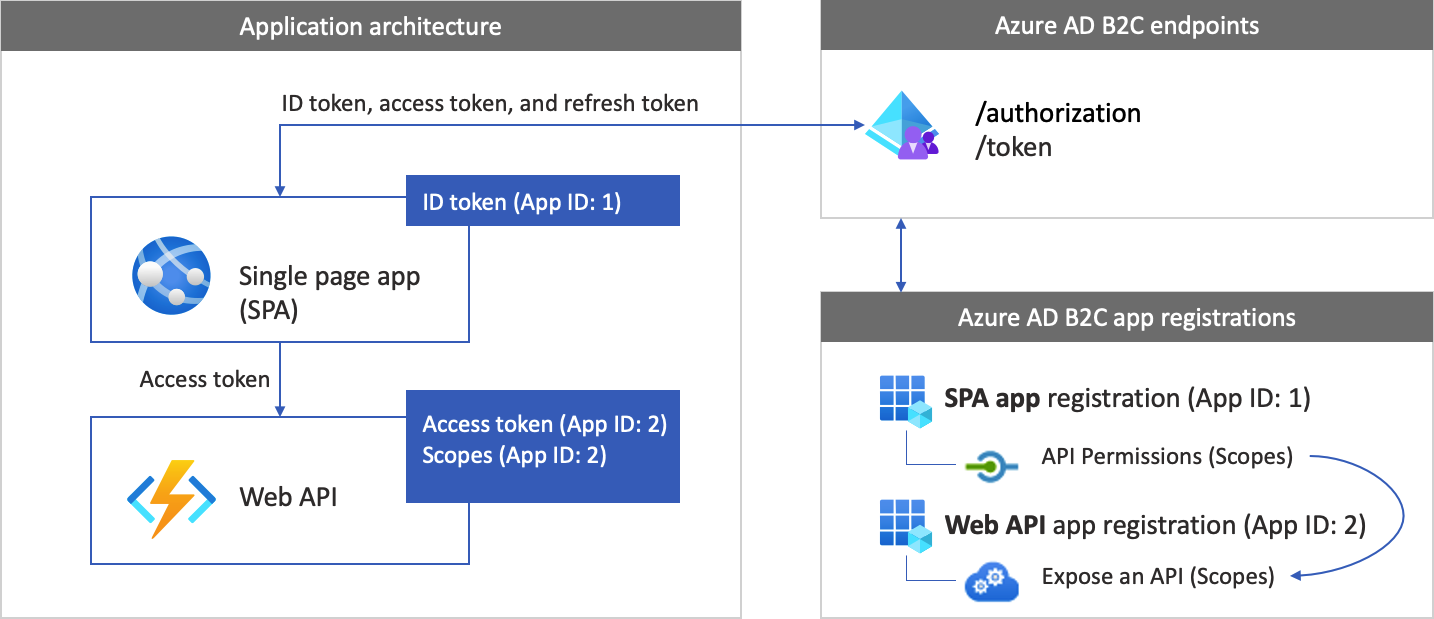
To enable your app to sign in with Azure AD B2C and call a web API, you register two applications in the Azure AD B2C directory.
The web application registration enables your app to sign in with Azure AD B2C. During the registration, you specify the redirect URI. The redirect URI is the endpoint to which users are redirected by Azure AD B2C after their authentication with Azure AD B2C is completed. The app registration process generates an application ID, also known as the client ID, which uniquely identifies your app.
The web API registration enables your app to call a secure web API. The registration includes the web API scopes. The scopes provide a way to manage permissions to protected resources, such as your web API. You grant the web application permissions to the web API scopes. When an access token is requested, your app specifies the desired permissions in the scope parameter of the request.
The app architecture and registrations are illustrated in the following diagram:
Call to a web API
After the authentication is completed, users interact with the app, which invokes a protected web API. The web API uses bearer token authentication. The bearer token is the access token that the app obtained from Azure AD B2C. The app passes the token in the authorization header of the HTTPS request.
Authorization: Bearer <access token>
If the access token's scope doesn't match the web API's scopes, the authentication library obtains a new access token with the correct scopes.
Sign out flow
The sign-out flow involves the following steps:
- From the app, users sign out.
- The app clears its session objects, and the authentication library clears its token cache.
- The app takes users to the Azure AD B2C sign-out endpoint to terminate the Azure AD B2C session.
- Users are redirected back to the app.
Prerequisites
A computer that's running:
- Visual Studio Code, or another code editor.
- Node.js runtime
Step 1: Configure your user flow
When users try to sign in to your app, the app starts an authentication request to the authorization endpoint via a user flow. The user flow defines and controls the user experience. After users complete the user flow, Azure AD B2C generates a token and then redirects users back to your application.
If you haven't done so already, create a user flow or a custom policy. Repeat the steps to create three separate user flows as follows:
- A combined Sign in and sign up user flow, such as
susi. This user flow also supports the Forgot your password experience. - A Profile editing user flow, such as
edit_profile. - A Password reset user flow, such as
reset_password.
Azure AD B2C prepends B2C_1_ to the user flow name. For example, susi becomes B2C_1_susi.
Step 2: Register your SPA and API
In this step, you create the SPA and the web API application registrations, and you specify the scopes of your web API.
Step 2.1: Register the web API application
To create the web API app registration (App ID: 2), follow these steps:
Sign in to the Azure portal.
Make sure you're using the directory that contains your Azure AD B2C tenant. Select the Directories + subscriptions icon in the portal toolbar.
On the Portal settings | Directories + subscriptions page, find your Azure AD B2C directory in the Directory name list, and then select Switch.
In the Azure portal, search for and select Azure AD B2C.
Select App registrations, and then select New registration.
For Name, enter a name for the application (for example, my-api1). Leave the default values for Redirect URI and Supported account types.
Select Register.
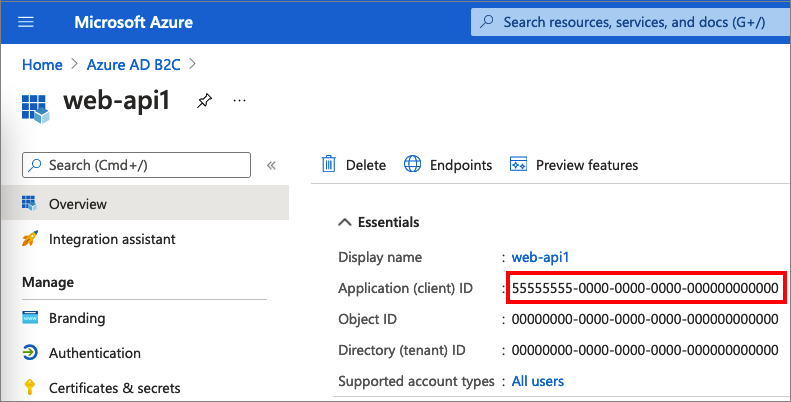
After the app registration is completed, select Overview.
Record the Application (client) ID value for later use when you configure the web application.
Step 2.2: Configure scopes
Select the my-api1 application that you created (App ID: 2) to open its Overview page.
Under Manage, select Expose an API.
Next to Application ID URI, select the Set link. Replace the default value (GUID) with a unique name (for example, tasks-api), and then select Save.
When your web application requests an access token for the web API, it should add this URI as the prefix for each scope that you define for the API.
Under Scopes defined by this API, select Add a scope.
To create a scope that defines read access to the API:
- For Scope name, enter tasks.read.
- For Admin consent display name, enter Read access to tasks API.
- For Admin consent description, enter Allows read access to the tasks API.
Select Add scope.
Select Add a scope, and then add a scope that defines write access to the API:
- For Scope name, enter tasks.write.
- For Admin consent display name, enter Write access to tasks API.
- For Admin consent description, enter Allows write access to the tasks API.
Select Add scope.
Step 2.3: Register the SPA
To create the SPA registration, use the following steps:
- Sign in to the Azure portal.
- If you have access to multiple tenants, select the Settings icon in the top menu to switch to your Azure AD B2C tenant from the Directories + subscriptions menu.
- Search for and select Azure AD B2C.
- Select App registrations, and then select New registration.
- Enter a Name for the application (for example, MyApp).
- Under Supported account types, select Accounts in any identity provider or organizational directory (for authenticating users with user flows).
- Under Redirect URI, select Single-page application (SPA) and then, in the URL box, enter
http://localhost:6420. - Under Permissions, select the Grant admin consent to openid and offline access permissions checkbox.
- Select Register.
Record the Application (client) ID to use later, when you configure the web application.

Step 2.4: Enable the implicit grant flow
In your own environment, if your SPA app uses MSAL.js 1.3 or earlier and the implicit grant flow or you configure https://jwt.ms/ app for testing a user flow or custom policy, you need to enable the implicit grant flow in the app registration:
In the left menu, under Manage, select Authentication.
Under Implicit grant and hybrid flows, select both the Access tokens (used for implicit flows) and ID tokens (used for implicit and hybrid flows) check boxes.
Select Save.
If your app uses MSAL.js 2.0 or later, don't enable implicit flow grant as MSAL.js 2.0+ supports the authorization code flow with PKCE. The SPA app in this article uses PKCE flow, and so you don't need to enable implicit grant flow.
Step 2.5: Grant permissions
To grant your app (App ID: 1) permissions, follow these steps:
Select App registrations, and then select the app that you created (App ID: 1).
Under Manage, select API permissions.
Under Configured permissions, select Add a permission.
Select the My APIs tab.
Select the API (App ID: 2) to which the web application should be granted access. For example, enter my-api1.
Under Permission, expand tasks, and then select the scopes that you defined earlier (for example, tasks.read and tasks.write).
Select Add permissions.
Select Grant admin consent for <your tenant name>.
Select Yes.
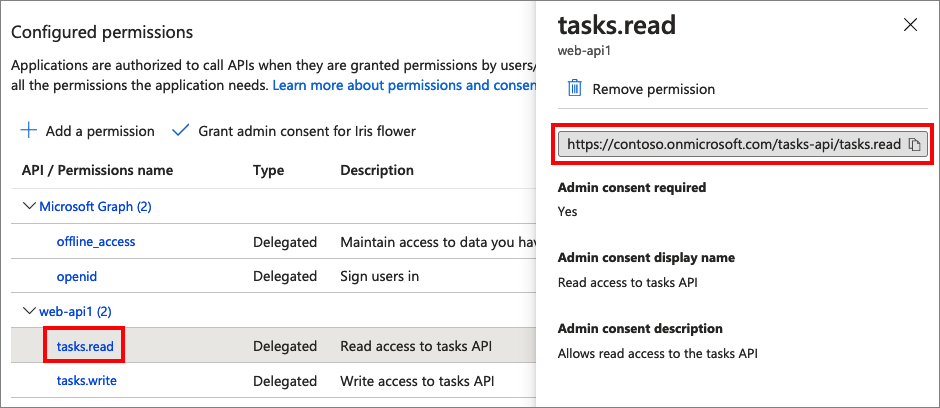
Select Refresh, and then verify that Granted for ... appears under Status for both scopes.
From the Configured permissions list, select your scope, and then copy the scope full name.
Step 3: Get the SPA sample code
This sample demonstrates how a single-page application can use Azure AD B2C for user sign-up and sign in. Then the app acquires an access token and calls a protected web API.
To get the SPA sample code, you can do either of the following:
Clone the sample from GitHub by running the following command:
git clone https://github.com/Azure-Samples/ms-identity-b2c-javascript-spa.git
Step 3.1: Update the SPA sample
Now that you've obtained the SPA sample, update the code with your Azure AD B2C and web API values. In the sample folder, under the App folder, open the JavaScript files that are listed in the following table, and then update them with their corresponding values.
| File | Key | Value |
|---|---|---|
| authConfig.js | clientId | The SPA ID from step 2.3. |
| policies.js | names | The user flows, or custom policy you created in step 1. |
| policies.js | authorities | Your Azure AD B2C user flows or custom policies authorities such as https://<your-tenant-name>.b2clogin.com/<your-tenant-name>.onmicrosoft.com/<your-sign-in-sign-up-policy>. Replace your-sign-in-sign-up-policy with user flow or custom policy you created in step 1 |
| policies.js | authorityDomain | Your Azure AD B2C authority domain such as <your-tenant-name>.b2clogin.com. |
| apiConfig.js | b2cScopes | The web API scopes you created in step 2.2 (for example, b2cScopes: ["https://<your-tenant-name>.onmicrosoft.com/tasks-api/tasks.read"]). |
| apiConfig.js | webApi | The URL of the web API, http://localhost:5000/hello. |
Your resulting code should look similar to following sample:
authConfig.js:
const msalConfig = {
    auth: {
      clientId: "<your-MyApp-application-ID>", // This is the ONLY mandatory field; everything else is optional.
      authority: b2cPolicies.authorities.signUpSignIn.authority, // Choose sign-up/sign-in user-flow as your default.
      knownAuthorities: [b2cPolicies.authorityDomain], // You must identify your tenant's domain as a known authority.
      redirectUri: "http://localhost:6420", // You must register this URI on Azure Portal/App Registration. Defaults to "window.location.href".
    },
    cache: {
      cacheLocation: "sessionStorage",
      storeAuthStateInCookie: false,
    },
    system: {
      loggerOptions: {
        loggerCallback: (level, message, containsPii) => {
          if (containsPii) {
            return;
          }
          switch (level) {
            case msal.LogLevel.Error:
              console.error(message);
              return;
            case msal.LogLevel.Info:
              console.info(message);
              return;
            case msal.LogLevel.Verbose:
              console.debug(message);
              return;
            case msal.LogLevel.Warning:
              console.warn(message);
              return;
          }
        }
      }
    }
  };
};

const loginRequest = {
  scopes: ["openid", ...apiConfig.b2cScopes],
};

const tokenRequest = {
  scopes: [...apiConfig.b2cScopes],  // e.g. ["https://fabrikamb2c.onmicrosoft.com/helloapi/demo.read"]
  forceRefresh: false // Set this to "true" to skip a cached token and go to the server to get a new token
};
policies.js:
const b2cPolicies = {
    names: {
        signUpSignIn: "b2c_1_susi",
        forgotPassword: "b2c_1_reset",
        editProfile: "b2c_1_edit_profile"
    },
    authorities: {
        signUpSignIn: {
            authority: "https://your-tenant-name.b2clogin.com/your-tenant-name.onmicrosoft.com/b2c_1_susi",
        },
        forgotPassword: {
            authority: "https://your-tenant-name.b2clogin.com/your-tenant-name.onmicrosoft.com/b2c_1_reset",
        },
        editProfile: {
            authority: "https://your-tenant-name.b2clogin.com/your-tenant-name.onmicrosoft.com/b2c_1_edit_profile"
        }
    },
    authorityDomain: "your-tenant-name.b2clogin.com"
}
apiConfig.js:
const apiConfig = {
  b2cScopes: ["https://your-tenant-name.onmicrosoft.com/tasks-api/tasks.read"],
  webApi: "http://localhost:5000/hello"
};
Step 4: Get the web API sample code
Now that the web API is registered and you've defined its scopes, configure the web API code to work with your Azure AD B2C tenant.
To get the web API sample code, do one of the following:
Clone the sample web API project from GitHub by running the following command:
git clone https://github.com/Azure-Samples/active-directory-b2c-javascript-nodejs-webapi.gitYou can also go directly to the Azure-Samples/active-directory-b2c-javascript-nodejs-webapi project on GitHub.
Step 4.1: Update the web API
Open the config.json file in your code editor.
Modify the variable values with the application registration you created earlier. And update the
policyNamewith the user flow you created as part of the prerequisites (for example, b2c_1_susi)."credentials": { "tenantName": "<your-tenant-name>", "clientID": "<your-webapi-application-ID>" }, "policies": { "policyName": "b2c_1_susi" }, "resource": { "scope": ["tasks.read"] },
Step 4.2: Enable CORS
To allow your single-page application to call the Node.js web API, you need to enable cross-origin resource sharing (CORS) in the web API. In a production application, be careful about which domain is making the request. In this example, allow requests from any domain.
To enable CORS, use the following middleware. In the Node.js web API code sample you downloaded, it has already been added to the index.js file.
app.use((req, res, next) => {
    res.header("Access-Control-Allow-Origin", "*");
    res.header("Access-Control-Allow-Headers", "Authorization, Origin, X-Requested-With, Content-Type, Accept");
    next();
});
Step 5: Run the SPA and web API
You're now ready to test the single-page application's scoped access to the API. Run both the Node.js web API and the sample JavaScript single-page application on your local machine. Then, sign in to the single-page application and select the Call API button to initiate a request to the protected API.
Run the Node.js web API
Open a console window, and change to the directory that contains the Node.js web API sample. For example:
cd active-directory-b2c-javascript-nodejs-webapiRun the following commands:
npm install && npm update
node index.js
The console window displays the port number where the application is hosted.
Listening on port 5000...
Run the single-page app
Open another console window, and change to the directory that contains the JavaScript SPA sample. For example:
cd ms-identity-b2c-javascript-spaRun the following commands:
npm install && npm update
npm start
The console window displays the port number of where the application is hosted.
Listening on port 6420...To view the application, go to
http://localhost:6420in your browser.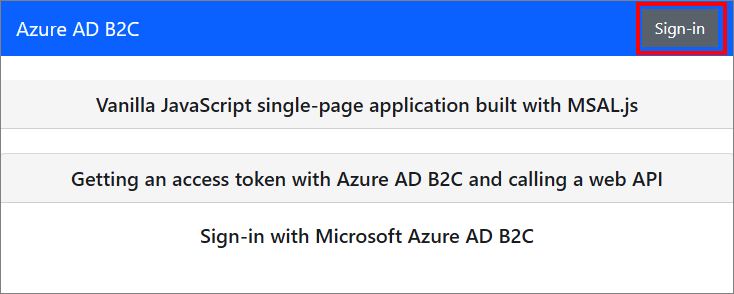
Complete the sign-up or sign in process. After you've logged in successfully, you should see the "User <your username> logged in" message.
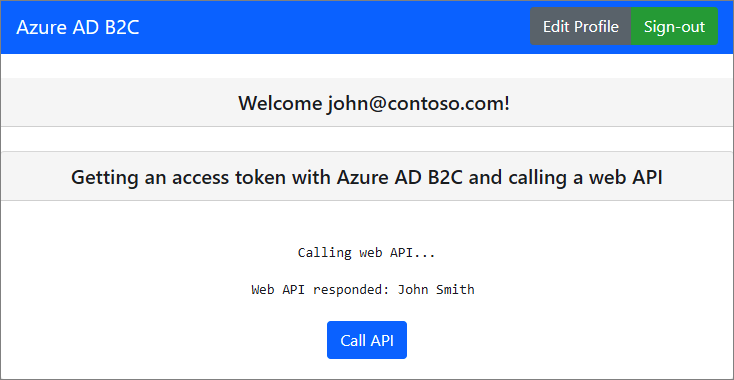
Select the Call API button. The SPA sends the access token in a request to the protected web API, which returns the display name of the logged-in user:
Deploy your application
In a production application, the app registration redirect URI is ordinarily a publicly accessible endpoint where your app is running, such as https://contoso.com/signin-oidc.
You can add and modify redirect URIs in your registered applications at any time. The following restrictions apply to redirect URIs:
- The reply URL must begin with the scheme
https. - The reply URL is case-sensitive. Its case must match the case of the URL path of your running application.
Next steps
For more information about the concepts discussed in this article:
Feedback
Coming soon: Throughout 2024 we will be phasing out GitHub Issues as the feedback mechanism for content and replacing it with a new feedback system. For more information see: https://aka.ms/ContentUserFeedback.
Submit and view feedback for