Connect Azure Data Lake Storage Gen2 for dataflow storage
You can configure dataflows to store their data in your organization's Azure Data Lake Storage Gen2 account. This article describes the general steps necessary to do so, and provides guidance and best practices along the way.
Important
Dataflow with Analytical tables feature utilizes the Azure Synapse Link for Dataverse service, which may offer varying levels of compliance, privacy, security, and data location commitments. For more information about Azure Synapse Link for Dataverse, go to What is Azure Synapse Link for Dataverse?.
There are some advantages to configuring dataflows to store their definitions and datafiles in your data lake, such as:
- Azure Data Lake Storage Gen2 provides an enormously scalable storage facility for data.
- Dataflow data and definition files can be leveraged by your IT department's developers to leverage Azure data and artificial intelligence (AI) services as demonstrated in the GitHub samples from Azure data services.
- It enables developers in your organization to integrate dataflow data into internal applications and line-of-business solutions, using developer resources for dataflows and Azure.
Requirements
To use Azure Data Lake Storage Gen2 for dataflows, you need the following:
- A Power Apps environment. Any Power Apps plan will allow you to create dataflows with Azure Data Lake Storage Gen2 as a destination. You'll need to be authorized in the environment as a maker.
- An Azure subscription. You need an Azure subscription to use Azure Data Lake Storage Gen2.
- A resource group. Use a resource group you already have, or create a new one.
- An Azure storage account. The storage account must have the Data Lake Storage Gen2 feature enabled.
Tip
If you don't have an Azure subscription, create a free trial account before you begin.
Prepare your Azure Data Lake Storage Gen2 for Power Platform dataflows
Before you configure your environment with an Azure Data Lake Storage Gen2 account, you must create and configure a storage account. Here are the requirements for Power Platform dataflows:
- The storage account must be created in the same Microsoft Entra ID tenant as your Power Apps tenant.
- We recommend that the storage account is created in the same region as the Power Apps environment you plan to use it in. To determine where your Power Apps environment is, contact your environment admin.
- The storage account must have the Hierarchical Name Space feature enabled.
- You must be granted an Owner role on the storage account.
The following sections walk through the steps necessary to configure your Azure Data Lake Storage Gen2 account.
Create the storage account
Follow the steps in Create an Azure Data Lake Storage Gen2 storage account.
- Make sure you select the same region as your environment and set your storage as StorageV2 (general purpose v2).
- Make sure you enable the hierarchical namespace feature.
- We recommend that you set the replication setting to Read-access geo-redundant storage (RA-GRS).
Connect your Azure Data Lake Storage Gen2 to Power Apps
Once you've set up your Azure Data Lake Storage Gen2 account in the Azure portal, you're ready to connect it to a specific dataflow or a Power Apps environment. Connecting the lake to an environment allows other makers and admins in the environment to create dataflows that store their data in your organization's lake as well.
To connect your Azure Data Lake Storage Gen2 account with the dataflow, follow these steps:
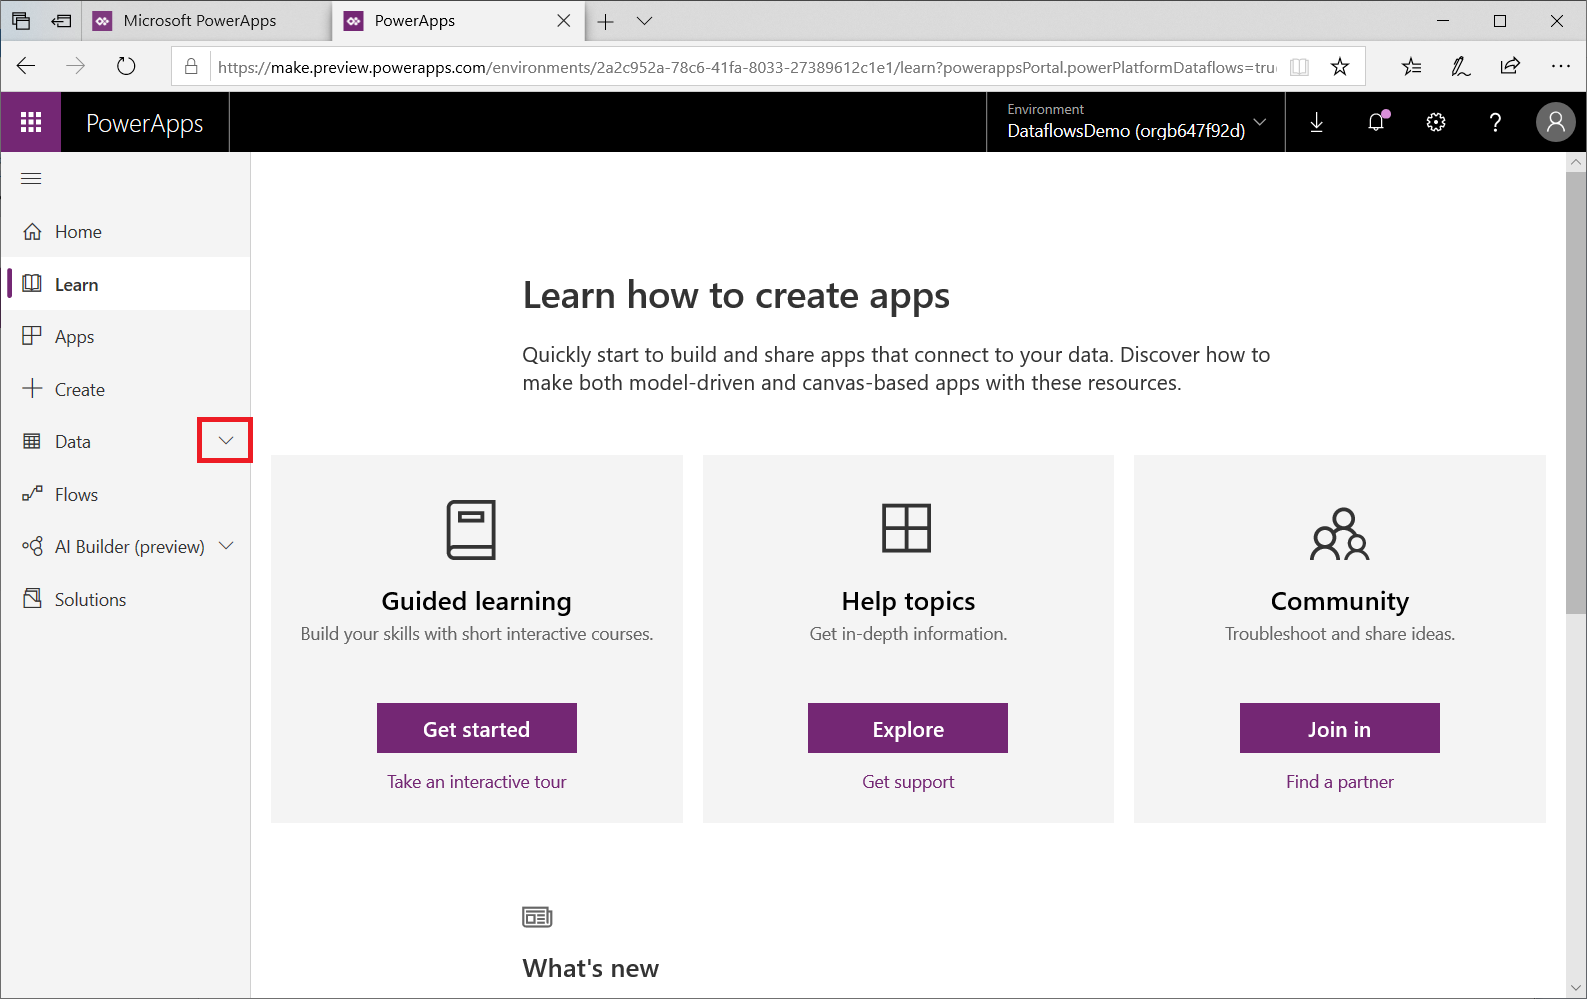
Sign in to Power Apps, and verify which environment you're in. The environment switcher is located on the right side of the header.
On the left navigation pane, select the down arrow next to Data.

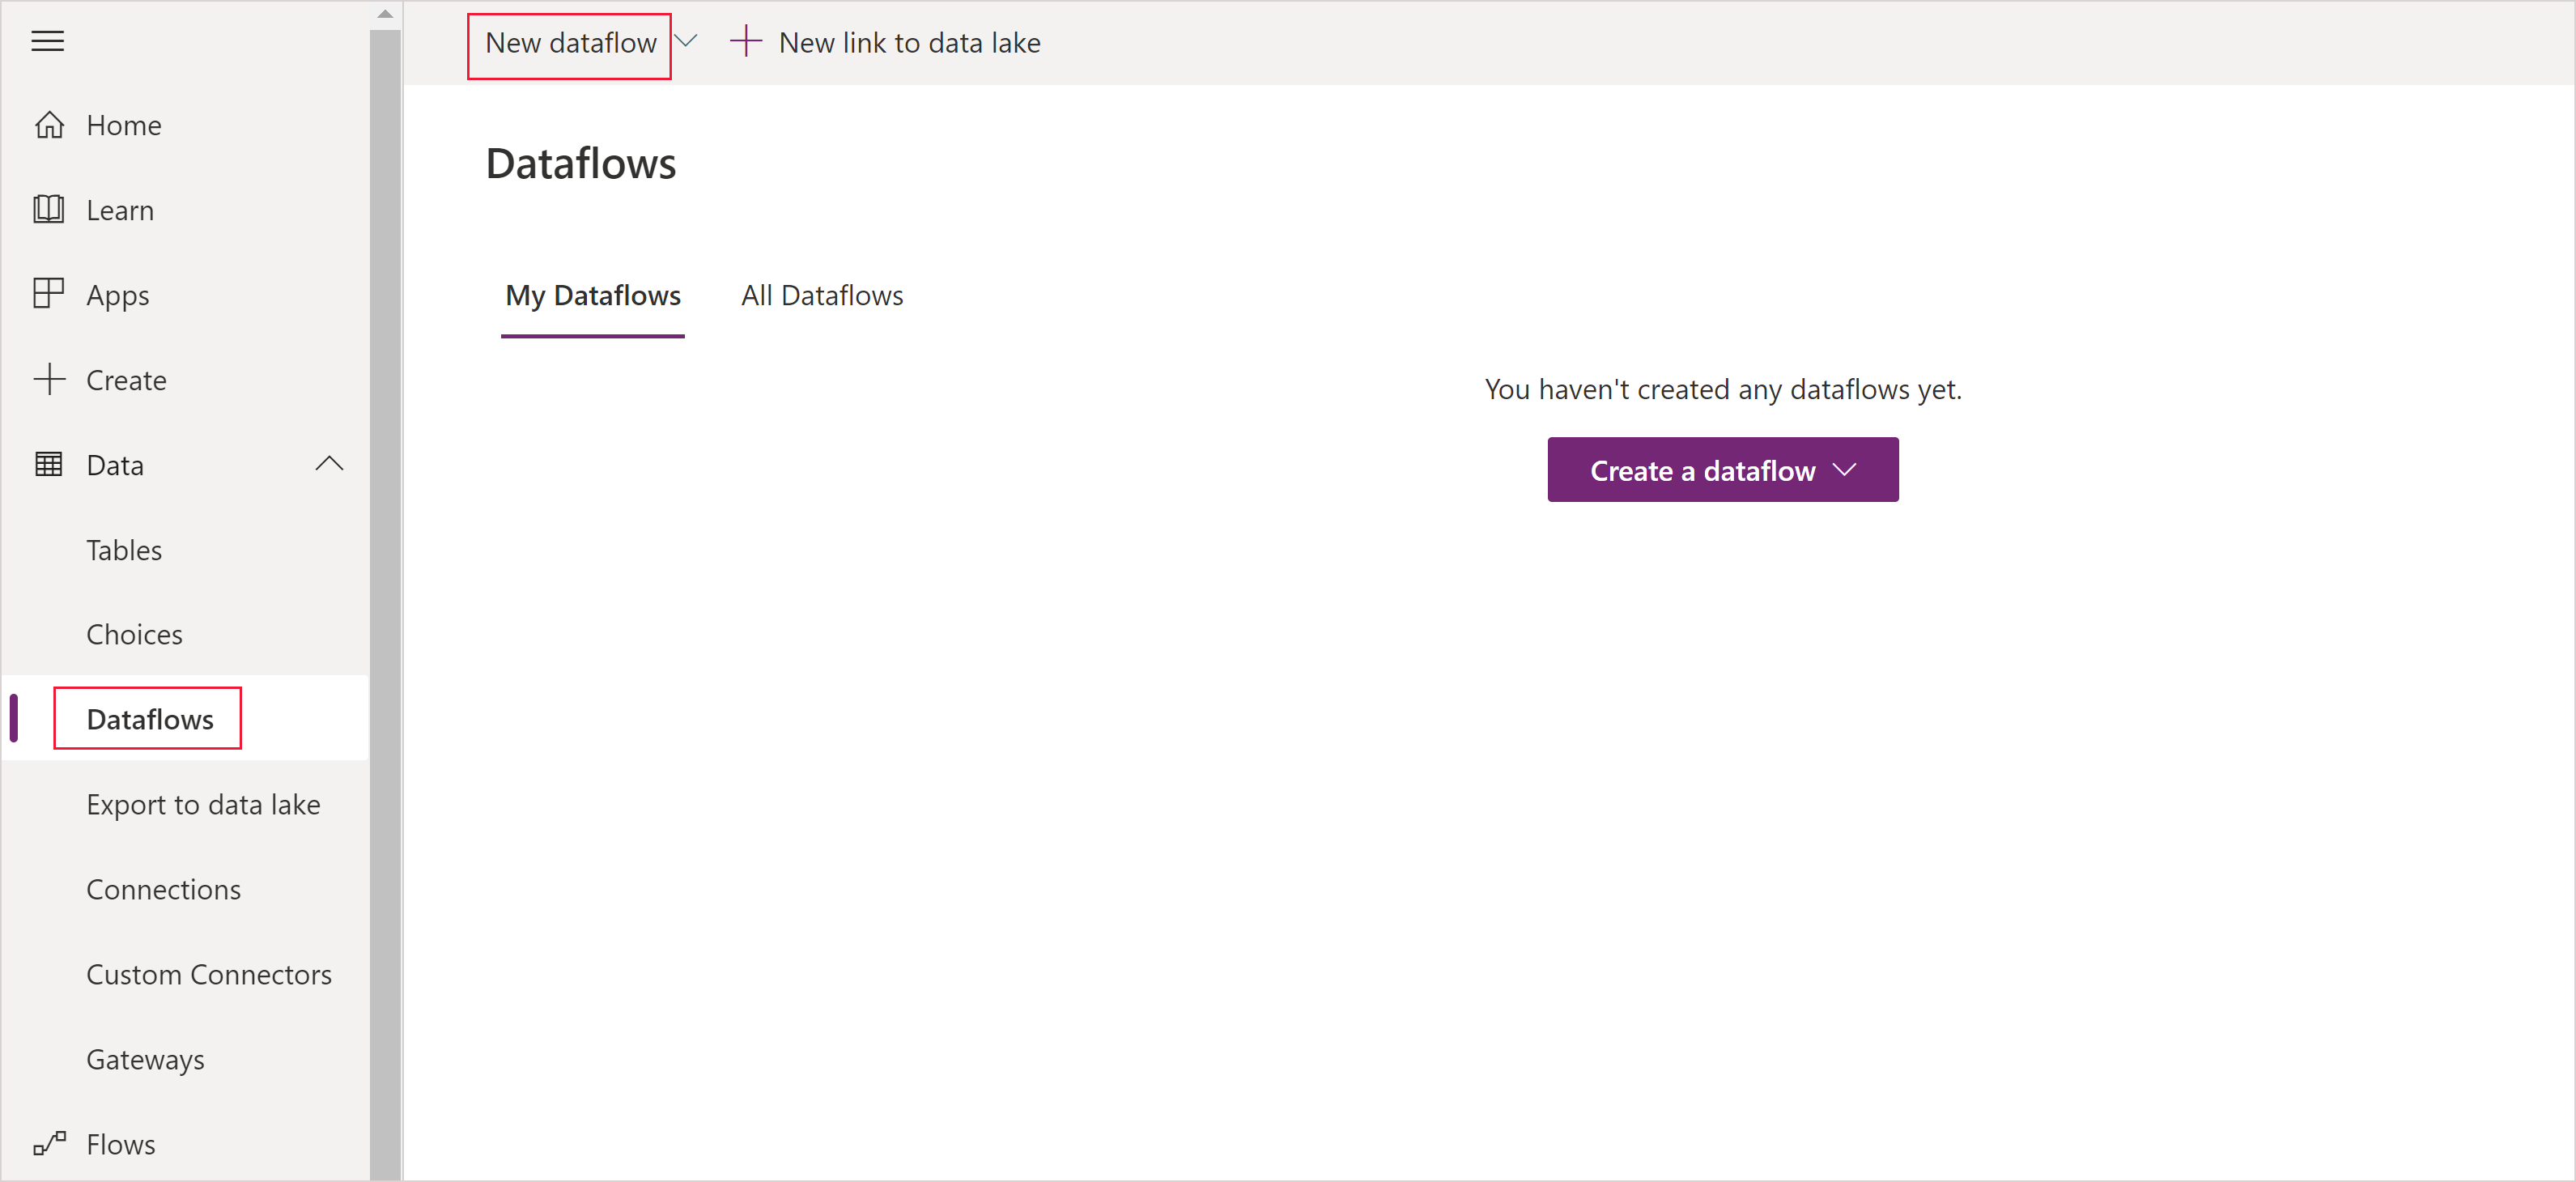
In the list that appears, select Dataflows and then on the command bar select New dataflow.

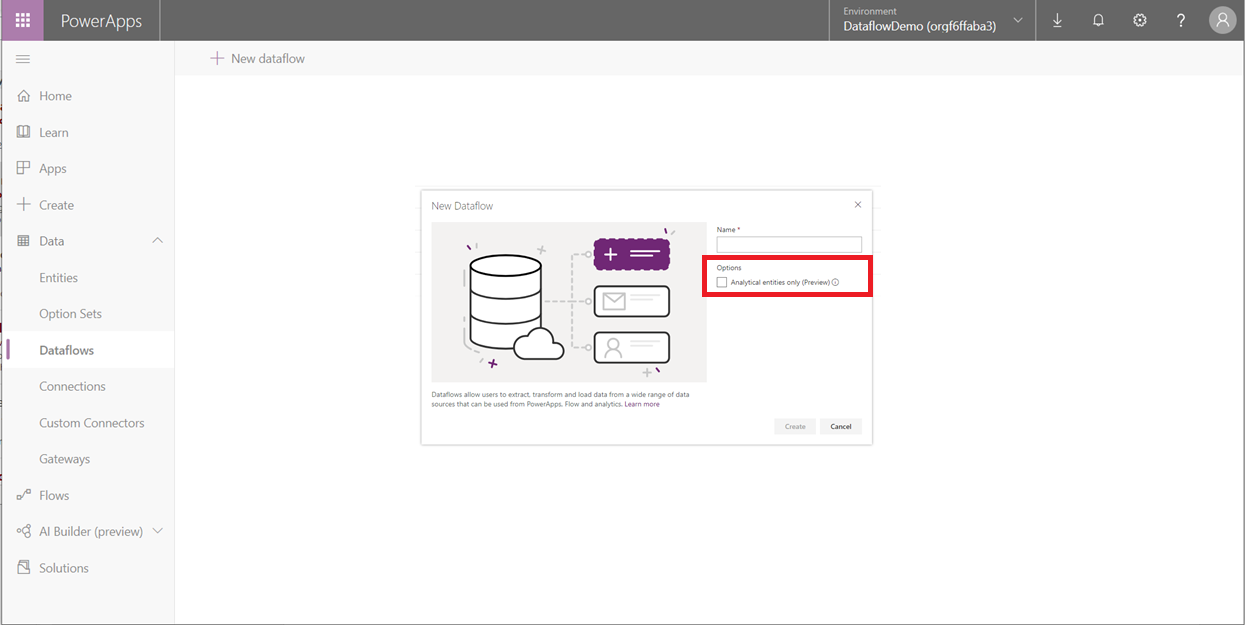
Select the analytical tables you want. These tables indicate what data you want to store in your organization's Azure Data Lake Store Gen2 account.

Select the storage account to use for dataflow storage
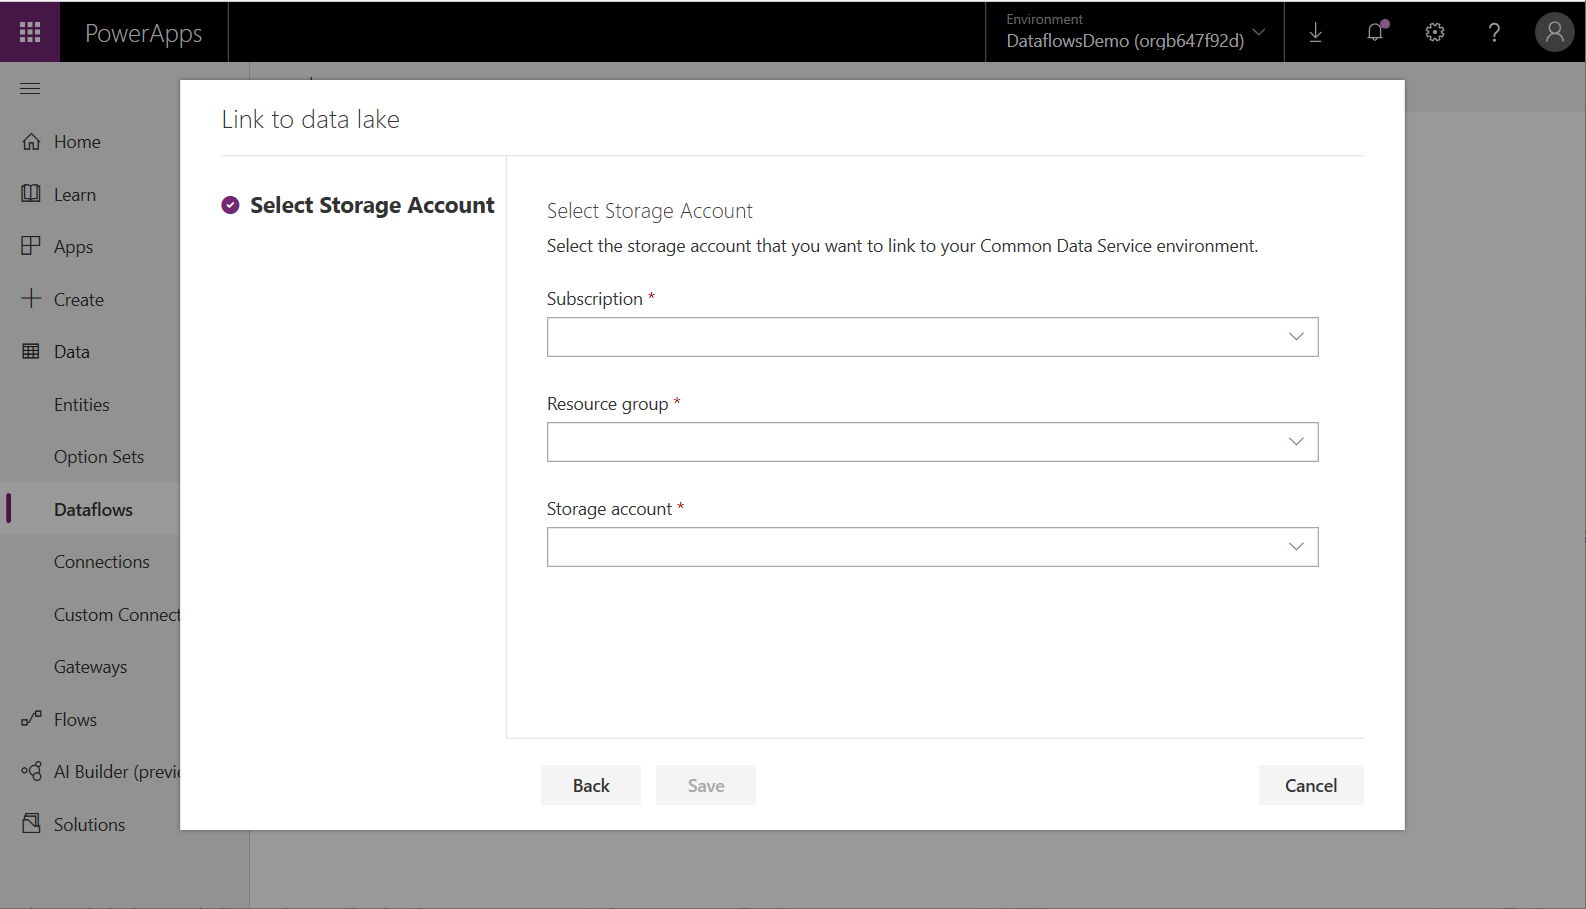
If a storage account hasn't yet been associated with the environment, a Link to data lake dialog box appears. You'll need to sign in and find the data lake you created in the previous steps. In this example, no data lake is associated with the environment and so a prompt occurs to add one.
Select storage account.
The Select Storage Account screen appears.

Select the Subscription ID of the storage account.
Select the Resource group name in which the storage account was created.
Enter the Storage account name.
Select Save.
Once these steps are successfully completed, your Azure Data Lake Storage Gen2 account is connected to Power Platform Dataflows and you can continue to create a dataflow.
Considerations and limitations
There are a few considerations and limitations to keep in mind when working with your dataflow storage:
- Linking an Azure Data Lake Store Gen2 account for dataflow storage isn't supported in the default environment.
- Once a dataflow storage location is configured for a dataflow, it can't be changed.
- Once a storage account is linked, changing the environment's name isn't supported and dataflows linked to the that storage account will fail. Changing back the environment's name will re-enable those dataflows.
- By default, any member of the environment can access dataflow data using the Power Platform Dataflows Connector. However, only the owners of a dataflow can access its files directly in Azure Data Lake Storage Gen2. To authorize more people to access the dataflows data directly in the lake, you must authorize them to the dataflow's CDM Folder in the data lake or the data lake itself.
- When a dataflow is deleted, its CDM Folder in the lake will also be deleted.
- Attempting to connect two dataflow tables between two workspaces of different storage types—Bring Your Own Storage Account (BYOSA) and Internal—isn't supported.
Important
You shouldn't change files created by dataflows in your organization's lake or add files to a dataflow's CDM Folder. Changing files might damage dataflows or alter their behavior and is not supported. Power Platform Dataflows only grants read access to files it creates in the lake. If you authorize other people or services to the filesystem used by Power Platform Dataflows, only grant them read access to files or folders in that filesystem.
Privacy notice
By enabling the creation of dataflows with Analytical tables in your organization, via the Azure Synapse Link for Dataverse service, details about the Azure Data Lake storage account, such as the name of the storage account, will be sent to and stored in the Azure Synapse Link for Dataverse service, which is currently located outside the PowerApps compliance boundary and may employ lesser or different privacy and security measures than those typically in PowerApps. Note that you may remove the data lake association at any time to discontinue use of this functionality and your Azure Data Lake storage account details will be removed from the Azure Synapse Link for Dataverse service. Further information about Azure Synapse Link for Dataverse is available in this article.
Frequently asked questions
What if I had previously created dataflows in my organization's Azure Data Lake Storage Gen2 and would like to change their storage location?
You can't change the storage location of a dataflow after it was created.
When can I change the dataflow storage location of an environment?
Changing the environment's dataflow storage location isn't currently supported.
Next steps
This article provided guidance about how to connect an Azure Data Lake Storage Gen2 account for dataflow storage.
For more information about dataflows, the Common Data Model, and Azure Data Lake Storage Gen2, go to these articles:
- Self-service data prep with dataflows
- Creating and using dataflows in Power Apps
- Add data to a table in Microsoft Dataverse
For more information about Azure storage, go to this article:
For more information about the Common Data Model, go to these articles:
You can ask questions in the Power Apps Community.
Feedback
Coming soon: Throughout 2024 we will be phasing out GitHub Issues as the feedback mechanism for content and replacing it with a new feedback system. For more information see: https://aka.ms/ContentUserFeedback.
Submit and view feedback for