Configure authentication settings
Omnichannel for Customer Service offers a suite of capabilities that extend the power of Dynamics 365 Customer Service Enterprise to enable organizations to instantly connect and engage with their customers across digital messaging channels. An additional license is required to access Omnichannel for Customer Service. For more information, see the Dynamics 365 Customer Service pricing overview and Dynamics 365 Customer Service pricing plan pages.
You can create authentication settings to validate a signed-in customer from a domain, and extract information based on the context variables that are defined. You can differentiate your anonymous customers from authenticated customers, and you can create rules based on the context variables.
For example, you can have separate queues for anonymous customers and authenticated customers. Because you have more information about your authenticated customers, you can also prioritize them based on specific variables, such as a shopping cart value or a privileged status.
After you create an authentication settings record, you must add it to a channel instance within a workstream's channel setup to make it work. Authentication is supported for these channels:
- Chat
- Apple Messages for Business
The agent will get a notification in the Conversation summary section whether the customer is authenticated or not. The Authenticated field is set to Yes or No based on the authentication of the customer. More information: Conversation summary
Prerequisites
- Make sure your organization has working knowledge of OAuth 2.0 and JSON Web Tokens (JWTs).
- Verify that you have permissions on the secure columns. More information: Configure permissions to access secure columns
Create an authentication setting record for chat
You can create a chat authentication setting record in the admin app.
In the site map of Customer Service admin center, select Customer Settings in Customer support. The Customer settings page appears.
In the Authentication settings section, select Manage. The Authentication settings page is displayed.
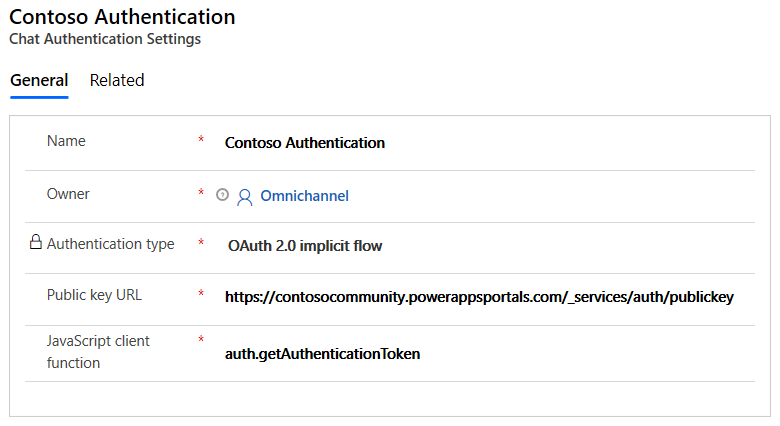
Select New Authentication Settings, and provide the following information on the Add authentication setting page:
Name: Enter a name for the authentication setting.
Owner: Accept the default value or change to a required value.
Authentication type: By default, it's OAuth 2.0 implicit flow that can't be edited.
Public key URL: Specify the public key URL of the domain. This URL is used to validate the information that comes in from the JavaScript Object Notation (JSON) Web Token (JWT) of the domain that a customer has signed in to.
JavaScript client function: Specify the JavaScript client function to use for authentication. This function extracts a token from the token endpoint.

For more information about how to find the public key URL and JavaScript client function, see the Setup for Power Apps portals or Setup for custom portals section later in this article.
Select Save.
Create an authentication setting record for chat using OAuth 2.0
Perform the steps 1 through 3 in Create an authentication setting record for chat, and enter the following details on the Add authentication setting page:
- Name: A name for the authentication setting.
- Channel Type: Live chat.
- Authentication Type: OAuth 2.0 implicit flow
Select Next and on the Details page, enter the following information:
- Token Custom Action: The custom code reference to validate the tokens that are provided by your identity provider and return the user ID of the authenticated user.
- Token URL: The URL that'll be used to exchange your authorization code for the token passed to your custom action to acquire the user ID.
- Redirect URL: The URL that's passed to the original authorization code request, which is a required parameter in calls to the token exchange endpoint.
- Client ID: The ID of the client that's passed to the token exchange endpoint.
- Client secret: The secret that authenticates the client that's passed to the token exchange endpoint.
- Scope: The scopes for which the user is authorized by the token acquired in the flow.
Save the changes.
Add authentication to chat widget
In Customer Service admin center, edit the chat widget in the workstream settings and go to the Behaviors tab.
In the Authentication settings box, browse and select the chat authentication record.
When a signed-in customer on a portal opens the chat widget, the JavaScript client function passes the JWT from the client to the server. The JWT is decrypted and validated by using the public key, and the information is then passed to the chat agent in Omnichannel for Customer Service. As an admin, you can also pass additional information about the signed-in customer in the JWT by defining custom context variables. The context variables must be defined exactly as they're defined in the workstream that's associated with the chat widget. More information: Manage context variables
Setup for Power Apps portals
If you're adding authentication for a chat widget on a website developed using Power Apps portals, then the public key URL and JavaScript client function are available out of the box. You'll need to upload a custom certificate to have a valid public key URL on Power Apps portals.
- Public key URL:
<portal_base_URL>/_services/auth/publickey - JavaScript client function:
auth.getAuthenticationToken
The Power Apps portal will try to automatically link a contact record to the conversation through the context passed in its JavaScript client function.
Setup for custom portals
If you're adding an authenticated chat experience to a custom website that isn't developed using Power Apps portals, your web development team must perform the following steps before your administrators can configure authenticated chat:
Generate a public/private key pair in their authentication servers. The keys must be generated using the RSA256 algorithm.
Here's sample code for generating private/public key pairs.
openssl genpkey -algorithm RSA -out private_key.pem -pkeyopt rsa_keygen_bits:2048
openssl rsa -pubout -in private_key.pem -out public_key.pem
Create an endpoint that will return your public keys. The Omnichannel servers will use the public keys to validate the JWT token passed as a part of authorizing the chat request. The URL of this endpoint will be entered into the admin app when creating an authentication setting record.
Your public key endpoint will look similar to this example:
  -----BEGIN PUBLIC KEY-----
  NIIBIjANBgkqhkiG9w0BAQEFABCOPQ8AMIIBCgKCAQEAn+BjbrY5yhSpLjcV3seP
  mNvAvtQ/zLwkjCbpc8c0xVUOzEdH8tq4fPi/X5P/Uf2CJomWjdOf1wffmOZjFasx
  ELG+poTqy5uX2dNhH6lOMUsV31QGG36skLivpLBCSK6lWlzsV6WGkb/m8r86aGzp
  jtNhw8yvoTYB4updDrJ8pC+tx4EWK0WEmKn1GsW6TjUtxJjcTLI1puSbmcGHbkSi
  RSbWkKPqaEVFALprw+W5ZCung5QX3KOkY/rJd+2JwULm7okyQCQaF7qwa5i9Uf65
  7M6ZL4vsDevq7E/v3tf6qxpSSHzt4XspXVQty9QHhqDqBEY3PfI4L2JjgIGuPhfS
  YQIDAQAB
  -----END PUBLIC KEY-----
If you need to use multiple public keys, your public key endpoint can return a set of <kid, publickey> pairs, where kid refers to the key ID. Key ID pairs must be unique. The kid will need to be passed in the JWT token in step 4. If you're using multiple keys, your public key endpoint should return something that looks like this. The public key is base64-encoded.
 [
      {
          "kid": "qWO4EaKT1xRO7JC/oqALz6DCVr41B/qL0Hqp4in7hu4=",
          "publicKey": LS0tLS1CRUdJTiBQVUJMSUMgS0VZLS0tLS0NCk1JSUJJakFOQmdrcWhraUc5dzBCQVFFRkFBT0NBUThBTUlJQkNnS0NBUUVBbjFLdXhtSEh3V3hjelZSWGRBVmMNCnBEaFZwa0FnYklhTGZBUWc1bFpvemZqc29vcWRGWkl0VlFMdmRERWFVeDNqTytrTkxZM0JFRnBYVDZTN3ZNZCsNCnZoM2hpMDNsQ1dINnNCTWtaSWtuUUliMnFpekFsT0diU2EvK3JrUElnYnpXQjRpT1QyWVhyOVB4bXR5d2o4WUINCnYram55VU5DSzMyZy9FYWsvM0k3YW1vZ2pJY0JISjNFTjVuQWJBMExVVnJwMW5DODJmeEVPOHNJTzNYdjlWNVUNCnc5QnVTVVFRSmtMejNQYVI5WTdRZUEyNW5LUGtqTXZ2Y0UxVU5oeVpIYlNLbmorSitkZmFjb1hsSGtyMEdGTXYNCldkSDZqR0pWcGNQMHBkNjFOa3JKa2c0aStheThwS2ZqdjNUOHN3NWdaVHFweFFaaitVRWxqaVM0SHRPTlhkNlENCnZRSURBUUFCDQotLS0tLUVORCBQVUJMSUMgS0VZLS0tLS0NCg==",
          "expiry": 1608495423
      },
 {
          "kid": "qWO4EaKT1xRO7JC/oqALz6DCVr41B/qL0Hqp__valid=",
          "publicKey": "LS0tLS1CRUdJTiBQVUJMSUMgS0VZLS0tLS0NCk1JSUJJakFOQmdrcWhraUc5dzBCQVFFRkFBT0NBUThBTUlJQkNnS0NBUUVBbjFLdXhtSEh3V3hjelZSWGRBVmMNCnBEaFZwa0FnYklhTGZBUWc1bFpvemZqc29vcWRGWkl0VlFMdmRERWFVeDNqTytrTkxZM0JFRnBYVDZTN3ZNZCsNCnZoM2hpMDNsQ1dINnNCTWtaSWtuUUliMnFpekFsT0diU2EvK3JrUElnYnpXQjRpT1QyWVhyOVB4bXR5d2o4WUINCnYram55VU5DSzMyZy9FYWsvM0k3YW1vZ2pJY0JISjNFTjVuQWJBMExVVnJwMW5DODJmeEVPOHNJTzNYdjlWNVUNCnc5QnVTVVFRSmtMejNQYVI5WTdRZUEyNW5LUGtqTXZ2Y0UxVU5oeVpIYlNLbmorSitkZmFjb1hsSGtyMEdGTXYNCldkSDZqR0pWcGNQMHBkNjFOa3JKa2c0aStheThwS2ZqdjNUOHN3NWdaVHFweFFaaitVRWxqaVM0SHRPTlhkNlENCnZRSURBUUFCDQotLS0tLUVORCBQVUJMSUMgS0VZLS0tLS0NCg==",
          "expiry": 1608495423
      }
 ]
You'll need a service that generates the JWT to send to Omnichannel’s servers as a part of starting a chat for an authenticated user.
a. The JWT header will look similar to the following example.
{
  "alg": "RS256",
  "typ": "JWT",
}
If you're using multiple public keys, you'll need to pass in the key ID (kid). Your header will look similar to this example:
{
  "alg": "RS256",
  "typ": "JWT",
  "kid": "qWO4EaKT1xRO7JC/oqALz6DCVr41B/qL0Hqp4in7hu4="
}
b. The JWT payload should include:
At minimum, the following claims:
Claim Definition iss The issuer of the token. iat The date the token was issued, in numeric date format. exp The expiration date of this token, in numeric date format. sub The subject of the claim.
NOTE: We recommend that you pass the GUID of the contact or account record in Customer Service for the logged-in user. This GUID will be used to identify and link the contact record to the conversation. The record search identifies records that have the active status code for contacts or accounts; if you use custom status codes, then record identification won't work.lwicontexts The context variables to pass in as part of the conversation, either for routing purposes or to display to the agent.
More information:
Manage custom context
setAuthTokenProvider method
Identify records automatically using context variablesAny other data that you want to pass.
Your payload will look similar to this example:
  {
      "sub" : "87b4d06c-abc2-e811-a9b0-000d3a10e09e",
      "lwicontexts" :"{\"msdyn_cartvalue\":\"10000\", \"msdyn_isvip\":\"false\", \"portalcontactid\":\"87b4d06c-abc2-e811-a9b0-000d3a10e09e\"}",
      "iat" : 1542622071,
      "iss" : "contosohelp.com",
      "exp" : 1542625672,
      "nbf" : 1542622072
  }
c. The JWT signature should be signed by your private key.
Note
- If the token has expired or is invalid, the chat widget will throw an error event.
- The setContextProvider method is not supported for authenticated chat. You should pass in your lwicontexts as a part of the JWT payload.
Create a JavaScript function on your website that will accept a callback function and return a JWT to the callback function. To avoid timeout, this JavaScript function should return a JWT within 10 seconds. This JWT must:
Contain the header, payload, and signature from step 3.
Be signed by the private key from the key pair in step 1.
(We recommend generating your JWT on your web server).
The name of this JavaScript method will be used to create the authentication settings record in the Customer Service admin app.
// This is a sample JavaScript client function

auth.getAuthenticationToken = function(callback){

  var xhttp = new XMLHttpRequest();
  xhttp.onreadystatechange = function() {
      if (this.readyState == 4 && this.status == 200) {
          callback(xhttp.responseText);
      }
  };
  xhttp.onerror = function(error) {
      callback(null);
  };
//Replace this with a call to your token generating service
  xhttp.open("GET", "https://contosohelp.com/token", true);
  xhttp.send();
}
Your developer will need to share the following information with your Omnichannel administrator:
a. The URL of the public key service from step 2.
Example: https://www.contoso.com/auth/publickey
b. The name of the JavaScript client function from step 4. The live chat widget will call this name internally during the start of a chat.
Example: auth.getAuthenticationToken
Note
If your user experience exposes the chat button before users are authenticated, make sure to redirect them to your authentication page as needed. This can be done in the method in step 4, or as an earlier step in your user flow.
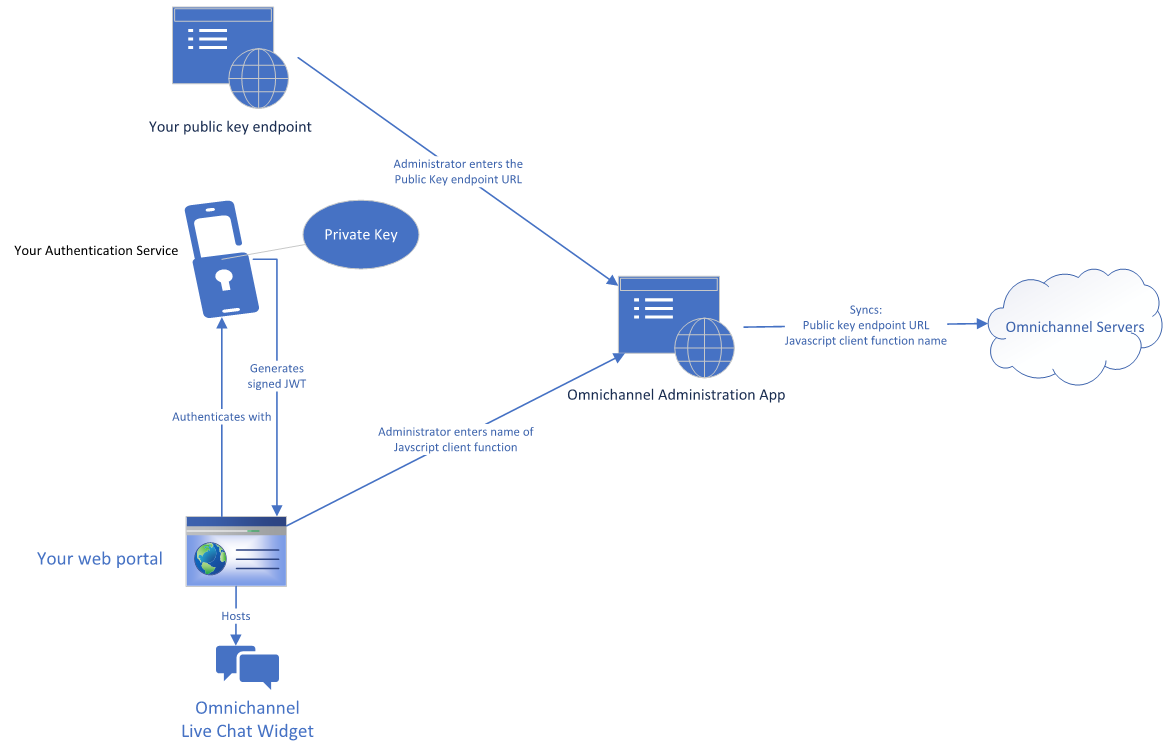
The following illustration demonstrates the setup.

Then, you can set up authenticated chat by following these steps:
Set up authenticated chat
Go to the admin app, and create an authentication settings record with the information from step 5 of the previous section. More information: Create an authentication setting record for chat
Associate the authentication settings to the chat widget that will have an authenticated experience. More information: Add authentication to chat widget
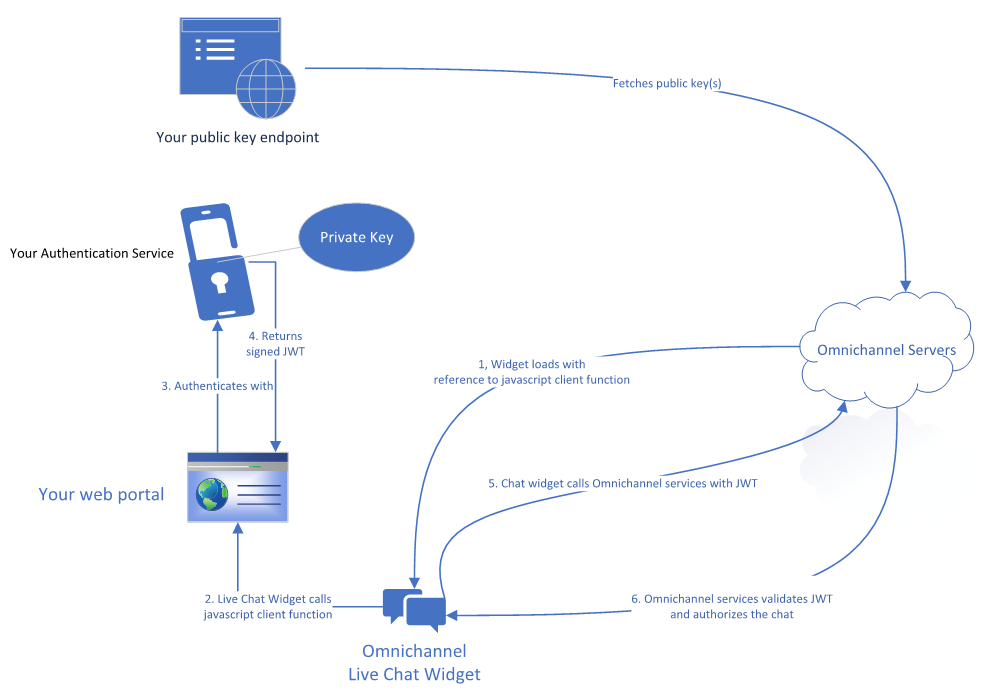
The following illustration demonstrates the call sequence when a user accesses your chat in an authenticated setup.

Create authentication settings for Apple Messages for Business
Prerequisites
Administrators who are configuring authentication settings will need more security permissions. More information: Set up security permissions for a field
Make sure your organization has working knowledge of OAuth 2.0 code flow or OAuth 2.0 OpenID connect flow. Steps for both types are outlined in the following sections.
Confirm that your organization has at least one Apple Messages for Business Authentication type rich message. This rich message is required for setup.
Create an authentication setting record for Apple Messages for Business using OAuth 2.0 code flow
In the Customer Service admin center app site map, select Customer settings, and then select Manage for Authentication settings. A list of existing authentication settings is shown.
Select New authentication setting, and on the Add authentication setting page, provide the following details:
On the Channel type page, enter a name and select Apple Messages for Business as the channel type.
By default, the authentication type is OAuth 2.0 code flow.On the Add authentication setting page, provide the following information:
- Client ID: OAuth 2.0 Client Identifier issued by an authorization server.
- Client secret: Client secret used to authenticate requests sent to an authorization server.
- Scope: Each scope added will specify which pieces of user data you've requested from the customer. The scope content must exactly match the ones available through your service provider.
- Access Token URL: The service provider's endpoint where an access token can be requested.
- Decrypted token URL: Endpoint where the OAuth 2.0 API can retrieve the customer info requested in the scope.
- Client ID: OAuth 2.0 Client Identifier issued by an authorization server.
On the Additional details page, you can optionally define an access token expiry time, in seconds. The default expiry time is one hour.
After the specified time, the Authenticated field in the Active Conversation section of a previously authenticated conversation will change to No.On the Rich messages page, select Add, and then select one or more rich messages to associate to this authentication setting.
Review the Summary page, and then select Finish. The authentication setting is configured.
Create an authentication setting record for Apple Messages for Business using OAuth 2.0 OpenID connect flow
In the Customer Service admin center site map, select Customer settings, and then select Manage for Authentication settings. A list of existing authentication settings is shown.
Select New authentication setting, and on the Add authentication setting page, provide the following details:
On the Channel type page, enter a name and select Apple Messages for Business as the channel type.
Change the authentication type OAuth 2.0 OpenID connect flow.
On the Add authentication setting page, provide the following information:
- Client ID: OAuth 2.0 Client Identifier issued by an authorization server.
- Client secret: Client secret used to authenticate requests sent to an authorization server.
- Scope: Each scope added will specify which pieces of user data you've requested from the customer. The scope content must exactly match the ones available through your service provider.
- Access Token URL: The service provider's endpoint where an access token can be requested.
- Decrypted token URL: Endpoint where the OAuth 2.0 API can retrieve the customer info requested in the scope.
- Additional parameters: Allows authentication services to take extra parameters from the request.
- Client ID: OAuth 2.0 Client Identifier issued by an authorization server.
On the Additional details page, you can optionally define an access token expiry time, in seconds. The default expiry time is one hour.
After the specified time, the Authenticated field in the Customer summary section of a previously authenticated conversation will change to No.On the Rich messages page, select Add, and then select one or more rich messages to associate to this authentication setting.
Review the Summary page, and then select Next. The authentication setting is configured.
On the Redirect information page, copy the URL. You'll add this URL to the authentication service provider's website under allowed callback URLs.
Select Finish.
Add authentication to an Apple Messages for Business channel
Open the workstream containing the channel instance to which you want to add authentication.
On the Behaviors page of the channel settings, navigate to Authentication settings, enable the capability, and select the correct setting from the dropdown menu. More information: Configure an Apple Messages for Business channel
Review or update the authentication settings for each channel instance by selecting Edit.
See also
Add a chat widget
Configure a pre-conversation survey
Create quick replies
Create and manage operating hours
Embed chat widget in Power Apps portals
Automatically identify customers
Feedback
Coming soon: Throughout 2024 we will be phasing out GitHub Issues as the feedback mechanism for content and replacing it with a new feedback system. For more information see: https://aka.ms/ContentUserFeedback.
Submit and view feedback for