Quickstart: Create an Azure Front Door profile - Azure portal
This quickstart guides you through the process of creating an Azure Front Door profile using the Azure portal. You have two options to create an Azure Front Door profile: Quick create and Custom create. The Quick create option allows you to configure the basic settings of your profile, while the Custom create option enables you to customize your profile with more advanced settings.
In this quickstart, you use the Custom create option to create an Azure Front Door profile. You first deploy two App services as your origin servers. Then, you configure the Azure Front Door profile to route traffic to your App services based on certain rules. Finally, you test the connectivity to your App services by accessing the Azure Front Door frontend hostname.
Note
For web workloads, we highly recommend utilizing Azure DDoS protection and a web application firewall to safeguard against emerging DDoS attacks. Another option is to employ Azure Front Door along with a web application firewall. Azure Front Door offers platform-level protection against network-level DDoS attacks. For more information, see security baseline for Azure services.
Prerequisites
An Azure account with an active subscription. Create an account for free.
Create Front Door profile - Quick Create
Sign in to the Azure portal.
To create a new resource for Front Door and CDN profiles, navigate to the home page or the Azure menu and select + Create a resource button. Then, enter Front Door and CDN profiles in the search box and select Create.
On the Compare offerings page, select Quick create. Then select Continue to create a Front Door.
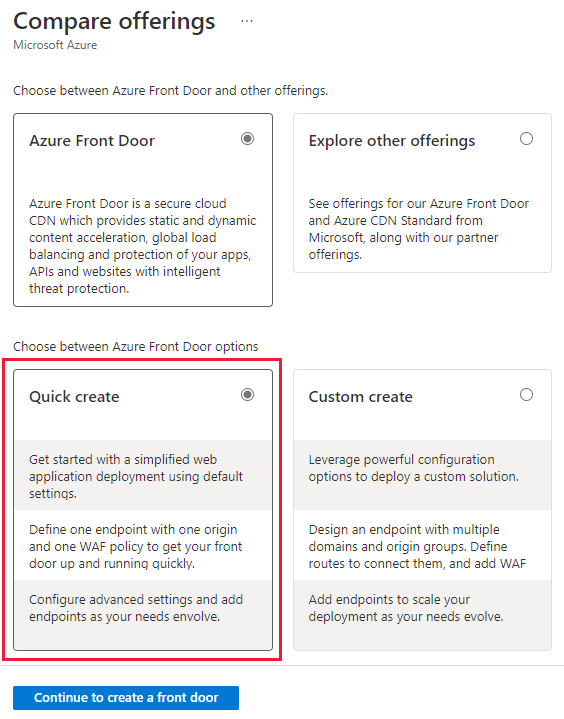
On the Create a Front Door profile page, provide the following information for the required settings.
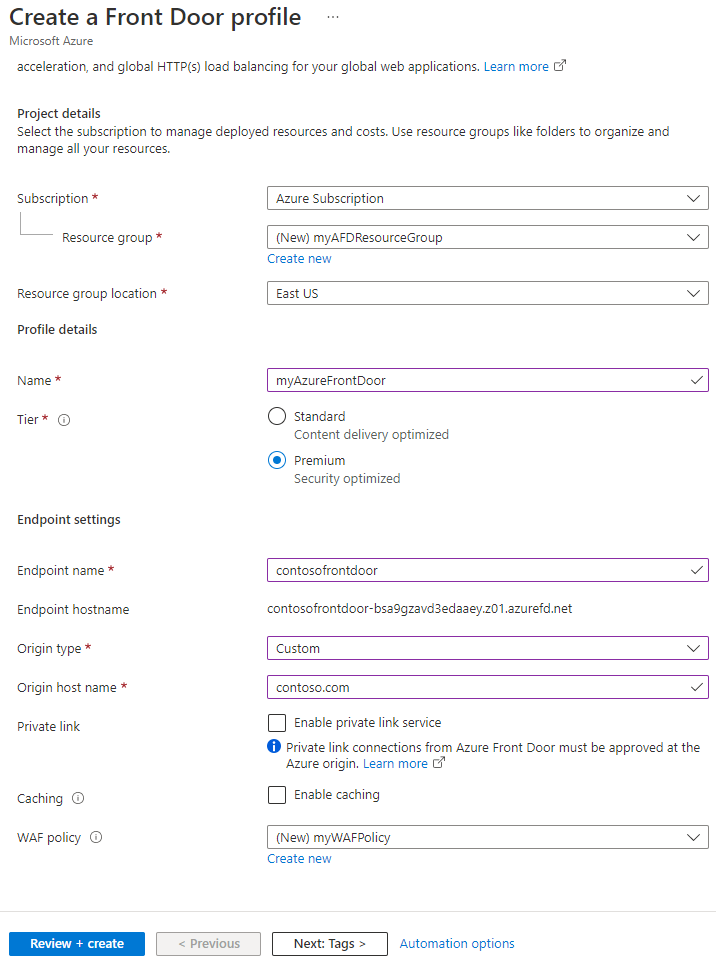
Settings Description Subscription Select your subscription. Resource group Select Create new and enter myAFDResourceGroup in the text box. Name Give your profile a name. This example uses myAzureFrontDoor. Tier Select either Standard or Premium tier. Standard tier is content delivery optimized. Premium tier builds on Standard tier and is focused on security. See Tier Comparison. Endpoint name Enter a globally unique name for your endpoint. Origin type Select the type of resource for your origin. In this example, we select an App service as the origin that has Private Link enabled. Origin host name Enter the hostname for your origin. Private link Enable private link service if you want to have a private connection between your Azure Front Door and your origin. Only internal load balancers, Storage Blobs and App services are supported. For more information, see Private Link service with Azure Front Door. Caching Select the check box if you want to cache contents closer to your users globally using Azure Front Door's edge POPs and the Microsoft network. WAF policy Select Create new or select an existing WAF policy from the dropdown if you want to enable this feature. Note
When creating an Azure Front Door profile, you must select an origin from the same subscription the Front Door is created in.
Select Review + Create and then select Create to deploy your Azure Front Door profile.
Note
- It may take a few minutes for the Azure Front Door configuration to be propagated to all edge POPs.
- If you enabled Private Link, go to the origin's resource page. Select Networking > Configure Private Link. Then select the pending request from Azure Front Door, and select Approve. After a few seconds, your origin will be accessible through Azure Front Door in a secured manner.
Create Front Door profile - Custom Create
In the previous tutorial, you created an Azure Front Door profile through Quick create, which created your profile with basic configurations.
You create an Azure Front Door profile using Custom create and deploy two App services that your Azure Front Door profile uses as your origins.
Create two Web App instances
If you already have services to use as an origin, skip to create a Front Door for your application.
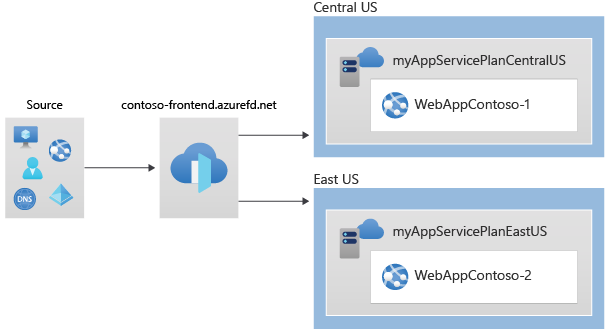
This example demonstrates how to create two Web App instances that are deployed in two different Azure regions. Both web application instances operate in Active/Active mode, which means that they can both handle incoming traffic. This configuration is different from an Active/Stand-By configuration, where one instance serves as a backup for the other.
To create the two Web Apps for this example, follow these steps:
Sign in to the Azure portal.
To start creating the first Web App, select + Create a resource button on the top left corner of the portal. Then, type Web App in the search box and select the Create to proceed with the configuration.
On the Create Web App page, fill in the required information on the Basics tab.
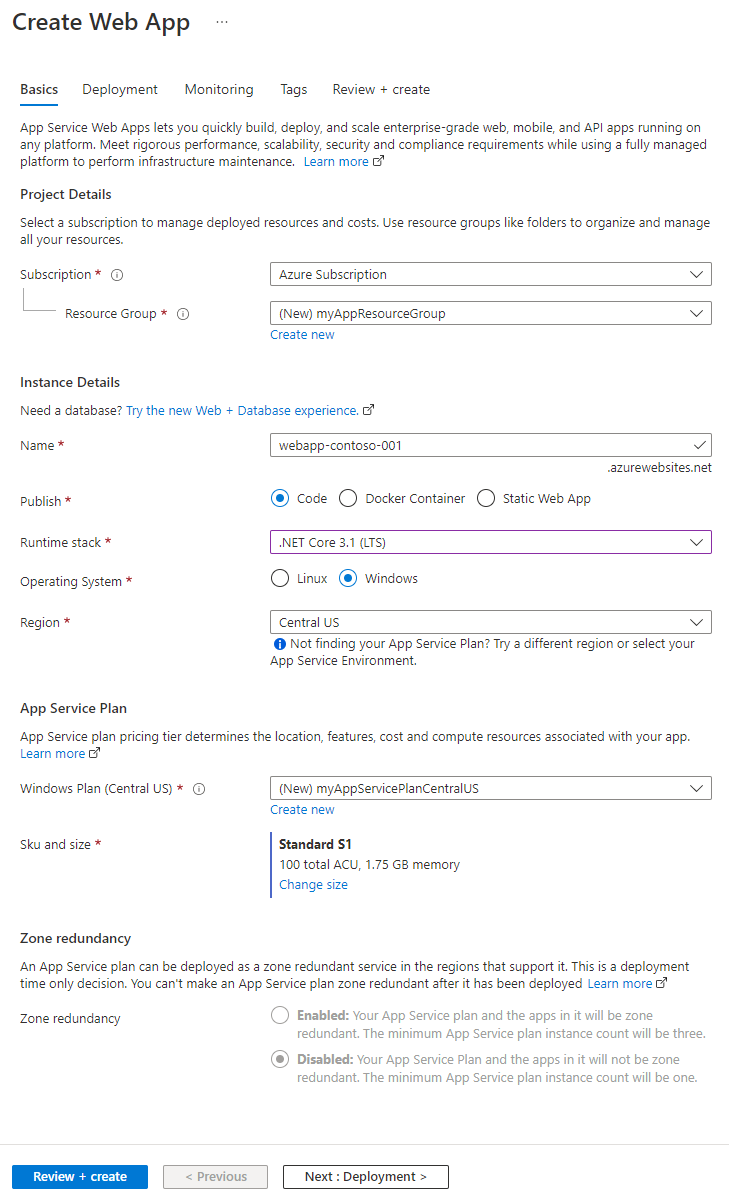
Setting Description Subscription Select your subscription. Resource group Select Create new and enter myAppResourceGroup in the text box. Name Enter a unique Name for your web app. This example uses webapp-contoso-001. Publish Select Code. Runtime stack Select .NET Core 3.1 (LTS). Operating System Select Windows. Region Select Central US. Windows Plan Select Create new and enter myAppServicePlanCentralUS in the text box. Sku and size Select Standard S1 100 total ACU, 1.75-GB memory. To complete the creation of the Web App, select Review + create button and verify the summary of the settings. Then, select the Create button to start the deployment process, which may take up to a minute.
To create a second Web App, follow the same steps as for the first Web App, but make the following changes in the settings:
Setting Description Resource group Select Create new and enter myAppResourceGroup2. Name Enter a unique name for your Web App, in this example, webapp-contoso-002. Region A different region, in this example, South Central US App Service plan > Windows Plan Select New and enter myAppServicePlanSouthCentralUS, and then select OK.
Create a Front Door for your application
In this step, you set up Azure Front Door to route user traffic to the nearest Web App origin based on the latency. You apply a Web Application Firewall (WAF) policy to protect your Azure Front Door from malicious attacks.
Sign in to the Azure portal.
Select + Create a resource from the home page or the Azure menu, search for Front Door and CDN profiles, and select Create.
Select Custom create on the Compare offerings page and then Continue to create a Front Door.
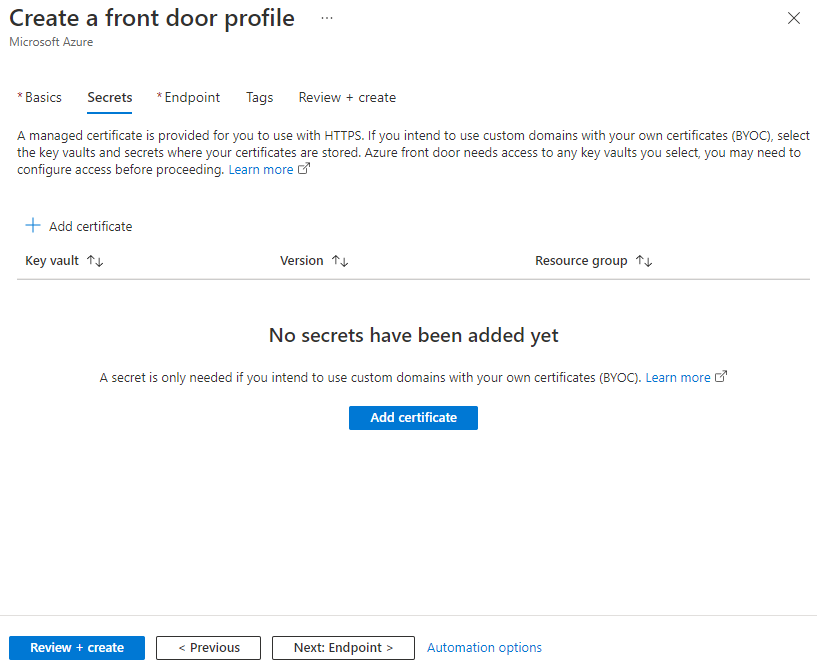
On the Basics tab, enter or select the following information, and then select Next: Secret.
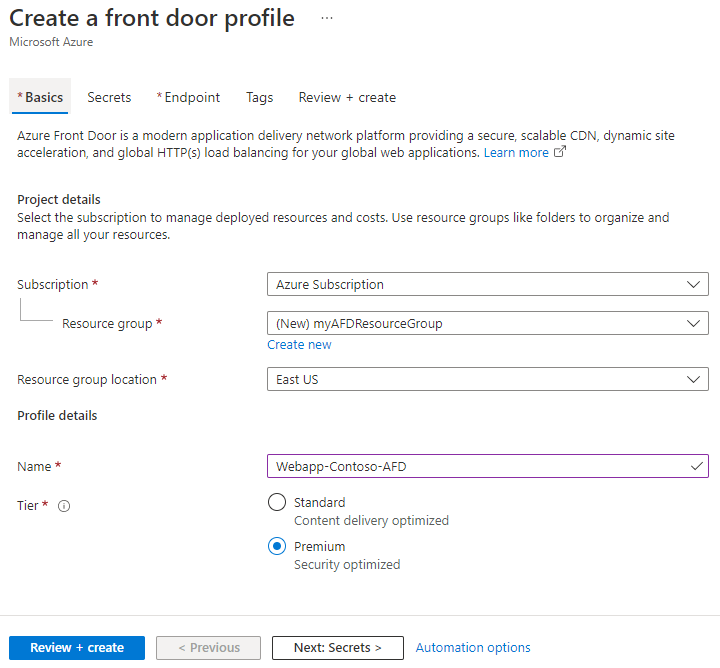
Setting Value Subscription Select your subscription. Resource group Select Create new and enter myAFDResourceGroup into the text box. Resource group location Select East US Name Enter a unique name in this subscription Webapp-Contoso-AFD Tier Select Premium. Optional: Secrets. You can skip this step if you plan to use managed certificates. If you have an existing Key Vault in Azure that contains a certificate for a custom domain, you can select Add a certificate. You can also add a certificate later in the management experience.
Note
To add a certificate from Azure Key Vault as a user, you must have the appropriate permission.
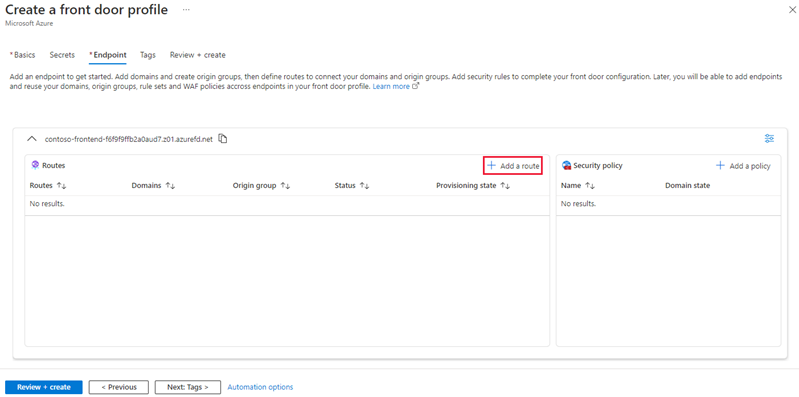
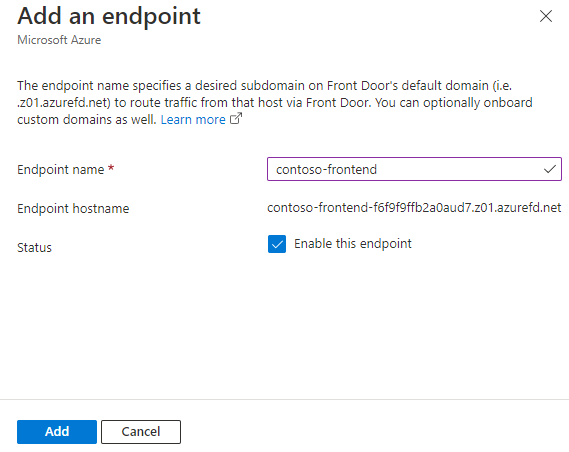
In the Endpoint tab, select Add an endpoint, enter a globally unique name (this example uses contoso-frontend), and select Add. You can create more endpoints after the deployment.
To configure routing to your Web App origin, select + Add a route.
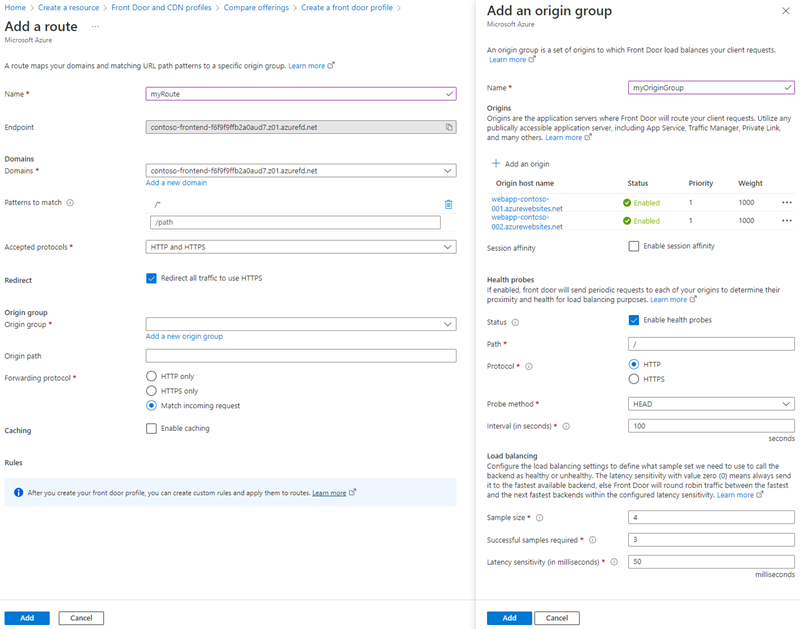
Enter or select the following information on the Add a route page and select Add to add the route to the endpoint configuration.
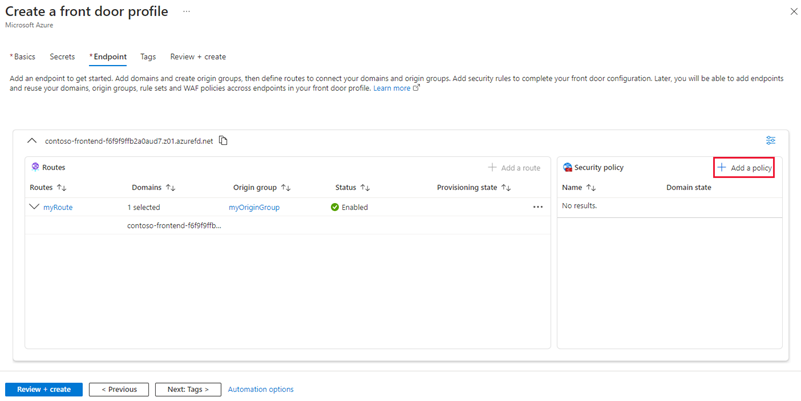
Setting Description Name Provide a name that identifies the mapping between domains and origin group. Domains The system has generated a domain name for you to use. To add a custom domain, select Add a new domain. This example uses the default domain name. Patterns to match Specify the URLs that this route accepts. This example uses the default setting, which accepts all URL paths. Accepted protocols Choose the protocol that the route accepts. This example accepts both HTTP and HTTPS requests. Redirect Turn on this setting to redirect all HTTP requests to the HTTPS endpoint. Origin group To create a new origin group, select Add a new origin group and enter myOriginGroup as the origin group name. Then select + Add an origin and enter WebApp1 for the Name and App services for the Origin Type. In the Host name, select webapp-contoso-001.azurewebsites.net and select Add to add the origin to the origin group. Repeat the steps to add the second Web App as an origin with WebApp2 as the Name and webapp-contoso-002.azurewebsites.net as the Host name. Choose a priority for each origin, with the lowest number having the highest priority. If you need Azure Front Door to serve both origins, use a priority of 1. Choose a weight for each origin, with the weight determining how traffic is routed to the origins. Use equal weights of 1000 if the traffic needs to be routed to both origins equally. Once both Web App origins have been added, select Add to save the origin group configuration. Origin path Don't enter any value. Forwarding protocol Choose the protocol that the origin group receives. This example uses the same protocol as the incoming requests. Caching Mark the check box if you want to use Azure Front Door’s edge POPs and the Microsoft network to cache contents closer to your users globally. Rules After deploying the Azure Front Door profile, you can use Rules to customize your route. Select + Add a policy to apply a Web Application Firewall (WAF) policy to one or more domains in the Azure Front Door profile.
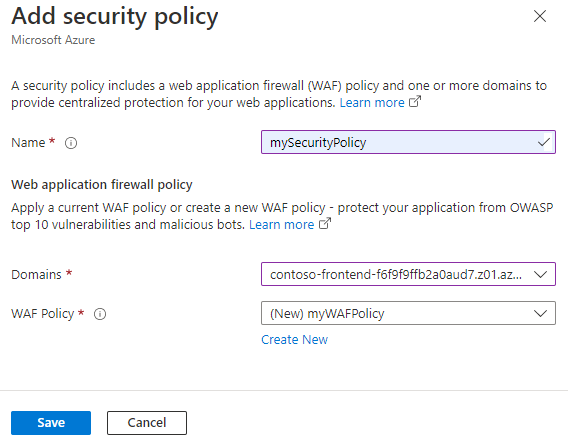
To create a security policy, provide a name that uniquely identifies it. Next, choose the domains that you want to apply the policy to. You can also select an existing WAF policy or create a new one. To finish, select Save to add the security policy to the endpoint configuration.
To deploy the Azure Front Door profile, select Review + Create and then Create. The configurations propagate to all edge locations in a few minutes.
Verify Azure Front Door
The global deployment of the Azure Front Door profile takes a few minutes to complete. After that, you can access the frontend host that you created by entering its endpoint hostname in a browser. For example, contoso-frontend.z01.azurefd.net. The request is automatically routed to the closest server among the specified servers in the origin group.
To test the instant global failover feature, follow these steps if you created the apps in this quickstart. You see an information page with the app details.
To access the frontend host, enter its endpoint hostname in a browser as described previous. For example,
contoso-frontend.z01.azurefd.net.In the Azure portal, find and select App services from the search bar. Locate one of your Web Apps from the list, such as WebApp-Contoso-001.
To stop your web app, select it from the list and then select Stop. Confirm your action by selecting Yes.
Reload the browser to see the information page again.
Tip
The traffic may take some time to switch to the second Web app. You may need to reload the browser again.
To stop the second Web app, select it from the list and then choose Stop. Confirm your action by selecting Yes.
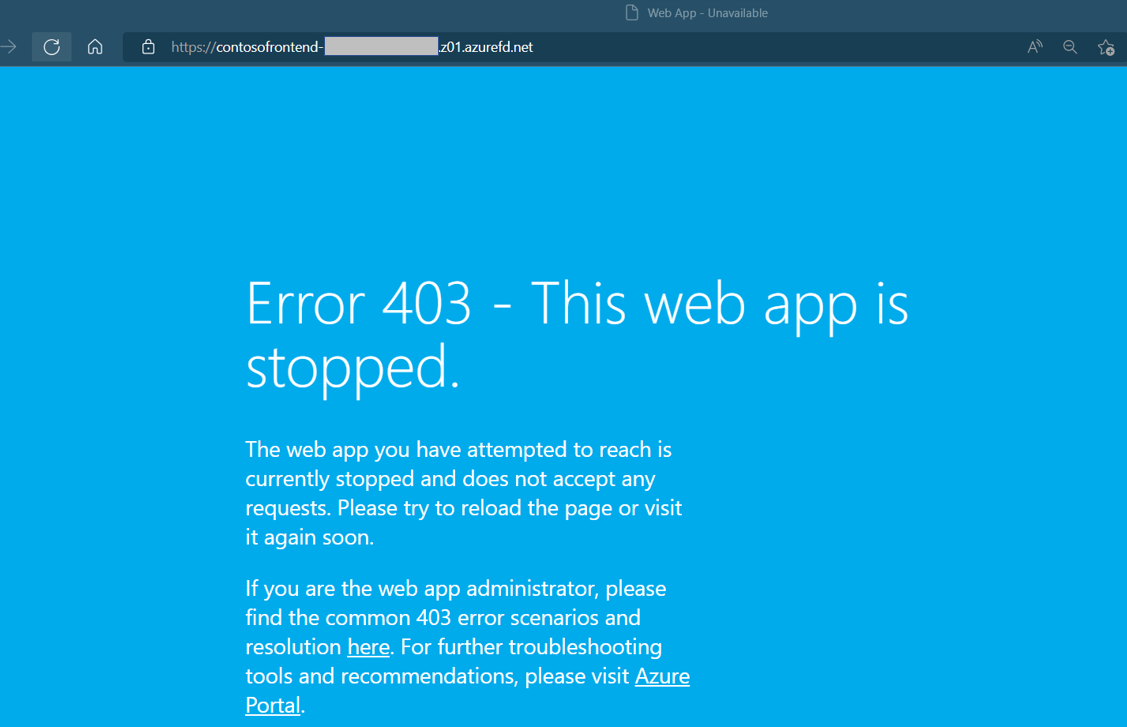
Reload the web page. You should encounter an error message after the refresh.
Clean up resources
Once you have completed the task, you can delete all the resources you created. Removing a resource group also eliminate its contents. To avoid incurring unnecessary charges, we recommend that you delete these resources if you don't plan to use this Azure Front Door.
In the Azure portal, locate and select Resource groups by using the search bar, or navigate to Resource groups from the Azure portal menu.
Use the filter option or scroll down the list to locate a resource group, such as myAFDResourceGroup, myAppResourceGroup or myAppResourceGroup2.
Choose the resource group, then select the option to Delete resource group.
Warning
Deleting a resource group is an irreversible action. The resources within the resource group won't be recoverable once they are deleted.
Enter the name of the resource group to confirm, and then select the Delete button.
Follow the same steps for the remaining two resource groups.
Next steps
Proceed to the next article to learn how to configure a custom domain for your Azure Front Door.
Feedback
Coming soon: Throughout 2024 we will be phasing out GitHub Issues as the feedback mechanism for content and replacing it with a new feedback system. For more information see: https://aka.ms/ContentUserFeedback.
Submit and view feedback for
