Create an import job from Blob Storage to a file system
Azure Managed Lustre integrates with Azure Blob Storage to simplify the process of importing data from a blob container to a file system. You can configure this integration during cluster creation, and you can create an import job any time after the cluster is created.
In this article, you learn how to use the Azure portal to create an import job to import data from a blob container into an existing Azure Managed Lustre file system.
Note
When you import data from a blob container to an Azure Managed Lustre file system, only the file names (namespace) and metadata are imported into the Lustre namespace. The actual contents of a blob are imported when accessed by a client for the first time. When first accessing the data, there's a slight delay while the Lustre Hierarchical Storage Management (HSM) feature pulls in the blob contents to the corresponding file in the file system. This delay only occurs the first time a file is accessed.
You can choose to prefetch the contents of blobs using Lustre's lfs hsm_restore command from a mounted client with sudo capabilities. To learn more, see Restore data from Blob Storage.
Prerequisites
- Existing Azure Managed Lustre file system - create one using the Azure portal, Azure Resource Manager, or Terraform. To learn more about blob integration, see Blob integration prerequisites.
Create an import job
Importing data from a blob container into an Azure Managed Lustre file system begins with creating an import job. In this section, you learn how to create, configure, and start an import job in the Azure portal.
Note
Only one import or export job can run at a time. For example, if an import job is in progress, attempting to start another import or export job returns an error.
Configure import options and start the job
To configure the import options and start the job, follow these steps:
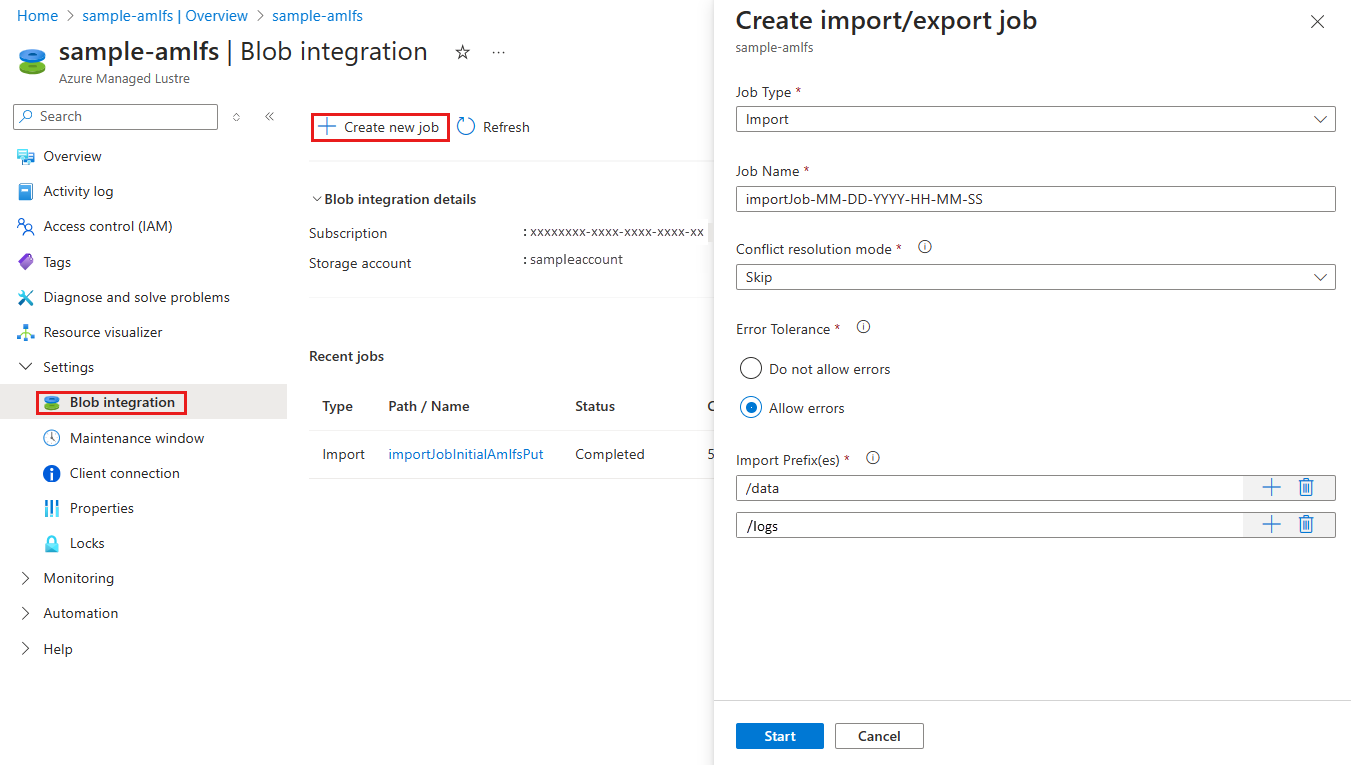
- In the Azure portal, open your Azure Managed Lustre file system and navigate to the Blob integration pane under Settings.
- Select + Create new job.
- Select Import from the Job type dropdown.
- Enter a name for the import job in the Job Name field.
- Choose a value for the Conflict resolution mode field. This setting determines how the import job handles conflicts between existing files in the file system and files being imported. In this example, we select Skip. To learn more, see Conflict resolution mode.
- Select a value for Error tolerance. This setting determines how the import job handles errors that occur during the import process. In this example, we select Allow errors. To learn more, see Error tolerance.
- Enter import prefixes to filter the data imported from Blob Storage. Azure portal allows you to enter up to 10 prefixes. In this example, we specify the prefixes /data and /logs. To learn more, see Import prefix.
- Once the job is configured, select Start to begin the import process.
The following screenshot shows the import job configuration settings in Azure portal:
Monitor the import job
After the import job is created, you can monitor its progress to make sure it completes successfully. In this section, you learn how to monitor the import job in the Azure portal.
To view the job details, follow these steps:
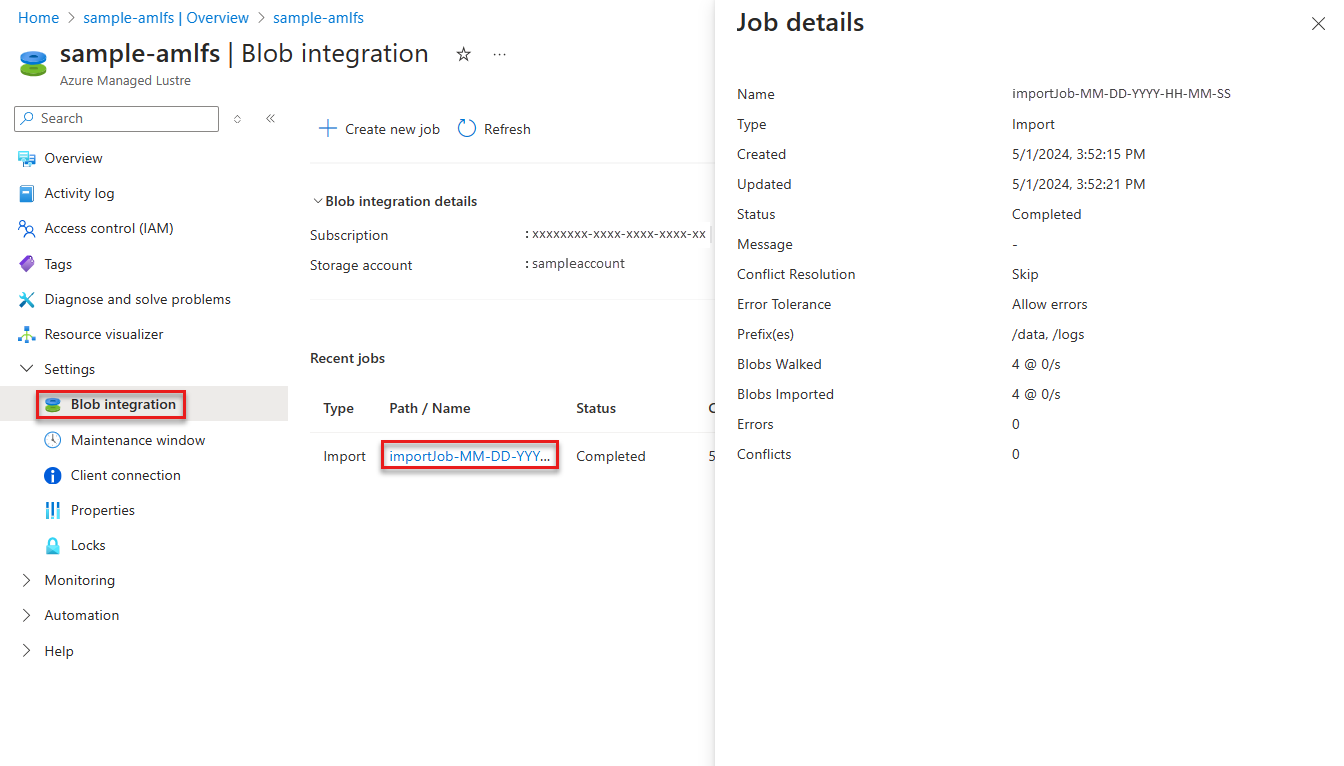
- In the Azure portal, open your Azure Managed Lustre file system and navigate to the Blob integration pane under Settings.
- Select the import job you want to monitor from the list of recent jobs.
- The Job details pane displays information about the job, including the job status, start time, blobs imported, and any errors or conflicts that occurred during the import process.
The following screenshot shows the job details for an import job in the Azure portal:
Once the job completes, you can view the logging container to see detailed information about the import process, including any errors or conflicts that occurred. This information is only available after the job completes.
Next steps
For more information about using Azure Blob Storage with Azure Managed Lustre, see Use Azure Blob storage with an Azure Managed Lustre file system.
Feedback
Coming soon: Throughout 2024 we will be phasing out GitHub Issues as the feedback mechanism for content and replacing it with a new feedback system. For more information see: https://aka.ms/ContentUserFeedback.
Submit and view feedback for

