Define product pricing with price lists and price list items
Use price lists and price list items to define price for a product.
Tip
If you’d like to try Dynamics 365 Sales for free, you can sign up for a 30-day trial.
License and role requirements
| Requirement type | You must have |
|---|---|
| License | Dynamics 365 Sales Premium, Dynamics 365 Sales Enterprise, or Dynamics 365 Sales Professional More information: Dynamics 365 Sales pricing |
| Security roles | Sales Manager, Sales Professional Manager, or Vice President of Sales More information: Predefined security roles for Sales |
What is a price list?
Price lists tell your sales agents what to charge for your products or services. You can create multiple price lists so that you can maintain separate price structures for different regions, sales channels, or sales territories.
Price lists tie the unit, product, and pricing details together, so before you create a price list, make sure the units and products are in place.
Note
- Territories are only supported for Sales Enterprise and Sales Premium licenses.
- The Price list table inherits its privileges from the Product table. For example, if a user has read and write privileges on the Product table, they get the same privileges on the Price list table too.
- You must create at least one price list for each of the currencies that your organization does business in.
Create a price list and price list items
Depending on the sales app that you're using, do one of the following:
- If you're using the Sales Hub app,
- Select Change area
 at the lower-left corner of the site map, and then select App Settings.
 - In the Product Catalog area, select Price Lists.
- Select Change area
- If you're using the Sales Professional app,
- Select Price List from the site map.
- If you're using the Sales Hub app,
To create a new price list, select New.
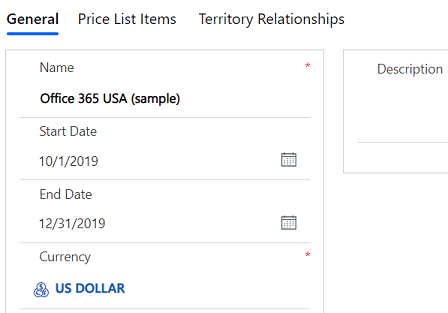
In the price list form, fill in your information, and then select Save.
a. Name. Type a descriptive name for the price list. For example, if you're creating a price list for retail, mention that.
b. Start Date/End Date. Select the start date and end date for the price list. For example, if this is a promotional price list that’s effective only for the promotional period, select that period.
c. Currency. Select the currency you’re creating the price list for. You can have different price list for different currencies.

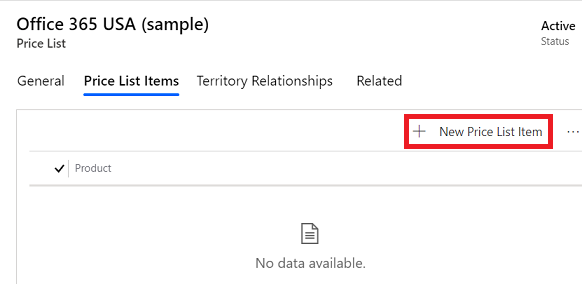
To add price per unit for a product, create and add price list items.
a. In the Price List form, select the Price List Items tab, and then select New Price List Item.

b. In the Price List Item form, fill in the information, and select Save:
Product. Select the product for which you’re creating this price list.
Unit. Select the unit for the product you’re creating this price list for.
Currency. The currency defined for the price list is automatically populated.
Discount List. If you want to offer a discount on the products, select a discount list to the price list item.
Quantity Selling Option. select whether the product or service can be ordered in whole, partial, or both types of quantities. This information is used in the Quantity field of Quote Product, Order Product, and Invoice Product records.

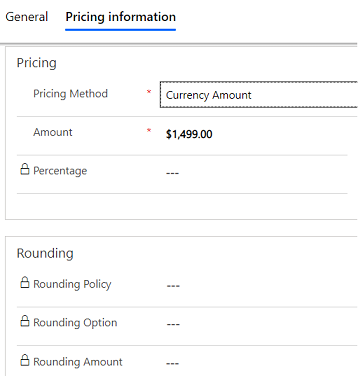
c. In the Price List item form, on the Pricing information tab, fill in the following information, and select Save & Close:
Pricing Method. select an option that determines how the pricing will be calculated. It could be a certain amount, or a percentage of the current or standard cost. The available options are as follows:
Currency Amount. Use this to ignore a product's list price in the product catalog and to enter a different price manually for this price list.
Percent of List. Use this to calculate a product's price in the price list as a percentage of the list price of the associated product.
Percent Markup - Current Cost. Use this to add a percent markup on top of the current cost of the product.
Percent Markup - Standard Cost. Use this to add a percent markup on top of the standard cost of the product.
Percent Margin - Current Cost. Use this for the price offered in the price list to yield a percentage margin of the current cost of the product.
Percent Margin - Standard Cost. Use this for the price offered in the price list to yield a percentage margin of the standard cost of the product.
Amount. If you selected Currency Amount as the pricing method, type the amount at which the product will be sold.
Percentage. If you selected any value other than Currency Amount as the pricing method, type the percentage for the pricing method that you want.
Rounding Policy. If you selected a pricing method other than Currency Amount, you can set up a rounding policy. For example, if you want per unit prices to be in the form of $0.99, you can select a rounding policy where all prices per unit automatically have a price that ends in 99 cents. To do this, you select the rounding policy to round up the price, and then set the price to end in a certain amount, such as 99 cents.
None. Prices are not rounded.
Up. Prices are rounded up to the nearest rounding amount.
Down. Prices are rounded down to the nearest rounding amount.
To Nearest. Prices are rounded to the nearest rounding amount.
Rounding Option. Select Ends in or Multiple of if you want the price to end in a certain amount or multiples of a certain amount.
Rounding Amount. Enter the amount.

(Applicable for Sales Premium and Sales Enterprise) You can also associate default price lists for territories so that the sales reps working with accounts and contacts in certain territories have the price list selected by default.
a. In the price list record, select the Territory Relationship tab.
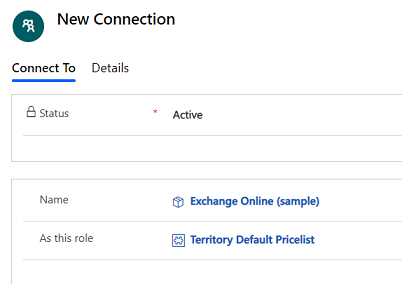
b. In the Territories section, select Add New Connection.
c. In the New Connection form, enter the following, and select Save & Close:
Name. Select the Lookup button and select a territory.
As this role. Select a connection role that is associated with the territory record type.

d. In the price list record, select Save & Close.
Typical next steps
 Publish a product or bundle to make it available for selling
 Set up a product catalog: Walkthrough
Can't find the options in your app?
There are three possibilities:
- You don't have the necessary license or role.
- Your administrator hasn't turned on the feature.
- Your organization is using a custom app. Check with your administrator for exact steps. The steps described in this article are specific to the out-of-the-box Sales Hub and Sales Professional apps.
See also
System Settings dialog box - Sales tab
Classify products and bundles into product families
Price calculation for opportunity, quote, order, and invoice records
Feedback
Coming soon: Throughout 2024 we will be phasing out GitHub Issues as the feedback mechanism for content and replacing it with a new feedback system. For more information see: https://aka.ms/ContentUserFeedback.
Submit and view feedback for