Provision SQL Server on Azure VM (Azure portal)
Applies to:
SQL Server on Azure VM
This article provides a detailed description of the available configuration options when deploying your SQL Server on Azure Virtual Machines (VMs) by using the Azure portal. For a quick guide, see the SQL Server VM quickstart instead.
Prerequisites
An Azure subscription. Create a free account to get started.
Choose Marketplace image
Use the Azure Marketplace to choose one of several pre-configured images from the virtual machine gallery.
The Developer edition is used in this article because it is a full-featured, free edition of SQL Server for development testing. You pay only for the cost of running the VM. However, you are free to choose any of the images to use in this walkthrough. For a description of available images, see the SQL Server Windows Virtual Machines overview.
Licensing costs for SQL Server are incorporated into the per-second pricing of the VM you create and varies by edition and cores. However, SQL Server Developer edition is free for development and testing, not production. Also, SQL Express is free for lightweight workloads (less than 1 GB of memory, less than 10 GB of storage). You can also bring-your-own-license (BYOL) and pay only for the VM. Those image names are prefixed with {BYOL}. For more information on these options, see Pricing guidance for SQL Server Azure VMs.
To choose an image, follow these steps:
Select Azure SQL in the left-hand menu of the Azure portal. If Azure SQL is not in the list, select All services, then type Azure SQL in the search box. You can select the star next to Azure SQL to save it as a favorite to pin it to the left-hand navigation.
Select + Create to open the Select SQL deployment option page. Select the Image dropdown list and then type 2019 in the SQL Server image search box. Choose a SQL Server image, such as Free SQL Server License: SQL 2019 on Windows Server 2019 from the dropdown list. Choose Show details for additional information about the image.
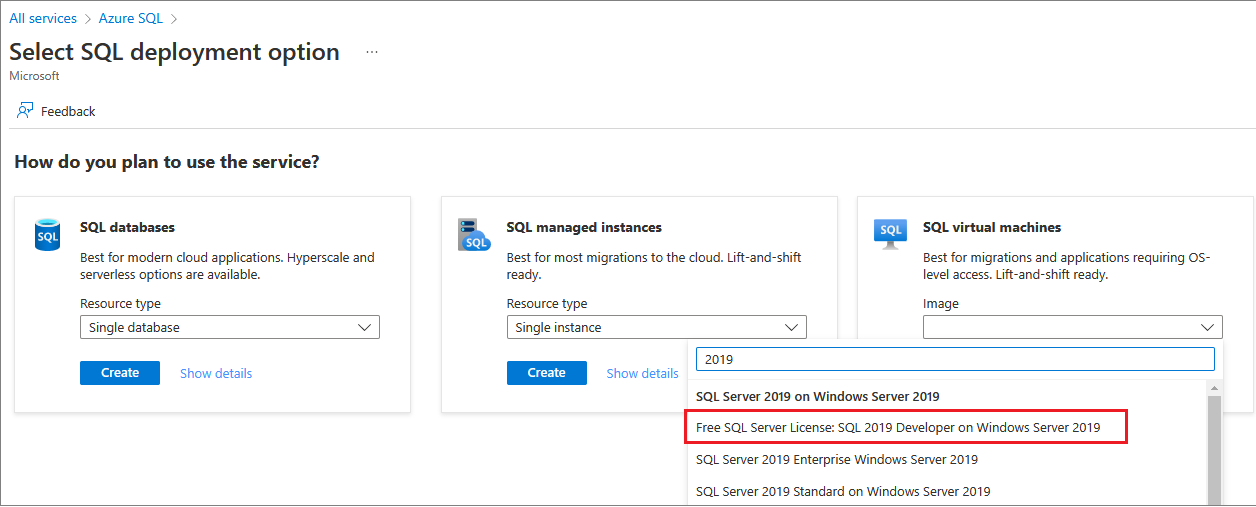
Select Create.
Note
SQL Server 2008 and SQL Server 2008 R2 are out of extended support and no longer available from the Azure Marketplace.
Basic settings
The Basics tab allows you to select the subscription, resource group, and instance details.
Using a new resource group is helpful if you are just testing or learning about SQL Server deployments in Azure. After you finish with your test, delete the resource group to automatically delete the VM and all resources associated with that resource group. For more information about resource groups, see Azure Resource Manager Overview.
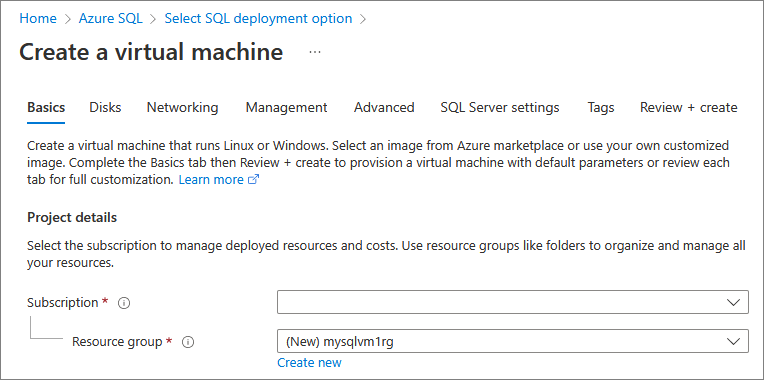
On the Basics tab, provide the following information:
- Under Project Details, make sure the correct subscription is selected.
- In the Resource group section, either select an existing resource group from the list or choose Create new to create a new resource group. A resource group is a collection of related resources in Azure (virtual machines, storage accounts, virtual networks, etc.).
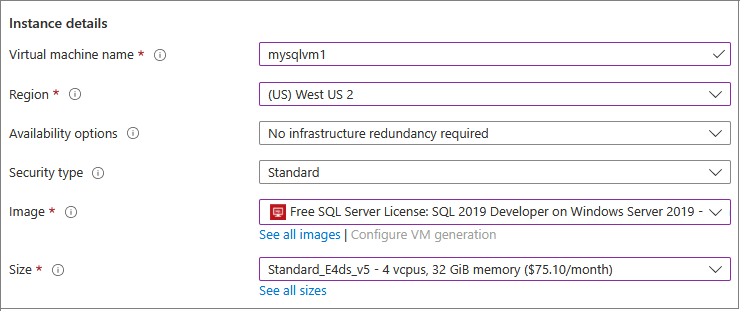
Under Instance details:
- Enter a unique Virtual machine name.
- Choose a location for your Region.
- For the purpose of this guide, leave Availability options set to No infrastructure redundancy required. To find out more information about availability options, see Availability.
- In the Image list, select Free SQL Server License: SQL Server 2019 Developer on Windows Server 2019 if it's not already selected.
- Choose Standard for Security type.
- Select See all sizes for the Size of the virtual machine and search for the E4ds_v5 offering. This is one of the minimum recommended VM sizes for SQL Server on Azure VMs. If this is for testing purposes, be sure to clean up your resources once you're done with them to prevent any unexpected charges. For production workloads, see the recommended machine sizes and configuration in Performance best practices for SQL Server in Azure Virtual Machines.
Important
The estimated monthly cost displayed on the Choose a size window does not include SQL Server licensing costs. This estimate is the cost of the VM alone. For the Express and Developer editions of SQL Server, this estimate is the total estimated cost. For other editions, see the Windows Virtual Machines pricing page and select your target edition of SQL Server. Also see the Pricing guidance for SQL Server Azure VMs and Sizes for virtual machines.
Under Administrator account, provide a username and password. The password must be at least 12 characters long and meet the defined complexity requirements.

Under Inbound port rules, choose Allow selected ports and then select RDP (3389) from the dropdown list.

You also have the option to enable the Azure Hybrid Benefit to use your own SQL Server license and save on licensing cost.
Disks
On the Disks tab, configure your disk options.
- Under OS disk type, select the type of disk you want for your OS from the dropdown list. Premium is recommended for production systems but is not available for a Basic VM. To use a Premium SSD, change the virtual machine size.
- Under Advanced, select Yes under use Managed Disks.
Microsoft recommends Managed Disks for SQL Server. Managed Disks handles storage behind the scenes. In addition, when virtual machines with Managed Disks are in the same availability set, Azure distributes the storage resources to provide appropriate redundancy. For more information, see Azure Managed Disks Overview. For specifics about managed disks in an availability set, see Use managed disks for VMs in availability set.
Networking
On the Networking tab, configure your networking options.
Create a new virtual network or use an existing virtual network for your SQL Server VM. Designate a Subnet as well.
Under NIC network security group, select either a basic security group or the advanced security group. Choosing the basic option allows you to select inbound ports for the SQL Server VM which are the same values configured on the Basic tab. Selecting the advanced option allows you to choose an existing network security group, or create a new one.
You can make other changes to network settings, or keep the default values.
Management
On the Management tab, configure monitoring and auto-shutdown.
- Azure enables Boot diagnostics by default with the same storage account designated for the VM. On this tab, you can change these settings and enable OS guest diagnostics.
- You can also enable System assigned managed identity and auto-shutdown on this tab.
SQL Server settings
On the SQL Server settings tab, configure specific settings and optimizations for SQL Server. You can configure the following settings for SQL Server:
- Connectivity
- Authentication
- Azure Key Vault integration
- Storage configuration
- SQL instance settings
- Automated patching
- Automated backup
- Machine Learning Services
Connectivity
Under SQL connectivity, specify the type of access you want to the SQL Server instance on this VM. For the purposes of this walkthrough, select Public (internet) to allow connections to SQL Server from machines or services on the internet. With this option selected, Azure automatically configures the firewall and the network security group to allow traffic on the port selected.
Tip
By default, SQL Server listens on a well-known port, 1433. For increased security, change the port in the previous dialog to listen on a non-default port, such as 1401. If you change the port, you must connect using that port from any client tools, such as SQL Server Management Studio (SSMS).

To connect to SQL Server via the internet, you also must enable SQL Server Authentication, which is described in the next section.
If you would prefer to not enable connections to the Database Engine via the internet, choose one of the following options:
- Local (inside VM only) to allow connections to SQL Server only from within the VM.
- Private (within Virtual Network) to allow connections to SQL Server from machines or services in the same virtual network.
In general, improve security by choosing the most restrictive connectivity that your scenario allows. But all the options are securable through network security group (NSG) rules and SQL/Windows Authentication. You can edit the NSG after the VM is created. For more information, see Security Considerations for SQL Server in Azure Virtual Machines.
Authentication
If you require SQL Server Authentication, select Enable under SQL Authentication on the SQL Server settings tab.

Note
If you plan to access SQL Server over the internet (the Public connectivity option), you must enable SQL Authentication here. Public access to the SQL Server requires SQL Authentication.
If you enable SQL Server Authentication, specify a Login name and Password. This login name is configured as a SQL Server Authentication login and a member of the sysadmin fixed server role. For more information about Authentication Modes, see Choose an Authentication Mode.
If you prefer not to enable SQL Server Authentication, you can use the local Administrator account on the VM to connect to the SQL Server instance.
Azure Key Vault integration
To store security secrets in Azure for encryption, select SQL Server settings, and scroll down to Azure key vault integration. Select Enable and fill in the requested information.

The following table lists the parameters required to configure Azure Key Vault (AKV) Integration.
| PARAMETER | DESCRIPTION | EXAMPLE |
|---|---|---|
| Key Vault URL | The location of the key vault. | https://contosokeyvault.vault.azure.net/ |
| Principal name | Microsoft Entra service principal name. This name is also referred to as the Client ID. | fde2b411-33d5-4e11-af04eb07b669ccf2 |
| Principal secret | Microsoft Entra service principal secret. This secret is also referred to as the Client Secret. | 9VTJSQwzlFepD8XODnzy8n2V01Jd8dAjwm/azF1XDKM= |
| Credential name | Credential name: AKV Integration creates a credential within SQL Server and allows the VM to access the key vault. Choose a name for this credential. | mycred1 |
For more information, see Configure Azure Key Vault Integration for SQL Server on Azure VMs.
Storage configuration
On the SQL Server settings tab, under Storage configuration, select Change configuration to open the Configure storage page and specify storage requirements. You can choose to leave the values at default, or you can manually change the storage topology to suit your IOPS needs. For more information, see storage configuration.
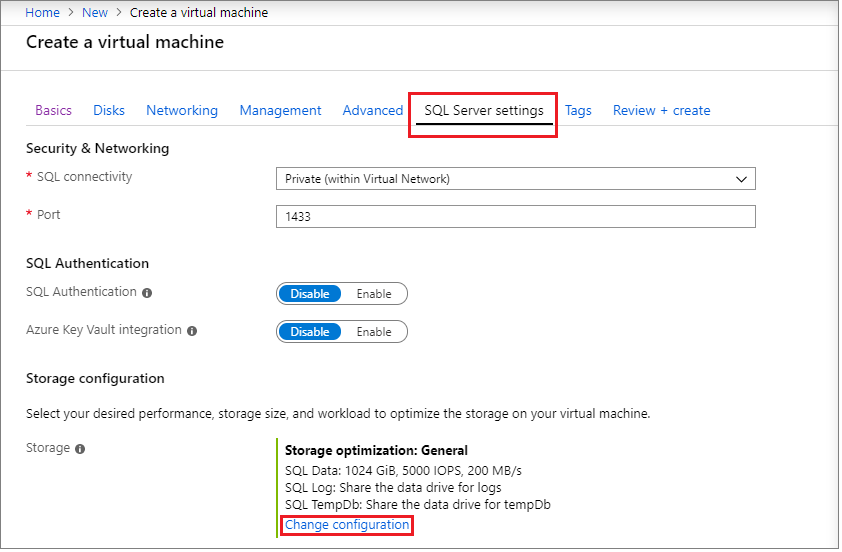
Under Data storage, choose the location for your data drive, the disk type, and the number of disks. You can also select the checkbox to store your system databases on your data drive instead of the local C:\ drive.
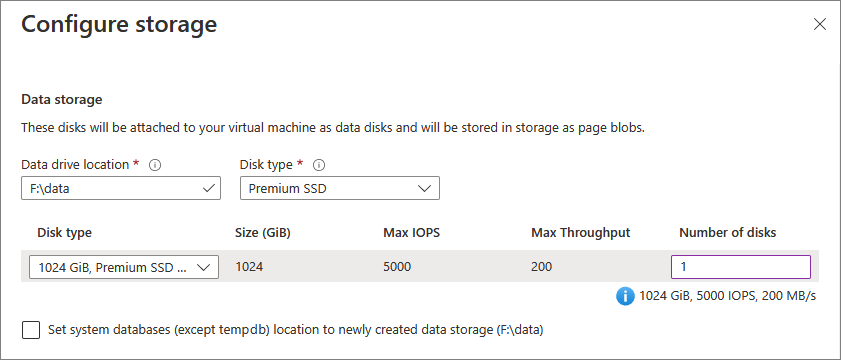
Under Log storage, you can choose to use the same drive as the data drive for your transaction log files, or you can choose to use a separate drive from the dropdown list. You can also choose the name of the drive, the disk type, and the number of disks.

Configure your tempdb database settings under TempDb storage, such as the location of the database files, as well as the number of files, initial size, and autogrowth size in MB.
- Currently, during deployment, the max number of
tempdbfiles is 8, but more files can be added after the SQL Server VM is deployed. - If you configure the SQL Server instance
tempdbon the D: local SSD volume as recommended, the SQL IaaS Agent extension will manage the folder and permissions needed upon re-provisioning.
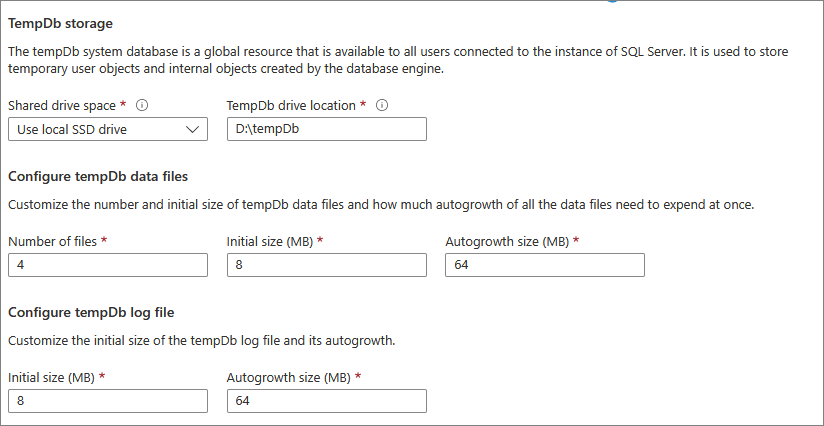
Select OK to save your storage configuration settings.
SQL instance settings
Select Change SQL instance settings to modify SQL Server configuration options, such as the server collation, max degree of parallelism (MAXDOP), SQL Server min and max memory limits, and whether you want to enable the optimize for ad hoc workloads option.

SQL Server license
If you're a Software Assurance customer, you can use the Azure Hybrid Benefit to bring your own SQL Server license and save on resources. Select Yes to enable the Azure Hybrid Benefit, and then confirm that you have Software Assurance by selecting the checkbox.

If you chose a free license image, such as the developer edition, the SQL Server license option is grayed out.
Automated patching
Automated patching is enabled by default. Automated Patching allows Azure to automatically apply SQL Server and operating system security updates. Specify a day of the week, time, and duration for a maintenance window. Azure performs patching in this maintenance window. The maintenance window schedule uses the VM locale. If you do not want Azure to automatically patch SQL Server and the operating system, select Disable.
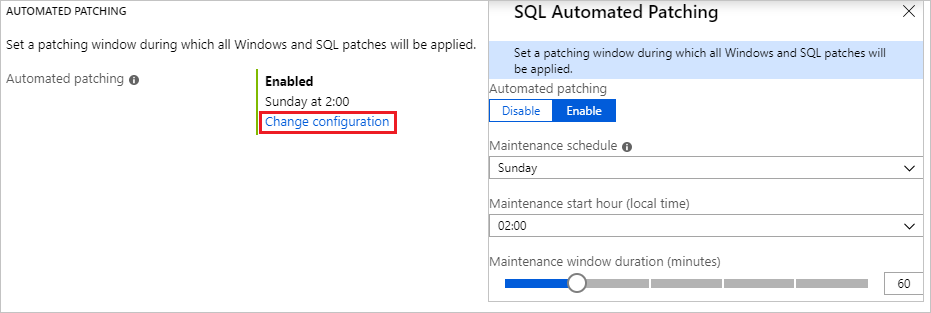
For improved patching management, which also includes Cumulative Updates, try the integrated Azure Update Manager experience after your SQL Server VM finishes deployment.
Automated backup
Enable automatic database backups for all databases under Automated backup. Automated backup is disabled by default.
When you enable SQL automated backup, you can configure the following settings:
- Retention period for backups (up to 90 days)
- Storage account, and storage container, to use for backups
- Encryption option and password for backups
- Backup system databases
- Configure backup schedule
To encrypt the backup, select Enable. Then specify the Password. Azure creates a certificate to encrypt the backups and uses the specified password to protect that certificate.
Choose Select Storage Container to specify the container where you want to store your backups.
By default the schedule is set automatically, but you can create your own schedule by selecting Manual, which allows you to configure the backup frequency, backup time window, and the log backup frequency in minutes.
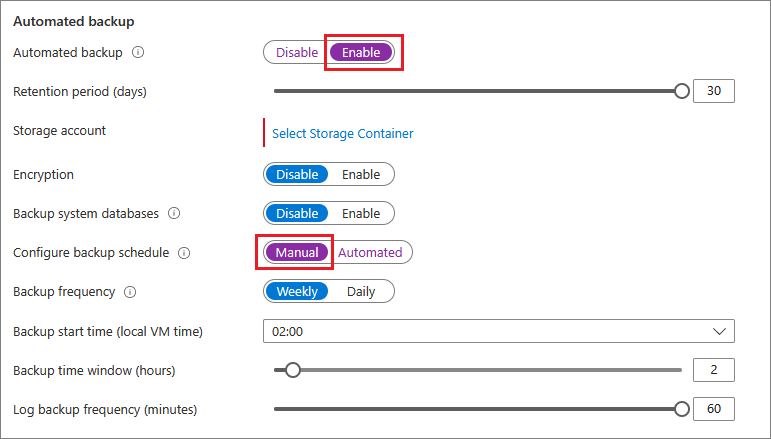
For more information, see Automated Backup for SQL Server in Azure Virtual Machines.
Machine Learning Services
You have the option to enable Machine Learning Services. This option lets you use machine learning with Python and R in SQL Server 2017. Select Enable on the SQL Server Settings window. Enabling this feature from the Azure portal after the SQL Server VM is deployed will trigger a restart of the SQL Server service.
Review + create
On the Review + create tab:
- Review the summary.
- Select Create to create the SQL Server, resource group, and resources specified for this VM.
You can monitor the deployment from the Azure portal. The Notifications button at the top of the screen shows basic status of the deployment.
Note
An example of time for Azure to deploy a SQL Server VM: A test SQL Server VM provisioned to the East US region with default settings takes approximately 12 minutes to complete. You might experience faster or slower deployment times based on your region and selected settings.
Open the VM with Remote Desktop
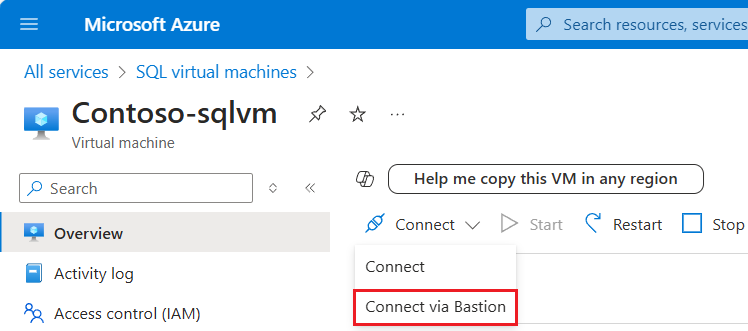
Use the following steps to connect to the SQL Server virtual machine with Remote Desktop Protocol (RDP):
After the Azure virtual machine is created and running, select Virtual machine, and then choose your new VM.
Select Connect and then choose RDP from the drop-down to download your RDP file.
Open the RDP file that your browser downloads for the VM.
The Remote Desktop Connection notifies you that the publisher of this remote connection cannot be identified. Click Connect to continue.
In the Windows Security dialog, click Use a different account. You might have to click More choices to see this. Specify the user name and password that you configured when you created the VM. You must add a backslash before the user name.
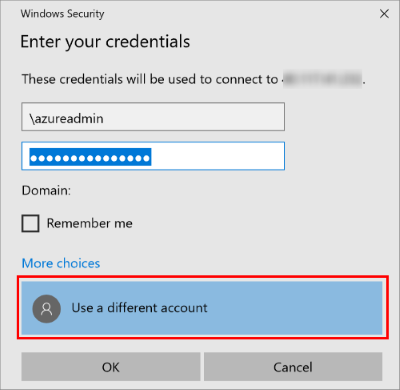
Click OK to connect.
After you connect to the SQL Server virtual machine, you can launch SQL Server Management Studio and connect with Windows Authentication using your local administrator credentials. If you enabled SQL Server Authentication, you can also connect with SQL Authentication using the SQL login and password you configured during provisioning.
Access to the machine enables you to directly change machine and SQL Server settings based on your requirements. For example, you could configure the firewall settings or change SQL Server configuration settings.
Connect to SQL Server remotely
In this walkthrough, you selected Public access for the virtual machine and SQL Server Authentication. These settings automatically configured the virtual machine to allow SQL Server connections from any client over the internet (assuming they have the correct SQL login).
The following sections show how to connect over the internet to your SQL Server VM instance.
Configure a DNS Label for the public IP address
To connect to the SQL Server Database Engine from the Internet, consider creating a DNS Label for your public IP address. You can connect by IP address, but the DNS Label creates an A Record that is easier to identify and abstracts the underlying public IP address.
Note
DNS Labels are not required if you plan to only connect to the SQL Server instance within the same Virtual Network or only locally.
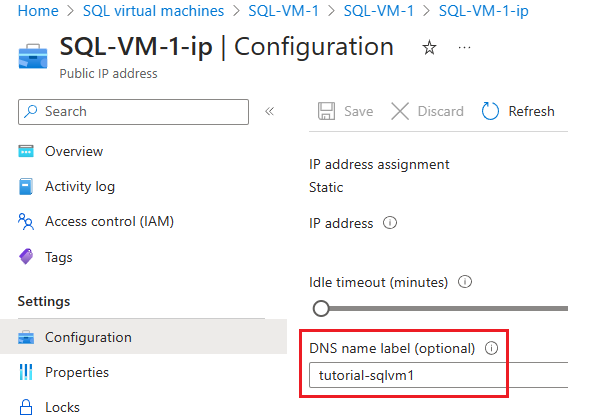
To create a DNS Label, first select Virtual machines in the portal. Select your SQL Server VM to bring up its properties.
In the virtual machine overview, select your Public IP address.

In the properties for your Public IP address, expand Configuration.
Enter a DNS Label name. This name is an A Record that can be used to connect to your SQL Server VM by name instead of by IP Address directly.
Select the Save button.
Connect to the Database Engine from another computer
On a computer connected to the internet, open SQL Server Management Studio (SSMS). If you do not have SQL Server Management Studio, you can download it here.
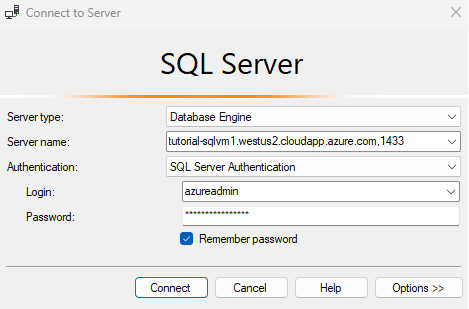
In the Connect to Server or Connect to Database Engine dialog box, edit the Server name value. Enter the IP address or full DNS name of the virtual machine (determined in the previous task). You can also add a comma and provide SQL Server's TCP port. For example,
tutorial-sqlvm1.westus2.cloudapp.azure.com,1433.In the Authentication box, select SQL Server Authentication.
In the Login box, type the name of a valid SQL login.
In the Password box, type the password of the login.
Select Connect.
Note
This example uses the common port 1433. However, this value will need to be modified if a different port (such as 1401) was specified during the deployment of the SQL Server VM.
Known Issues
I am unable to change the SQL Binary files installation path
SQL Server images from Azure Marketplace install the SQL Server binaries to the C drive. It is not currently possible to change this during deployment. The only available workaround is to manually uninstall SQL Server from within the VM, then reinstall SQL Server and choose a different location for the binary files during the installation process.
Related content
Feedback
Coming soon: Throughout 2024 we will be phasing out GitHub Issues as the feedback mechanism for content and replacing it with a new feedback system. For more information see: https://aka.ms/ContentUserFeedback.
Submit and view feedback for