Create a survey invitation
If you want to send a survey by using a platform other than Dynamics 365 Customer Voice—such as Outlook, Gmail, or SMS—you can create a survey invitation by using Power Automate. The survey invitation creates a personalized link that can be distributed by using the platform of your choice. The survey invitation link is a short URL that can be easily distributed by the platforms that have a lower character limit (for example, SMS or Twitter). The short URL is in the following format: https://<region>.microsoft.com/<10-digit code>
Note
- When you create a survey invitation, the email address is considered as-is, and is not validated for correctness.
- Once you create a survey invitation, it can't be updated. If some update is required, you must create a new invitation link.
- The output of this action will be InviteId, InviteUrl, and UnsubscribeUrl.
Sign in to flow.microsoft.com.
Start to create a flow from scratch. More information: Create a flow in Power Automate
In the flow editor, add a trigger to start your flow.
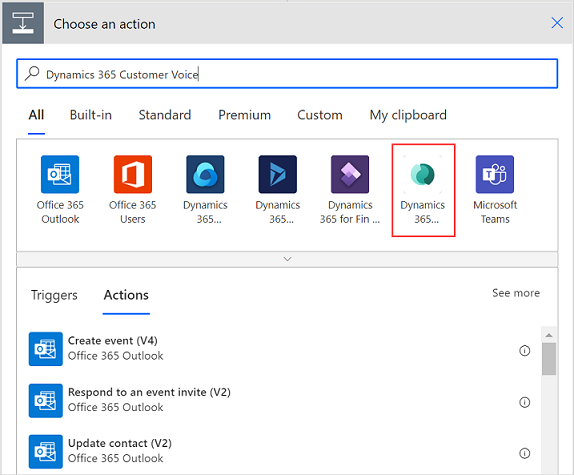
After adding the trigger, add a new step, and search for the Dynamics 365 Customer Voice connector.
In search results, select Dynamics 365 Customer Voice.

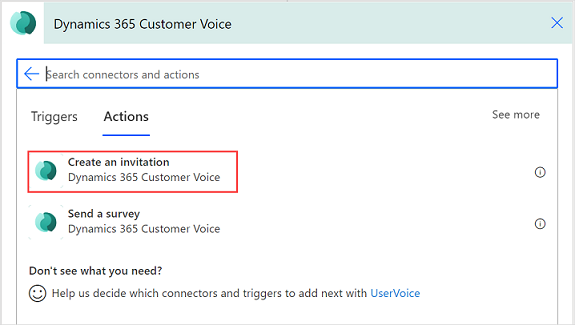
Select the Create an invitation action.

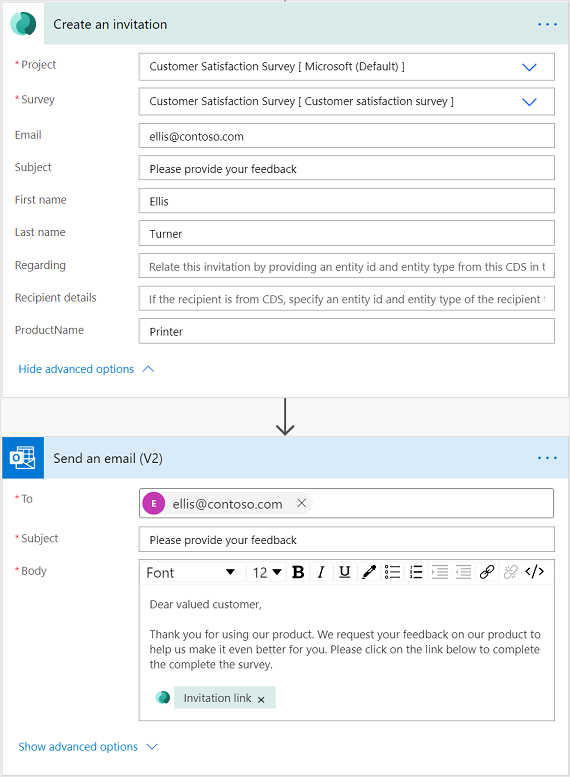
In the Create an invitation action, enter or select the following information:
- Project: Select the project that contains a survey to be sent.
- Survey: Select the survey to be sent.
- Email: Enter the recipient's email address.
- Subject: Enter the subject of the survey invitation.
- Regarding: Specify a record to associate the survey invitation and response. This value is stored in the survey invitation's Regarding field.
Note
- You must enter a table's logical name in this field. For example, if you want to associate the Case table, you must enter incident, as it is the logical name of the Case table. Similarly, if you create a custom table with its display name as Custom Table and its logical name as new_customtable, you must enter new_customtable in this field.
- Only tables that are marked for collaboration in activities are supported. For example, the Task table is not supported.
- Recipient details: Specify a contact to associate your survey invitation and response records with. This value is stored in the survey invitation's To field. Only a Contact record is supported in this field.
Note
- You must enter a value either in Email or Recipient details field for executing the Create an invitation action.
- If you want to associate your survey invitation and response with Microsoft Dataverse, you must enter values in Regarding and Recipient details fields, respectively. You must also ensure that Save invited participants as Contacts is turned on in survey distribution settings. If Save invited participants as Contacts isn't turned on, the survey invitation's To field isn't populated. For more information about Regarding and Recipient details fields and how they're stored in the survey invitation, see Send a survey action.
- If you've used variables in your survey, they'll be visible in this action and you can specify the values accordingly. More information: Specify values in a flow
- Once invites are created, they are saved in Microsoft Dataverse. The process of saving invites in Microsoft Dataverse is asynchronous and may take some time. It is recommended that you wait for a few minutes before you use the invite for further processing. You can either add a delay after the Create an invitation action or create two separate flows, one for creating invites and another for sending invites. You can then trigger the second flow based on the creation of invites in Microsoft Dataverse.
Add a new step, and then select the action to send the email. You can use providers such as Outlook, Gmail, or SMS; we've used Outlook to send the survey in this procedure.
In the Send an email action, do the following:
- To: Enter the recipient's email address.
- Subject: Enter the subject of the email.
- Body: Enter the text you want for the body of the email, and add the Invitation link dynamic content.
After you enter the required details, the flow looks as shown in the following image:

The flow runs in accordance with the configured trigger, and then sends the survey.
See also
Work with survey distribution settings
Send a survey by using the built-in email composer
Send a survey by using Power Automate
Embed a survey in a webpage
Send a survey link to others
Send a survey by using QR code
Feedback
Coming soon: Throughout 2024 we will be phasing out GitHub Issues as the feedback mechanism for content and replacing it with a new feedback system. For more information see: https://aka.ms/ContentUserFeedback.
Submit and view feedback for