Learn the basics of the Customer Service Hub
Open the Customer Service Hub
The Customer Service Hub app is available to use on a desktop browser and on a mobile device for managing knowledge articles and case management. You can open the Customer Service Hub in one the following ways:
Note
These options are available only to users with the Customer Service app access role, System Administrator role, or System Customizer role.
Desktop browser
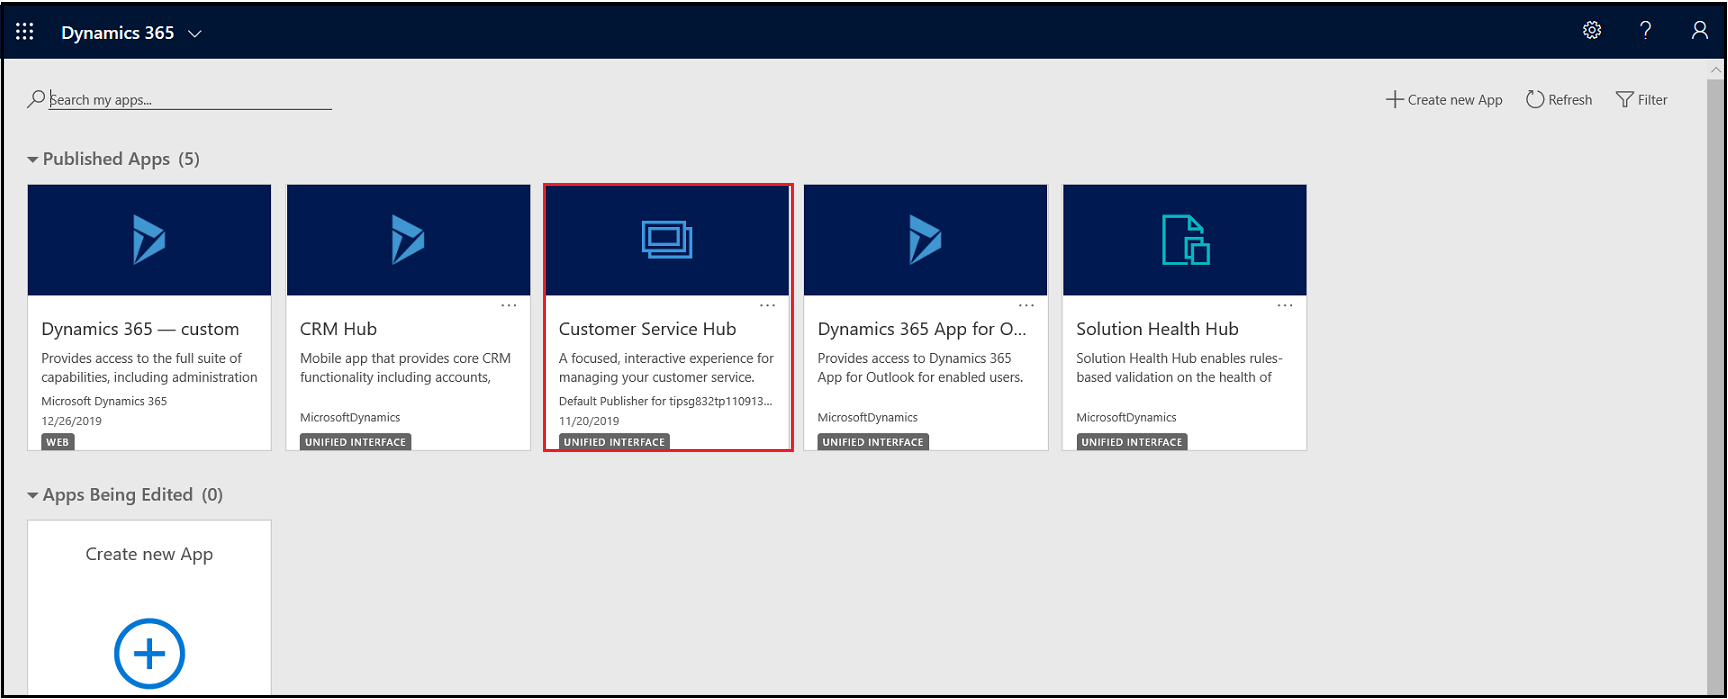
On the Dynamics 365 page, in the Published Apps area, select Customer Service Hub.
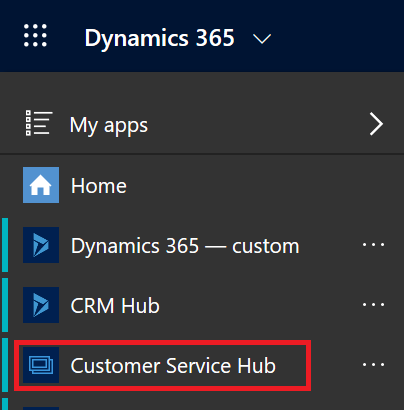
If you're on the Settings page, then in the Dynamics 365 Customer Service site map, navigate to the app switcher, and then select Customer Service Hub.
Mobile device
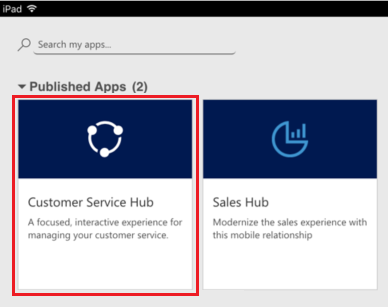
To access the Customer Service Hub app on a mobile device:
- Install the Dynamics 365 Customer Service mobile app.
To install the Dynamics 365 Customer Service mobile app, see Install Dynamics 365 for phones and tablets
From the My Apps page, select Customer Service Hub.
Work with case management record types, dashboards, and tools
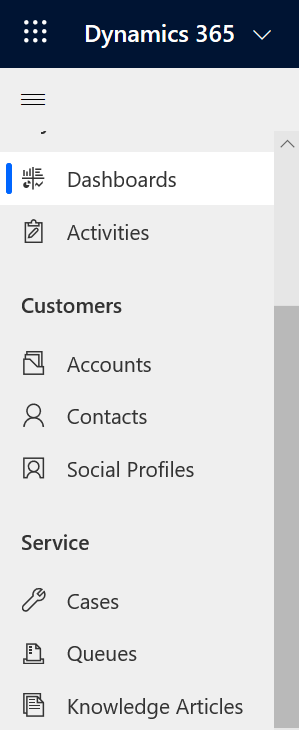
In the Customer Service Hub, you'll find everything you need to easily manage customer service for your organization:
- Dashboards
- Activities: Email, Task, Appointment, Phone Call, Social Activity
- Accounts
- Contacts
- Social Profiles
- Cases
- Queues
- Knowledge Articles
The Customer Service Hub app comes with an enhanced site map to enable easy navigation of the interface. More information: Understand the site map navigation.
Understand the site map navigation
- Select the site map icon
 , select Service, and then select an entity record type.
When you select a record type from the menu, such as Accounts, Contacts, or Cases, you'll see a list of corresponding customer records (also known as Entity grid).
To view recently opened records, select the down-arrow next to the record type in the site map.
Here's what each entity record type is used for:
- Dashboards collect all your most important data in one place. You can select from multiple dashboards as per your role.
- Activities help you keep track of tasks, email messages, appointments, phone calls and much more.
- Accounts are the companies you do business with.
- Contacts help you manage and store information about the customers you work with.
- Social Profiles let you track a contact's presence in social media.
- Cases help you create and track your customer requests and issues.
- Queues keep a track of cases waiting for you to work on.
- Knowledge Articles capture your customer's questions, issues, feedback, and resolutions, so that other service reps can benefit from them.
Select ... to go to Training, and access the documentation site to view the Help Center.
You can also access Service Management from the site map. Service Management lets you define all the customer service admin settings from the Customer Service Hub site map. Select ... to go to Service Management.
Important
The Service Management area in Customer Service Hub is deprecated. Use the Customer Service admin center app for admin tasks across Customer Service.
Select Favorites and Recent button
 to see recently viewed records, or to see views that have been pinned as favorites.
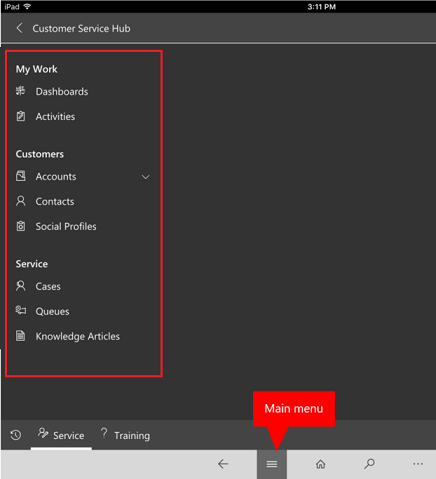
For a mobile device, the site map is displayed as illustrated in the following image:
Open the default dashboard for a record type
When you're viewing the list of records for a specific record type, select Open Dashboards in the command bar to switch to the default dashboard for that record type.
To return to the list of records, select Open Views in the command bar.
More information: Use interactive dashboards to effectively manage service cases
Navigate through records and pages
When you're viewing a record:
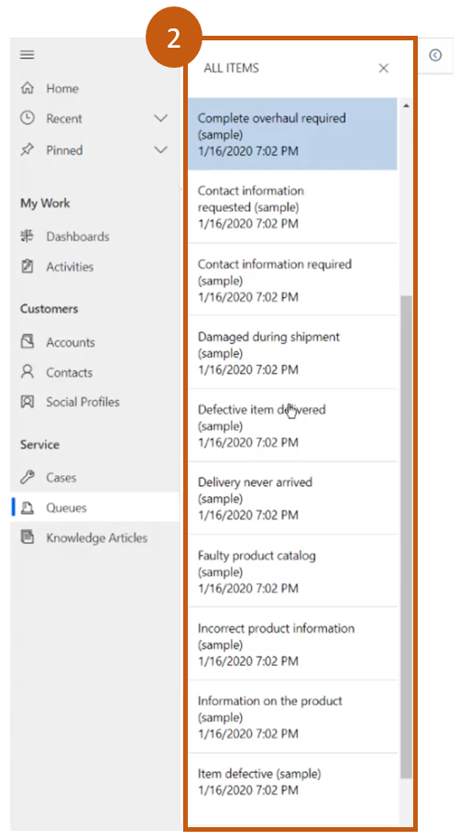
Select and expand Open Record Set to navigate to other records.

A side panel opens where you can view other records. You can directly select the records from the panel and view the details of the record.
Note
The option Open Record Set will not be available on devices with comparatively smaller screen sizes.
More information: Create and manage queues
Quickly create new records
To create records quickly by filling in only the most basic information, select the New button
 given on the nav bar.
Tip
On a mobile device, from the nav bar, tap
 and then tap Quick Create Menu.
Email a link
You can email links to records so your colleagues can quickly find these records by selecting the links. To email links to records, select one or more records in the list, and then on the command bar, select Email a link. The default email client opens with the links to these records. The recipients will see all content in the records for which they have permission.
Know your forms
Forms are designed to help you quickly handle important customer service tasks and complete actions from a single place.
The different components of a form are explained in the following sections.
Business processes
In the Customer Service Hub, forms for cases and knowledge articles include a process bar (also called a business process flow), which appears when you save the record for the first time.
When you select a process stage on the process bar, you'll see the steps to take to complete that stage. A flag on a stage indicates the stage you're currently on. When you select an active stage, you can see the Next Stage button move to the next stage in the process.
The stages in the business process flow are displayed in floating mode, or docked mode. Stages can be aligned in a vertical layout, instead of horizontal, which makes it easier to see what steps are required to move forward. You can also choose to include an optional step in the business process flow and define criteria to trigger it.

If there's more than one process to follow, you can switch between them by selecting Process > Switch Process on the command bar, and then selecting the process you want to use. Or you can choose to abandon the process if it no longer applies.
When a business process flow based on multiple entities is applied to a case or a knowledge article, the following limitations apply:
The business process flow based on multiple entities isn't displayed on the form.
The Switch Process option only shows business process flows that are based on a single entity.
If there are only multi-entity business process flows for an entity, the Switch Process option isn't available.
Tabs on the form
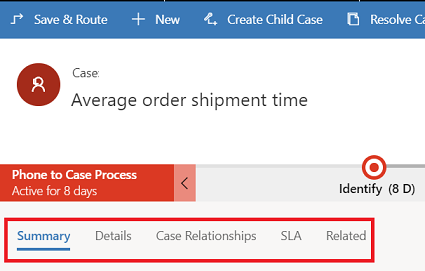
Each case form is composed of one or more tabs. By default, the Summary tab shows information about the customer, interactions with the customer, and other related records. You can select different tabs to enter or see other miscellaneous details of a record.
For example, here's a view of how the tabs appear on the case form:
This table lists the default tabs for each record type and the information that they show for a particular record.
| Record type | Default tabs |
|---|---|
| Case | Summary. Includes the customer card, Timeline, and the Related section. Details. Tracks Case details, other details, and social response details of the case. Case Relationships. Shows merged cases, child cases, and associated knowledge articles. You can add a child case to the current case from the Child Cases list. It also shows a list of knowledge articles associated with the case. SLA. Shows the related SLA KPI Instance records that are created for each SLA KPI that is tracked for the case. Related. Shows related entities, such as activities and connections. |
| Account | Summary. Includes the customer card, Timeline, and the Related section. Details. Tracks other details like company profile, marketing details, contact preferences, and billing and shipping. Related. Shows related common entities. |
| Contact | Summary. Includes the customer card, Timeline, and the Related section. Details. Tracks other details like personal information, marketing details, contact preferences, and billing and shipping. Related. Shows related common entities. |
| Activities | Activity forms show a tab called Task for the respective activity and a Related tab for common entities. |
| Knowledge Articles | Content. Lets you write and edit the content for the article. Summary. Tracks basic settings, Timeline, publishing settings, and related information. Analytics. Shows the number of views, feedback, and a list of cases using the article. Related. Shows related common entities. |
| Social Profiles | Social Profile. Captures general information, and social profile details along with related social profiles. Related. Shows related common entities. |
Contact card
See a complete view of your customer's touch points in the Contact card. This card is available in the General Information section of the Summary tab.
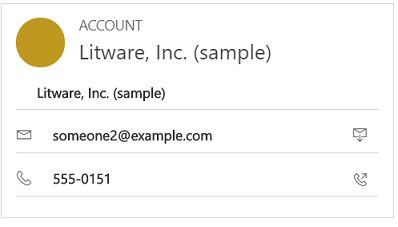
You can add a picture to the account or contact record in Dataverse, and it will appear on this card. You can make calls to customers from the Contact card using Skype for Business – IP telephony.
For account records, the card shows contact details for the primary contact associated with the account. For contact records, the card appears if the contact is the customer value on the case form.
Work with Queues
Use queues to organize, prioritize, and monitor the progress of your work. In Dynamics 365 Customer Service, queues are containers that are used to store anything that needs to be completed or requires an action. For example, you could use queues for completing a task or closing a case. To learn more about creating and managing queues, see Create and manage queues.

To know how to add a case to a queue, see Add a case to a queue.
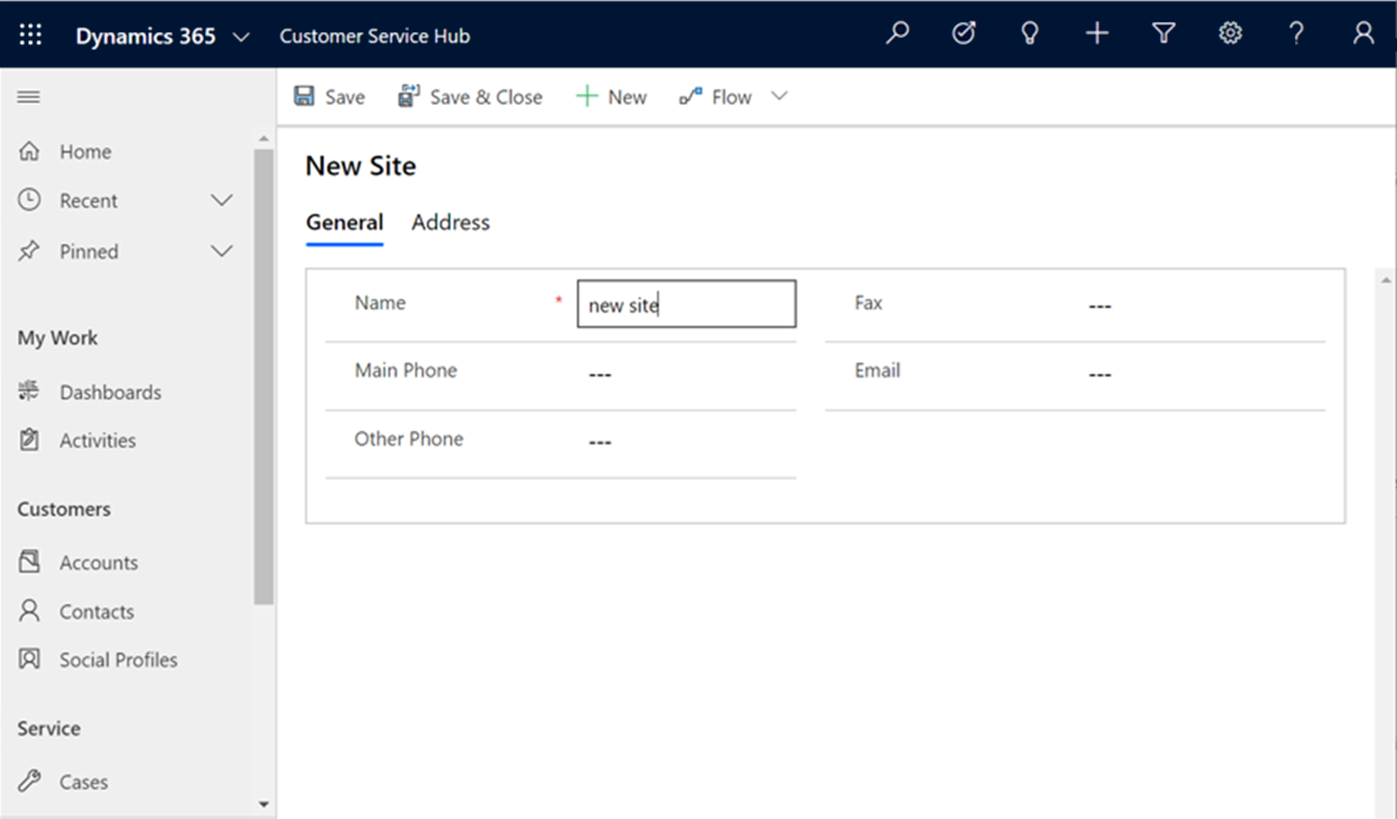
Understand Site
To create a new site, you need to go to Advanced find ![]() . Then you can customize other entity forms (for example, Account) by adding this site field.
. Then you can customize other entity forms (for example, Account) by adding this site field.
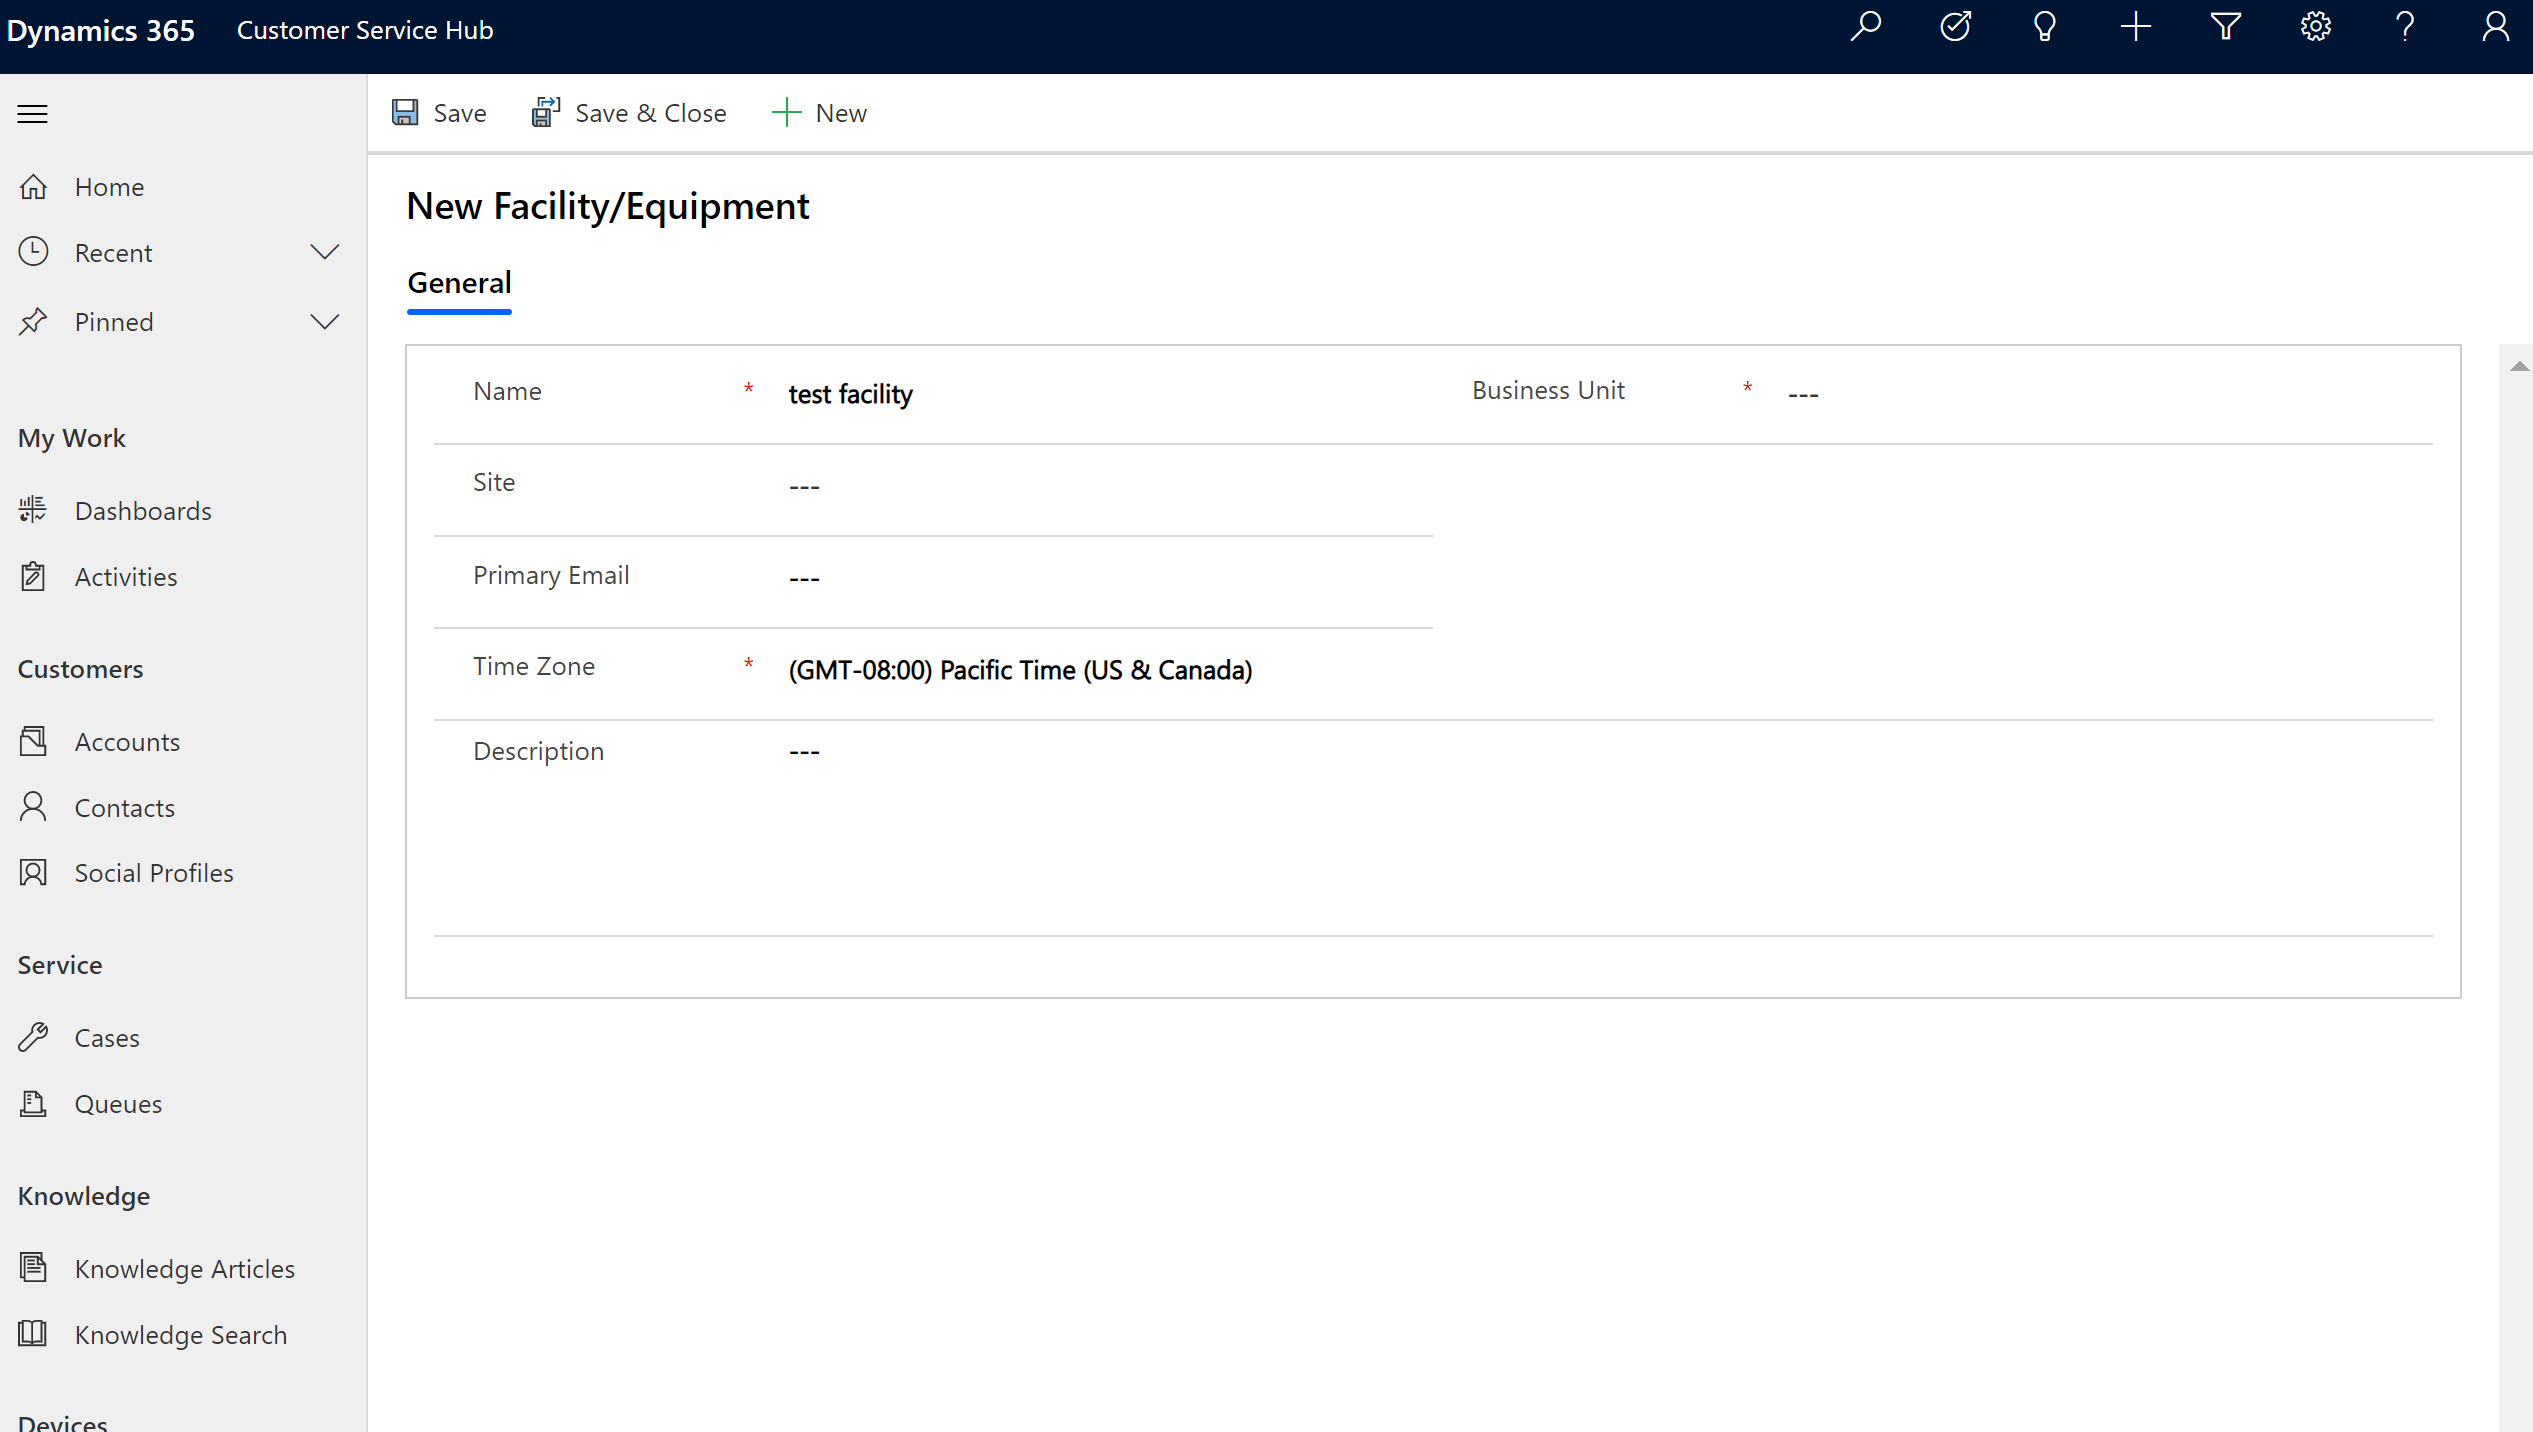
Understand Facility/Equipment
To create a new Facility/Equipment item, you need to go to Advanced find ![]() , where you can create Facility/Equipment.
, where you can create Facility/Equipment.
Related section
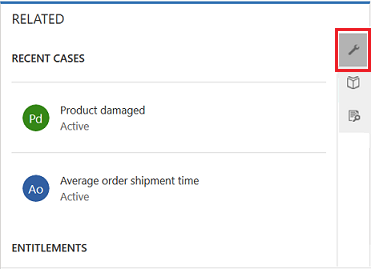
In the Related section (also known as Reference panel), use the tabs to see related records for the current record. This section is enabled by default for account, contact, case, and knowledge article records. Your customizer can add this section for all entities (including custom entities) that are enabled for interactive experience. The reference panel is also available in model-driven apps. For information, see Reference Panel in model-driven apps .
By default, the first tab in the Related section of a case record shows the Recent Cases and Entitlements for the current case record you're working on.
The second tab in the Related section of a case record is the Knowledge Base search. Knowledge Base search lets you search for the knowledge articles related to a specific record. It also lets you view automatic suggestions. You can filter the search results to display articles that are Published, Draft, or Approved. For more information, see Search for Knowledge articles.
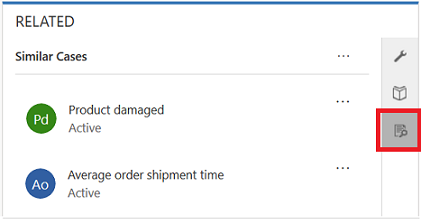
The third tab in the Related section of a case record displays Similar Cases. Select ... on a record to follow or unfollow the case, and explore other options.
Watch this video to learn more about the Reference Panel in the Customer Service Hub:
Note
You can configure rules that help you view similar cases based on automatic suggestions. For more information, see Use advanced similarity rules to view similar case suggestions.
Similarly,
- For Accounts records, you can view Contacts, Recent Opportunities, Recent Cases, and Entitlements in the Related section.
- For Contacts records, the Related section displays Recent Opportunities, Recent Cases, and Entitlements.
- For Knowledge articles records, select an article and go to the Summary tab to view the Related Information panel. Here you can view Related versions, Related translations, Related categories, Related articles, and Related products for an article.
Note
Your system administrator or customizer can choose if Related section should be included in a form. They can also decide on what related data should be displayed in the section for each form.
Reference Panel reflow
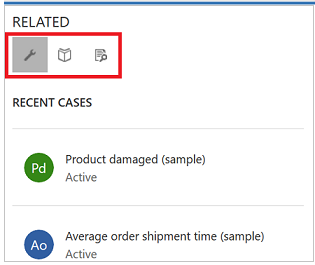
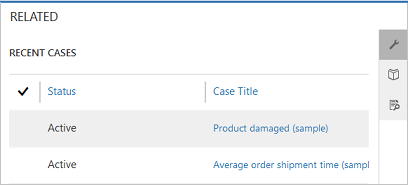
The Customer Service Hub is available to use on a desktop browser, and on a mobile device. Depending on the zoom level and the resolution of the system on which you're accessing the hub interface, the Reference panel adjusts the tabs and records for an optimum experience.
For example, on a browser, if you zoom in to about 100% or more, the tabs get docked on the top of the panel.
Similarly, if you zoom out to about 60-70%, the records appear in grid form.
Understand Activities
Activities are the tasks that you or your team perform while interacting with customers. An activity is any action that can be entered on a calendar and has time dimensions (start time, stop time, due date, and duration) that help determine when the action occurred or is planned to occur.
For example, you can make a record to track a phone call with a customer, or list an appointment scheduled with a customer to discuss a certain issue. You can create activities for yourself, or assign them to other service reps.
In Dynamics 365 Customer Service, the following activities are supported:
- Task
- Appointment
- Phone Call
- Social Activity
Note
You can create and edit emails in the Customer Service Hub app on a desktop browser. However, on a mobile device, email is read only on the app.
Open Activities view
In the Customer Service Hub site map, select Service > Activities. The My Activities view is displayed.

Select
 in the nav bar to go to Activities to quickly add a new activity.
Select My Activities to switch between activity views.
Select Due to see the list of activities that are due in coming time or are already overdue.
Explore the command bar options to create a new activity like new Task, Email, Appointment, or Phone call.
For example: To create a new email, select Email from the command bar. The New Email activity form is displayed.
Select ... in the command bar and go to Open Dashboards to directly open activity dashboard.
To view the status of an activity, select the activity record. The status is displayed in the bottom left corner of the activity form.
Insert a knowledge article into an email
While working on an email, you can quickly help customers by searching and selecting a relevant knowledge article to include in your email. You can insert the article and/or share a link to it in the body of your message.
You can insert a knowledge article in an email in Dynamics 365 Customer Engagement (on-premises) 9.1. More information: New features in Dynamics 365 Customer Engagement (on-premises)
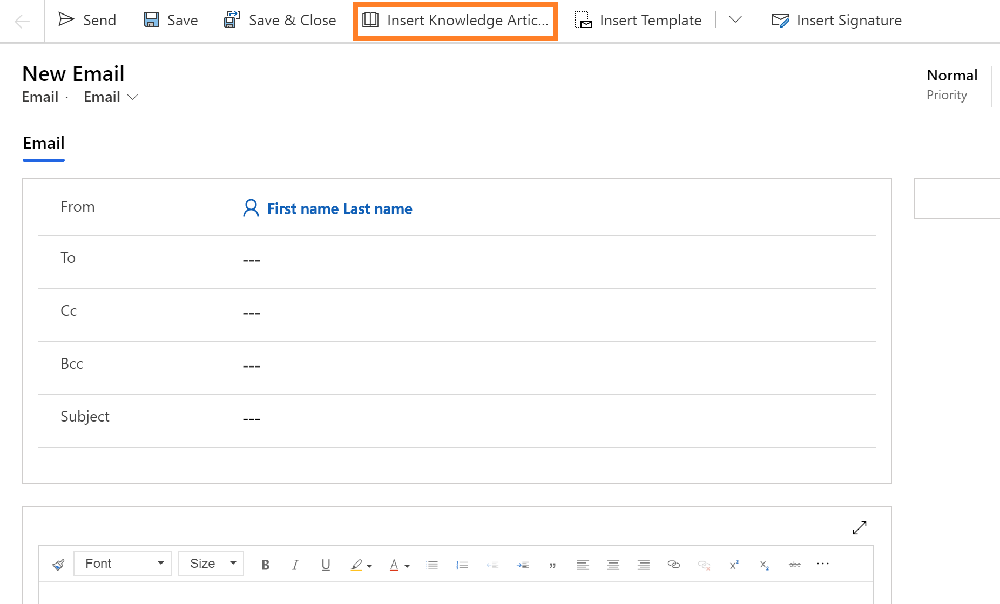
On an email form where you're drafting, place your cursor where you want to place the knowledge article or its link, and then select Insert Knowledge Article.
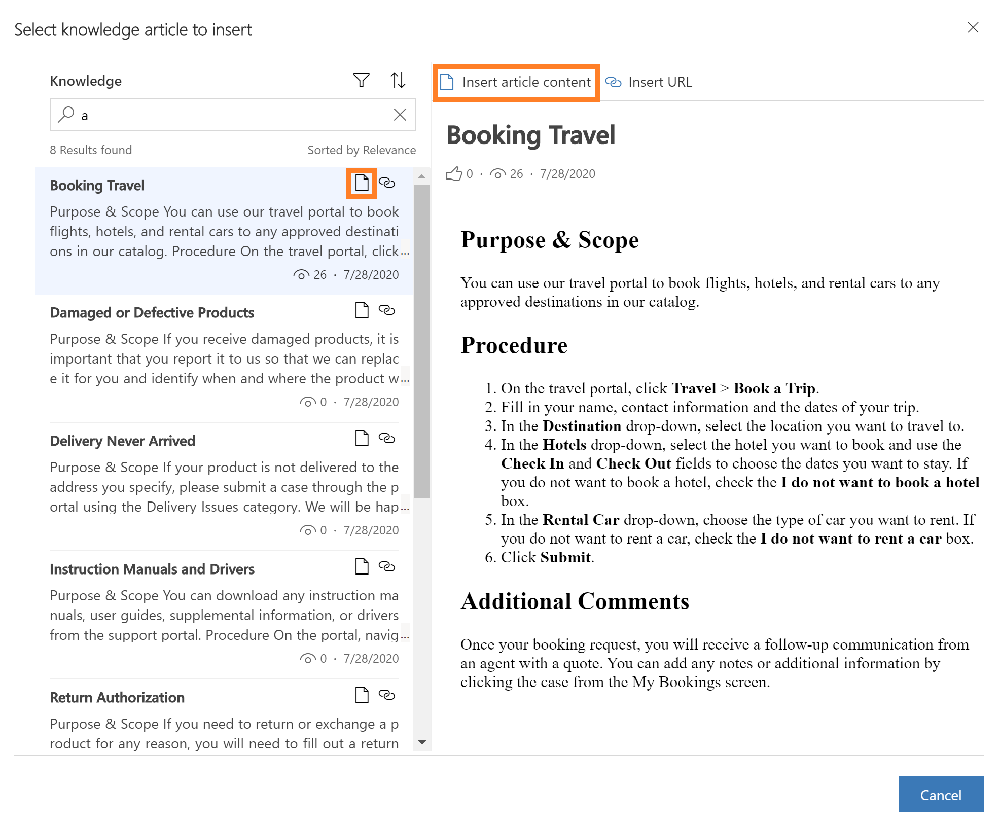
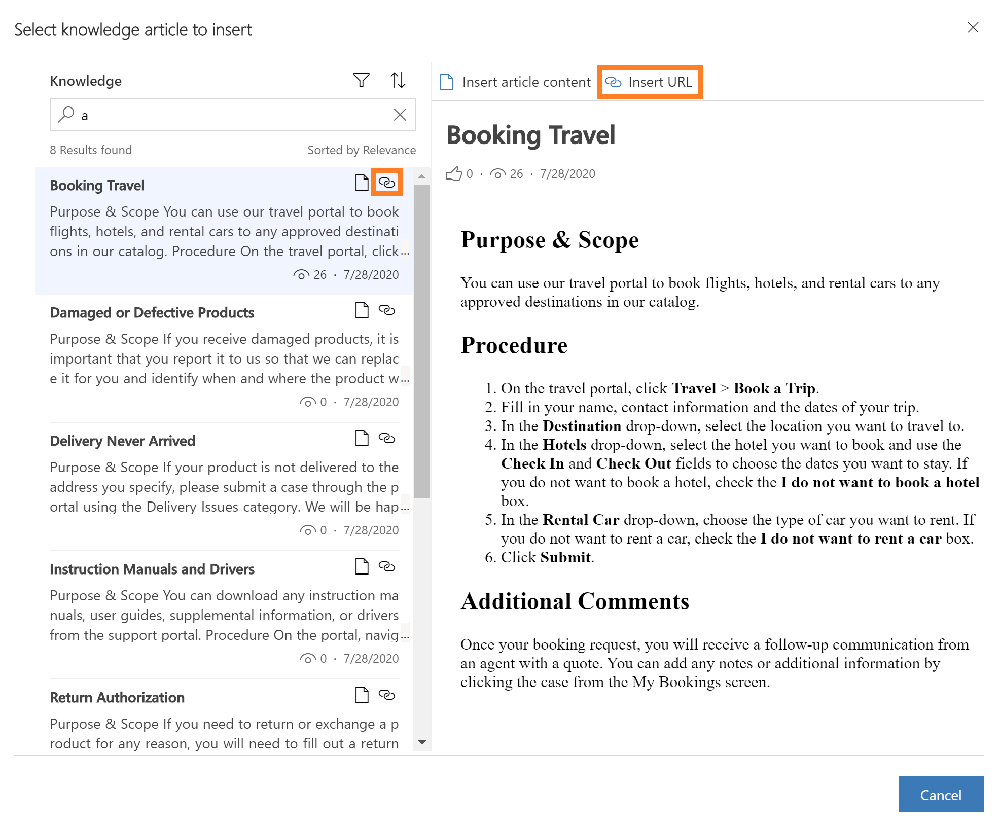
The Select knowledge article to insert screen is displayed.
Search for the article you want to include. For more information about searching for knowledge articles, see Search for knowledge articles in the Customer Service Hub.
A list of available articles will be displayed. You can select an article in the search results to view it in the preview pane.
When you've found the article you want to include, do one of the following actions:
To insert an article into the email, select the Insert content icon for the article in the search results or in the article preview pane, select Insert article content at the top of the pane. This will insert the content into the body of your email and close the Select knowledge article to insert page.
Note
- To insert a knowledge article into a field that is enabled for using the rich text editor options, you must first configure the custom rich text editor for the field. For more information on this configuration, see Customize the email experience.
- If you add more than one field, and then select Insert Knowledge Article, by default, the knowledge article gets inserted into the first field in the form.
If your administrator has set up an external portal that supports a URL format, you can include a link. For more information, see Set up knowledge management (Customer Service Hub). To insert an article as a link in the email, select the URL icon for the article in the search results or in the article preview pane, select Insert URL at the top of the pane. This will insert a link to the article into the body of your email and close the Select knowledge article to insert page.
Create and Manage Queues
Use queues to organize, prioritize, and monitor the progress of your work. In Dynamics 365 Customer Service, queues are containers that are used to store anything that needs to be completed or requires an action. For example, you might use a queue for completing a task or closing a case. To know more about creating and managing queues, see Create and manage queues.
Open Queues view
In the Customer Service Hub site map, select Service > Queues. The queues view is displayed.

- Use the drop-down lists to switch between the views and the various queues.
- Select a record in the queues view to:
- Edit the record
- Route the record
- Pick the record. It will be assigned to you and will be moved to your queue.
- Release the record. It will be assigned back to the queue owner for other's to pick up.
To learn how to add a case to a queue, see Add a case to a queue.
Create a new site
To create a new site, go to Advanced find ![]() . Then you can customize other entity forms (for example, Account) by adding this site field.
. Then you can customize other entity forms (for example, Account) by adding this site field.

Create a facility/equipment item
To create a new Facility/Equipment item, go to Advanced find ![]() , where you can create Facility/Equipment.
, where you can create Facility/Equipment.

See also
Create and design forms for Customer Service Hub
Track your cases efficiently and act on them quickly
Feedback
Coming soon: Throughout 2024 we will be phasing out GitHub Issues as the feedback mechanism for content and replacing it with a new feedback system. For more information see: https://aka.ms/ContentUserFeedback.
Submit and view feedback for
