Turn on and set up Copilot in Dynamics 365 Sales
Effective April 1, 2024, Copilot in Dynamics 365 Sales is turned on by default for the following orgs:
- Orgs in North America.
- Orgs in other regions where an Open AI Service endpoint is available.
- Orgs that have provided consent for data movement across regions.
For all the other orgs, an admin must provide consent in the Power Platform admin center and then turn on Copilot in the Sales Hub app. This article provides instructions for turning Copilot on or off, providing consent for data movement, and configuring Copilot for your business.
Important
- If you had previously turned Copilot off, it remains turned off.
- Throughout this article, the term sales apps refers to apps that have lead and opportunity tables and are not part of the exclusion list.
License and role requirements
| Requirement type | You must have |
|---|---|
| License | Dynamics 365 Sales Premium or Dynamics 365 Sales Enterprise |
| Security roles | System Administrator |
For more information about the licensing requirements for Copilot in Dynamics 365 Sales, see licensing FAQs
Prerequisites
- Verify whether your org is in a region where Copilot in Dynamics 365 Sales is available. For a list of unsupported regions, see this FAQ.
- Verify whether your region has an Azure Open AI Service endpoint. If not, you must provide consent for data movement across regions to use Copilot in Dynamics 365 Sales. For more information, see Copilot data movement.
Turn Copilot features on or off in Sales Hub
In the Sales Hub app, go to Change area in the lower-left corner of the page and select App Settings.
Under General Settings, select Copilot.
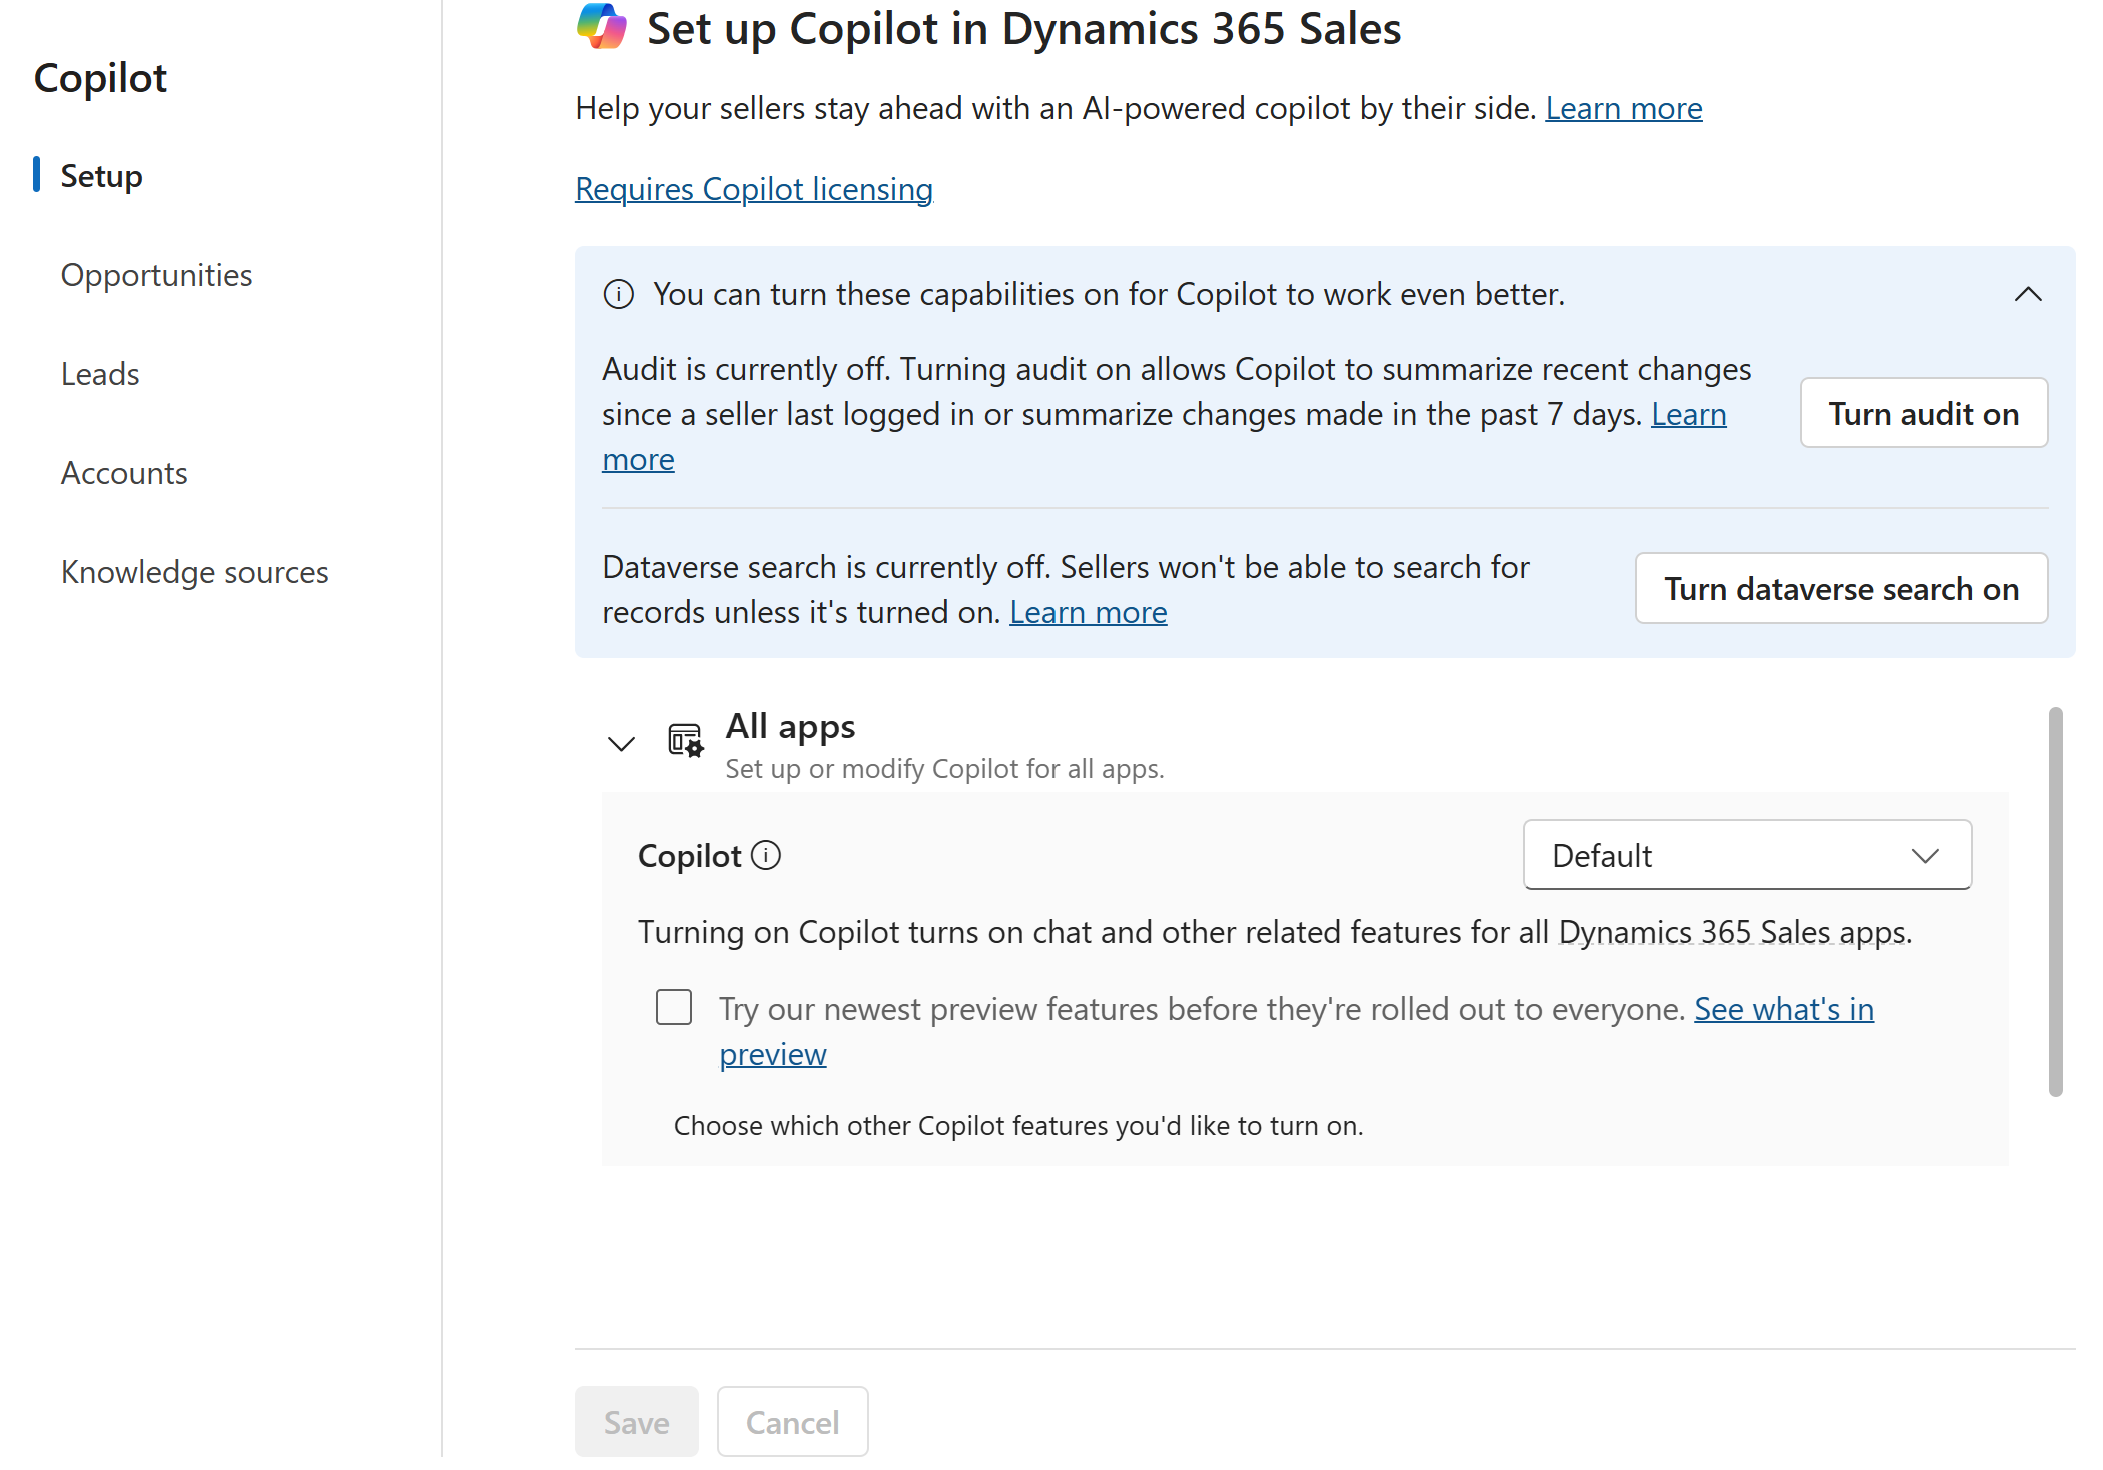
In the Set up Copilot in Dynamics 365 Sales page, select Try our newest preview features before they're rolled out to everyone to get all the Copilot preview features automatically.
If your org is in a region where Azure Open AI Service endpoint isn't available but you didn't provide the consent for data movement, select Go to Power Platform admin center and follow the instructions to provide consent.
Under All Dynamics 365 Sales apps, select a global setting that you want to apply to all Sales apps and then override the setting at the app-level. For example, if you want to enable Copilot only for the Sales Hub app, select Off for All Dynamics 365 Sales apps and then select On only for the Sales Hub app.
The initial setting on the Set up Copilot in Dynamics 365 Sales page depends on the setting for the org and the app. For example, if your Power Platform admin turned Copilot on for your org but your Power Apps admin turned it off for the Sales Hub app, the initial setting in the Set up Copilot in Dynamics 365 Sales page is set to Off for Sales Hub app and On for all other Sales apps.
The Default setting has the following behavior:
For orgs in North America, Copilot Chat is turned on for all Dynamics 365 Sales apps (with lead and opportunity tables). Copilot for email is turned on only if you had opted in for early access.
For orgs in other regions, Copilot is turned on for all Dynamics 365 Sales apps that meet the following conditions:
Consent for data movement is provided for the org.
The release channel for the app is set to Monthly release channel.
For Copilot for email, you had opted in for preview features.
For apps that don't meet the above conditions, the Default setting turns Copilot off.
Select Turn audit on to turn on audit history for the lead and opportunity tables. If auditing is already turned on for the lead and opportunity tables or globally, the Turn audit on option isn't displayed.
- Audit history is required for Copilot to display recent changes to leads and opportunities.
- If you configure Copilot to show recent changes from tables other than leads and opportunities, turning on auditing turns on audit history for those tables as well. However, if you remove those fields later, you need to turn off audit history for those tables manually.
Select Save.
The Welcome to Copilot pane opens in the right side pane with a quick tour.
Configure fields for generating summaries and recent changes list
By default, Copilot uses a set of predefined fields to generate summaries, a list of recent changes for accounts, leads, and opportunities, and prepare for meetings. You can add other fields from lead, opportunity, account, and related tables to make the summaries and recent changes list more relevant for your business.
Important
- The Account summary feature is a preview feature.
- Preview features aren’t meant for production use and may have restricted functionality. These features are subject to supplemental terms of use, and are available before an official release so that customers can get early access and provide feedback.
In the Sales Hub app, go to Change area in the lower-left corner of the page and select App Settings.
Under General Settings, select Copilot.
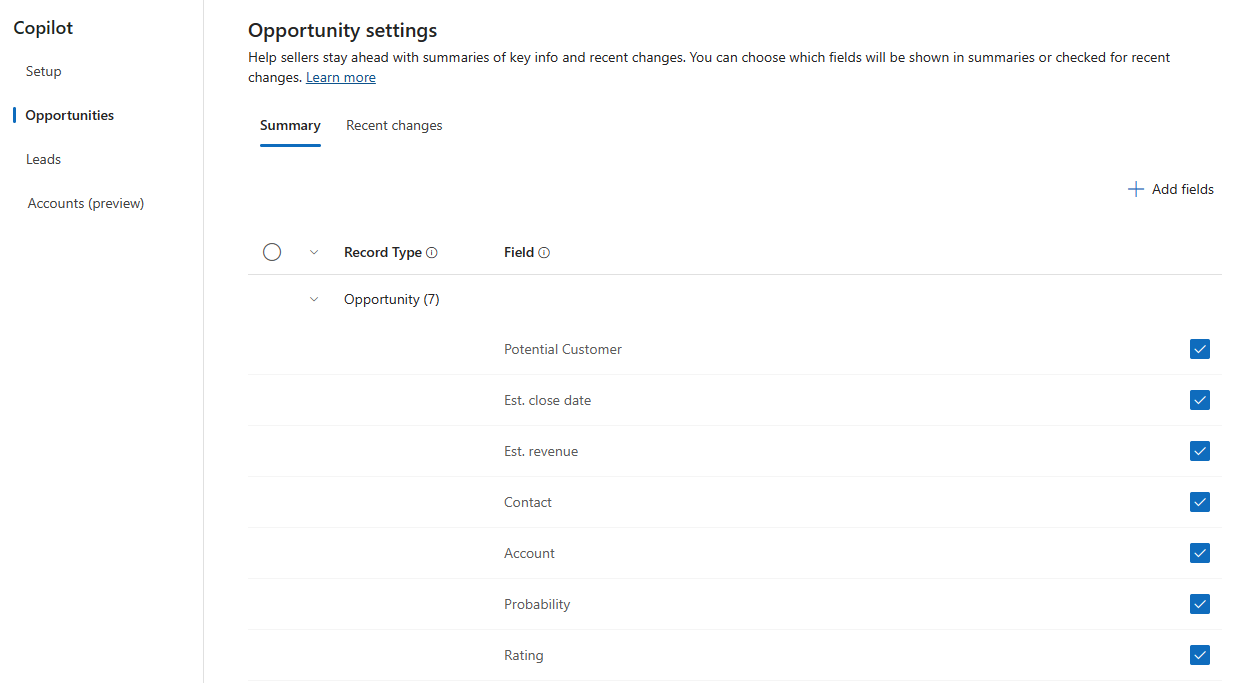
Select Opportunities, Leads, or Accounts (preview). The following screenshot shows the Opportunity settings page. The Lead and Account settings page is similar.

To choose fields for generating summaries, select the Summary tab. To choose fields for generating the recent changes list, select the Recent changes tab.
The recent changes list is generated from the audit history. If the Recent changes tab isn't available, it means that auditing is turned off globally or for the table you selected (leads or opportunities). Select Turn audit on in the notification bar to turn on audit history for all the tables in the Recent changes tab.
Select Add fields.
Select at least four fields, up to a maximum of 10.
The Save button is disabled if you select fewer than 4 or more than 10 fields. If you added more than 10 fields, clear the checkbox, or select fields that you don't need and select Delete.
In the Recent changes tab, when you add a field from a related table that doesn't have audit history turned on, Turn audit on appears in the notification bar. Select it to turn on auditing for the table. If you remove the field later, you need to turn off audit history for the table manually.
For Opportunities only. To display the opportunity summary widget within the opportunity form, in the Opportunities settings page, select the Show opportunity summary as a widget in the form option.
To add the opportunity widget to custom forms, see Add the opportunity summary widget to custom forms.For Opportunities and Accounts (preview) only. To customize the sections to display in the summary, select Customize related info.
Opportunities:
In the Customize related info dialog box, select the sections that you want to display in the Opportunity summary view for users to see. These sections are:
- Enriched key info: Displays relevant insights from related records in the key info section.
- Product insights: Displays insights about the products in the opportunity and fields such as product names, total amount, and budget are considered for insights.
- Quote insights: Displays insights about the quotes in the opportunity and fields such as total number of quotes, most recent quote, and total amount are considered for insights.
- Competitor insights: Displays insights about the competitors in the opportunity and fields such as competitor names, strengths, and weaknesses are considered for insights.
By default, all options are selected.
Select Save.
Accounts (preview):
In the Customize related info dialog box, select the sections that you want to display in the Account summary view for users to see. These sections are:
- Enriched key info: Displays relevant insights from related records in the key info section.
- Opportunities: Displays all open opportunities for this account.
- Leads: Displays all leads linked to this account.
- Cases: Displays all open cases linked to this account. However, to display information in this section, Dynamics 365 Customer Service must be enabled in your environment.
By default, all options are selected.
Select Save.
Save your changes.
Configure fields for generating what's new with my sales records list
The What's new with my sales records prompt lists the sales records that were updated in the last seven days. The list is generated from the audit history of the lead, opportunity, and account tables. Depending on the record type, Copilot uses different fields to get the list of records updated:
For the lead and opportunity records, Copilot uses the fields in the primary table (lead or opportunity) that you had configured for generating the recent changes list. For example, if you had configured four fields from the lead table and six fields from related tables, Copilot monitors changes to only those four fields from the lead table to identify the lead records that are updated.
For the account records, Copilot lists the following changes:
- Contacts, leads, and opportunities created for the account in the last seven days.
- Changes to the fields in the Quick Find view of the account table. If you'd like to see changes to other fields, add them to the Quick Find view of your account table. Learn how to add fields to the Quick Find view.
Grant audit access to your sellers
Copilot generates the list of recent changes for leads and opportunities from the audit history. So, your sellers need access to the audit history and audit summary to view the recent changes.
Sign in to the Power Platform admin center and select your environment.
Select Settings > Users + permissions > Security roles.
Select the security role that's assigned to your sellers, and then select the Miscellaneous Privileges tab.
In the list below the tab, select Show only unassigned privileges.
Select Organization as the Privilege Level for the following privileges:
- View Audit History
- View Audit Summary
Select Save + close.
Add the Copilot page site map entry to custom sales app
When you create a custom model-driven app, you can choose a default solution to create a site map for it. However, you can choose solutions that are based on table forms only. The full-screen Copilot page is based on a URL custom control and doesn't appear in the list of solutions. You must add it to the site map manually.
Add the Copilot page to your site map by following the instructions in add site map entry to your custom app and enter or paste the following URL:
/main.aspx?&pagetype=control&controlName=PowerApps.Copilot
Add the opportunity summary widget to custom forms
To add the opportunity summary widget to custom forms, follow these steps:
Sign in to the Power Apps maker portal.
From the site map, select Tables and open the table.
From the Data experience section, select Forms.
Open your custom form for which you want to add the opportunity summary widget.
On the command bar, select Component and then add the 1-column section component to the form as a placeholder for the widget.
From the Component site map, select Display and then add the Record summary to the newly added column.
The opportunity summary widget is added to the form.
Note
To hide the New section label, go to the Properties tab of the New Section settings pane, and then select Hide label.
Save and publish the form.
See also
Feedback
Coming soon: Throughout 2024 we will be phasing out GitHub Issues as the feedback mechanism for content and replacing it with a new feedback system. For more information see: https://aka.ms/ContentUserFeedback.
Submit and view feedback for

