Quickstart: Use images in your AI chats
Get started using GPT-4 Turbo with images with the Azure OpenAI Service.
GPT-4 Turbo model upgrade
The latest GA release of GPT-4 Turbo is:
gpt-4Version:turbo-2024-04-09
This is the replacement for the following preview models:
gpt-4Version:1106-Previewgpt-4Version:0125-Previewgpt-4Version:vision-preview
Differences between OpenAI and Azure OpenAI GPT-4 Turbo GA Models
- OpenAI's version of the latest
0409turbo model supports JSON mode and function calling for all inference requests. - Azure OpenAI's version of the latest
turbo-2024-04-09currently doesn't support the use of JSON mode and function calling when making inference requests with image (vision) input. Text based input requests (requests withoutimage_urland inline images) do support JSON mode and function calling.
Differences from gpt-4 vision-preview
- Azure AI specific Vision enhancements integration with GPT-4 Turbo with Vision aren't supported for
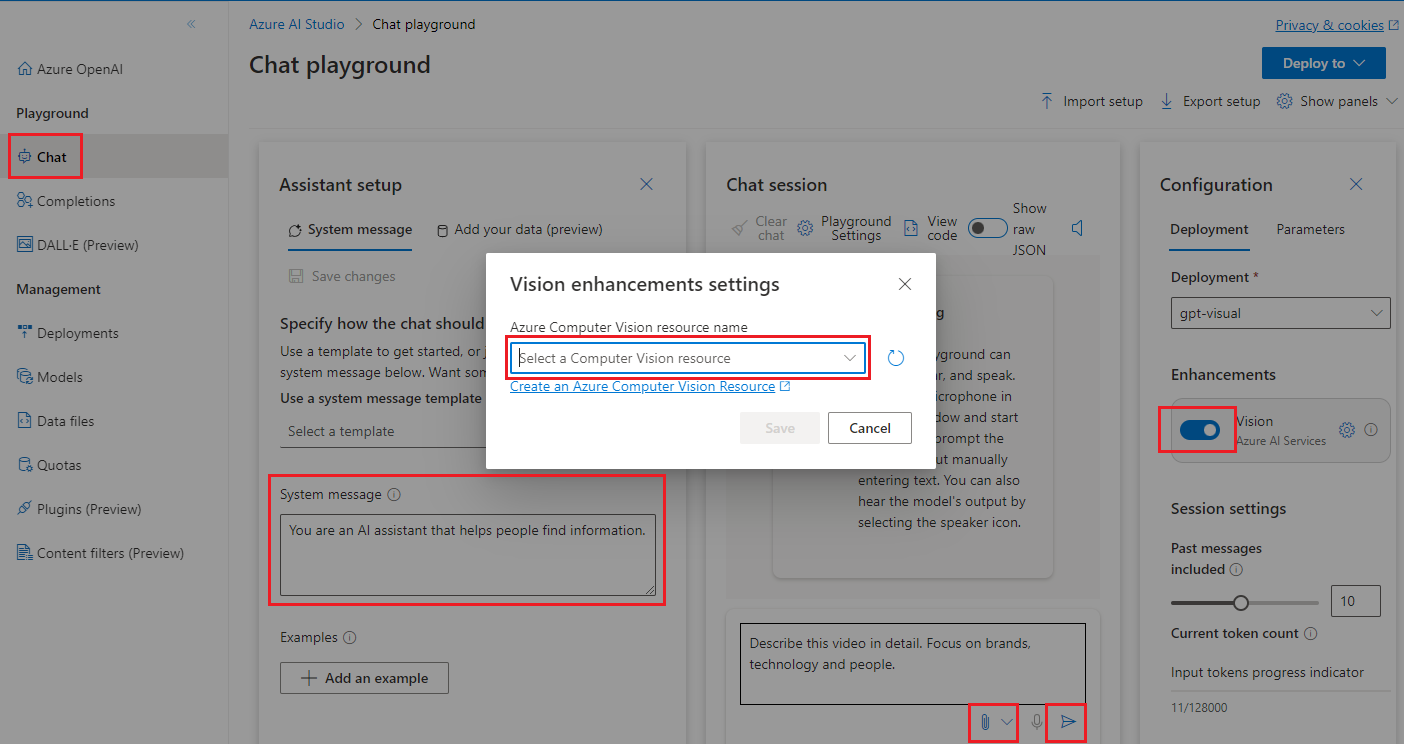
gpt-4Version:turbo-2024-04-09. This includes Optical Character Recognition (OCR), object grounding, video prompts, and improved handling of your data with images.
GPT-4 Turbo provisioned managed availability
gpt-4Version:turbo-2024-04-09is available for both standard and provisioned deployments. Currently the provisioned version of this model doesn't support image/vision inference requests. Provisioned deployments of this model only accept text input. Standard model deployments accept both text and image/vision inference requests.
Region availability
For information on model regional availability consult the model matrix for standard, and provisioned deployments.
Deploying GPT-4 Turbo with Vision GA
To deploy the GA model from the Studio UI, select GPT-4 and then choose the turbo-2024-04-09 version from the dropdown menu. The default quota for the gpt-4-turbo-2024-04-09 model will be the same as current quota for GPT-4-Turbo. See the regional quota limits.
Start exploring GPT-4 Turbo with Vision capabilities with a no-code approach through Azure OpenAI Studio.
Prerequisites
- An Azure subscription. Create one for free.
- Access granted to Azure OpenAI in the desired Azure subscription. Currently, access to this service is granted only by application. You can apply for access to Azure OpenAI by completing the form at https://aka.ms/oai/access. Open an issue on this repo to contact us if you have an issue.
- An Azure OpenAI Service resource with a GPT-4 Turbo with Vision model deployed. See GPT-4 and GPT-4 Turbo Preview model availability for available regions. For more information about resource creation, see the resource deployment guide.
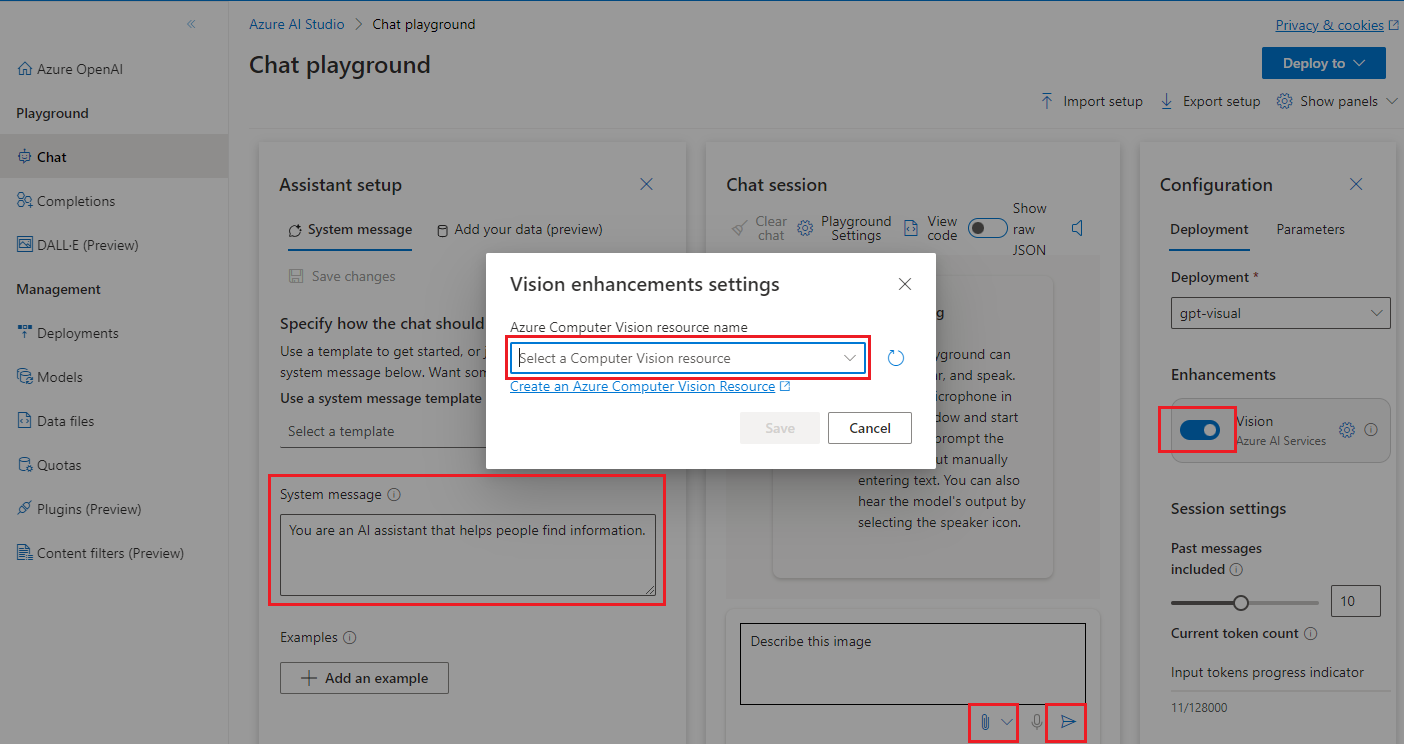
- For Vision enhancement (optional): An Azure Computer Vision resource in the same region as your Azure OpenAI resource, in the paid (S1) tier.
Note
It is currently not supported to turn off content filtering for the GPT-4 Turbo with Vision model.
Go to Azure OpenAI Studio
Browse to Azure OpenAI Studio and sign in with the credentials associated with your Azure OpenAI resource. During or after the sign-in workflow, select the appropriate directory, Azure subscription, and Azure OpenAI resource.
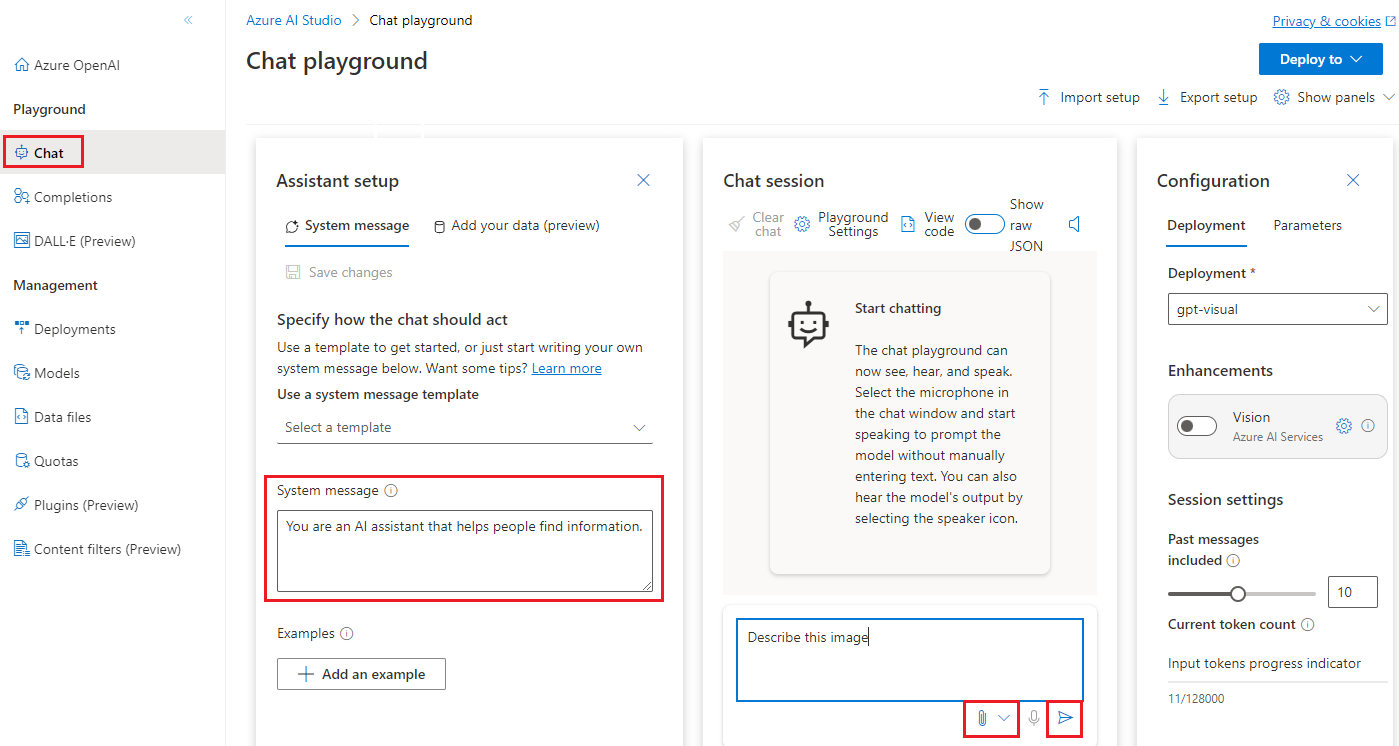
Under Management select Deployments and Create a GPT-4 Turbo with Vision deployment by selecting model name: "gpt-4" and model version "vision-preview". For more information about model deployment, see the resource deployment guide.
Under the Playground section select Chat.
Playground
From this page, you can quickly iterate and experiment with the model's capabilities.
For general help with assistant setup, chat sessions, settings, and panels, refer to the Chat quickstart.
Start a chat session to analyze images or video
In this chat session, you're instructing the assistant to aid in understanding images that you input.
To start, select your GPT-4 Turbo with Vision deployment from the dropdown.
In the Assistant setup pane, provide a System Message to guide the assistant. The default System Message is: "You are an AI assistant that helps people find information." You can tailor the System Message to the image or scenario that you're uploading.
Note
It is recommended to update the System Message to be specific to the task in order to avoid unhelpful responses from the model.
Save your changes, and when prompted to confirm updating the system message, select Continue.
In the Chat session pane, enter a text prompt like "Describe this image," and upload an image with the attachment button. You can use a different text prompt for your use case. Then select Send.
Observe the output provided. Consider asking follow-up questions related to the analysis of your image to learn more.
Clean up resources
If you want to clean up and remove an Azure OpenAI resource, you can delete the resource or resource group. Deleting the resource group also deletes any other resources associated with it.
Use this article to get started using the Azure OpenAI REST APIs to deploy and use the GPT-4 Turbo with Vision model.
Prerequisites
- An Azure subscription. Create one for free.
- Access granted to Azure OpenAI in the desired Azure subscription. Currently, access to this service is granted only by application. You can apply for access to Azure OpenAI by completing the form at https://aka.ms/oai/access. Open an issue on this repo to contact us if you have an issue.
- Python 3.8 or later version.
- The following Python libraries:
requests,json. - An Azure OpenAI Service resource with a GPT-4 Turbo with Vision model deployed. See GPT-4 and GPT-4 Turbo Preview model availability for available regions. For more information about resource creation, see the resource deployment guide.
- For Vision enhancement (optional): An Azure Computer Vision resource in the same region as your Azure OpenAI resource, in the paid (S1) tier.
Note
It is currently not supported to turn off content filtering for the GPT-4 Turbo with Vision model.
Retrieve key and endpoint
To successfully call the Azure OpenAI APIs, you need the following information about your Azure OpenAI resource:
| Variable | Name | Value |
|---|---|---|
| Endpoint | api_base |
The endpoint value is located under Keys and Endpoint for your resource in the Azure portal. Alternatively, you can find the value in Azure OpenAI Studio > Playground > Code View. An example endpoint is: https://docs-test-001.openai.azure.com/. |
| Key | api_key |
The key value is also located under Keys and Endpoint for your resource in the Azure portal. Azure generates two keys for your resource. You can use either value. |
Go to your resource in the Azure portal. On the navigation pane, select Keys and Endpoint under Resource Management. Copy the Endpoint value and an access key value. You can use either the KEY 1 or KEY 2 value. Having two keys allows you to securely rotate and regenerate keys without causing a service disruption.
Create a new Python application
Create a new Python file named quickstart.py. Open the new file in your preferred editor or IDE.
Replace the contents of quickstart.py with the following code.
# Packages required:
import requests
import json

api_base = '<your_azure_openai_endpoint>'
deployment_name = '<your_deployment_name>'
API_KEY = '<your_azure_openai_key>'

base_url = f"{api_base}openai/deployments/{deployment_name}"
headers = {
    "Content-Type": "application/json",
    "api-key": API_KEY
}

# Prepare endpoint, headers, and request body
endpoint = f"{base_url}/chat/completions?api-version=2023-12-01-preview"
data = {
    "messages": [
        { "role": "system", "content": "You are a helpful assistant." },
        { "role": "user", "content": [
            {
                "type": "text",
                "text": "Describe this picture:"
            },
            {
                "type": "image_url",
                "image_url": {
                    "url": "<image URL>"
                }
            }
        ] }
    ],
    "max_tokens": 2000
}

# Make the API call
response = requests.post(endpoint, headers=headers, data=json.dumps(data))

print(f"Status Code: {response.status_code}")
print(response.text)
Make the following changes:
Enter your endpoint URL and key in the appropriate fields.
Enter your GPT-4 Turbo with Vision deployment name in the appropriate field.
Change the value of the
"image"field to the URL of your image.Tip
You can also use a base 64 encoded image data instead of a URL. For more information, see the GPT-4 Turbo with Vision how-to guide.
Run the application with the
pythoncommand:python quickstart.py
Clean up resources
If you want to clean up and remove an Azure OpenAI resource, you can delete the resource or resource group. Deleting the resource group also deletes any other resources associated with it.
Use this article to get started using the Azure OpenAI Python SDK to deploy and use the GPT-4 Turbo with Vision model.
Library source code | Package (PyPi) |
Prerequisites
- An Azure subscription. Create one for free.
- Access granted to Azure OpenAI in the desired Azure subscription. Currently, access to this service is granted only by application. You can apply for access to Azure OpenAI by completing the form at https://aka.ms/oai/access. Open an issue on this repo to contact us if you have an issue.
- Python 3.8 or later version.
- The following Python libraries:
os - An Azure OpenAI Service resource with a GPT-4 Turbo with Vision model deployed. See GPT-4 and GPT-4 Turbo Preview model availability for available regions. For more information about resource creation, see the resource deployment guide.
- For Vision enhancement (optional): An Azure Computer Vision resource in the same region as your Azure OpenAI resource, in the paid (S1) tier.
Set up
Install the OpenAI Python client library with:
pip install openai
Note
This library is maintained by OpenAI. Refer to the release history to track the latest updates to the library.
Retrieve key and endpoint
To successfully make a call against Azure OpenAI, you need an endpoint and a key.
| Variable name | Value |
|---|---|
ENDPOINT |
This value can be found in the Keys & Endpoint section when examining your resource from the Azure portal. Alternatively, you can find the value in the Azure OpenAI Studio > Playground > Code View. An example endpoint is: https://docs-test-001.openai.azure.com/. |
API-KEY |
This value can be found in the Keys & Endpoint section when examining your resource from the Azure portal. You can use either KEY1 or KEY2. |
Go to your resource in the Azure portal. The Keys & Endpoint section can be found in the Resource Management section. Copy your endpoint and access key as you'll need both for authenticating your API calls. You can use either KEY1 or KEY2. Always having two keys allows you to securely rotate and regenerate keys without causing a service disruption.
Environment variables
Create and assign persistent environment variables for your key and endpoint.
setx AZURE_OPENAI_API_KEY "REPLACE_WITH_YOUR_KEY_VALUE_HERE"
setx AZURE_OPENAI_ENDPOINT "REPLACE_WITH_YOUR_ENDPOINT_HERE"
Create a new Python application
Create a new Python file named quickstart.py. Open the new file in your preferred editor or IDE.
Replace the contents of quickstart.py with the following code.
from openai import AzureOpenAI

api_base = os.getenv("AZURE_OPENAI_ENDPOINT")
api_key= os.getenv("AZURE_OPENAI_API_KEY")
deployment_name = '<your_deployment_name>'
api_version = '2023-12-01-preview' # this might change in the future

client = AzureOpenAI(
    api_key=api_key,
    api_version=api_version,
    base_url=f"{api_base}/openai/deployments/{deployment_name}"
)

response = client.chat.completions.create(
    model=deployment_name,
    messages=[
        { "role": "system", "content": "You are a helpful assistant." },
        { "role": "user", "content": [
            {
                "type": "text",
                "text": "Describe this picture:"
            },
            {
                "type": "image_url",
                "image_url": {
                    "url": "<image URL>"
                }
            }
        ] }
    ],
    max_tokens=2000
)

print(response)
Make the following changes:
- Enter the name of your GPT-4 Turbo with Vision deployment in the appropriate field.
- Change the value of the
"url"field to the URL of your image.Tip
You can also use a base 64 encoded image data instead of a URL. For more information, see the GPT-4 Turbo with Vision how-to guide.
Run the application with the
pythoncommand:python quickstart.py
Clean up resources
If you want to clean up and remove an Azure OpenAI resource, you can delete the resource or resource group. Deleting the resource group also deletes any other resources associated with it.
Next steps
- Learn more about these APIs in the GPT-4 Turbo with Vision how-to guide
- GPT-4 Turbo with Vision frequently asked questions
- GPT-4 Turbo with Vision API reference
Feedback
Coming soon: Throughout 2024 we will be phasing out GitHub Issues as the feedback mechanism for content and replacing it with a new feedback system. For more information see: https://aka.ms/ContentUserFeedback.
Submit and view feedback for


