Configure a container image to execute deployments
In this article, you learn how to build custom container images to deploy your environment definitions in Azure Deployment Environments (ADE).
An environment definition comprises at least two files: a template file, like azuredeploy.json, and a manifest file named environment.yaml. ADE uses containers to deploy environment definitions, and natively supports the Azure Resource Manager (ARM) and Bicep IaC frameworks.
The ADE extensibility model enables you to create custom container images to use with your environment definitions. By using the extensibility model, you can create your own custom container images, and store them in a container registry like DockerHub. You can then reference these images in your environment definitions to deploy your environments.
The ADE team provides a selection of images to get you started, including a core image, and an Azure Resource Manager (ARM)/Bicep image. You can access these sample images in the Runner-Images folder.
Prerequisites
- An Azure account with an active subscription. Create an account for free.
- Azure Deployment Environments set up in your Azure subscription.
- To set up ADE, follow the Quickstart: Configure Azure Deployment Environments.
Use container images with ADE
You can take one of the following approaches to use container images with ADE:
- Use the standard container image: For simple scenarios, use the standard Bicep container image provided by ADE.
- Create a custom container image: For more complex scenarios, create a custom container image that meets your specific requirements.
Regardless of which approach you choose, you must specify the container image in your environment definition to deploy your Azure resources.
Use a standard image
ADE supports Bicep natively, so you can configure an environment definition that deploys Azure resources for a deployment environment by adding the template files (azuredeploy.json and environment.yaml) to your catalog. ADE then uses the standard Bicep container image to create the deployment environment.
In the environment.yaml file, the runner property specifies the location of the container image you want to use. To use the sample image published on the Microsoft Artifact Registry, use the respective identifiers runner, as listed in the following table.
The following example shows a runner that references the sample Bicep container image:
    name: WebApp
    version: 1.0.0
    summary: Azure Web App Environment
    description: Deploys a web app in Azure without a datastore
    runner: Bicep
    templatePath: azuredeploy.json
You can see the standard Bicep container image in the ADE sample repository under the Runner-Images folder for the ARM-Bicep image.
For more information about how to create environment definitions that use the ADE container images to deploy your Azure resources, see Add and configure an environment definition.
Create a custom container image
Creating a custom container image allows you to customize your deployments to fit your requirements. You can create custom images based on the ADE standard container images.
After you complete the image customization, you must build the image and push it to your container registry.
Create and customize a container image with Docker
In this example, you learn how to build a Docker image to utilize ADE deployments and access the ADE CLI, basing your image on one of the ADE authored images.
The ADE CLI is a tool that allows you to build custom images by using ADE base images. You can use the ADE CLI to customize your deployments and deletions to fit your workflow. The ADE CLI is preinstalled on the sample images. To learn more about the ADE CLI, see the CLI Custom Runner Image reference.
To create an image configured for ADE, follow these steps:
- Base your image on an ADE-authored sample image or the image of your choice by using the FROM statement.
- Install any necessary packages for your image by using the RUN statement.
- Create a scripts folder at the same level as your Dockerfile, store your deploy.sh and delete.sh files within it, and ensure those scripts are discoverable and executable inside your created container. This step is necessary for your deployment to work using the ADE core image.
Select a sample container image by using the FROM statement
To build a Docker image to utilize ADE deployments and access the ADE CLI, you should base your image on one of the ADE-authored images. Including a FROM statement within a created DockerFile for your new image that points to an ADE-authored sample image hosted on Microsoft Artifact Registry. When using ADE-authored images, you should base your custom image on the ADE core image.
Here's an example FROM statement, referencing the sample core image:
FROM mcr.microsoft.com/deployment-environments/runners/core:latest
This statement pulls the most recently published core image, and makes it a basis for your custom image.
Install packages in an image
You can install packages with the Azure CLI by using the RUN statement, as shown in the following example:
RUN az bicep install
The ADE sample images are based on the Azure CLI image, and have the ADE CLI and JQ packages preinstalled. You can learn more about the Azure CLI, and the JQ package.
To install any more packages you need within your image, use the RUN statement.
Execute operation shell scripts
Within the sample images, operations are determined and executed based on the operation name. Currently, the two operation names supported are deploy and delete.
To set up your custom image to utilize this structure, specify a folder at the level of your Dockerfile named scripts, and specify two files, deploy.sh, and delete.sh. The deploy shell script runs when your environment is created or redeployed, and the delete shell script runs when your environment is deleted. You can see examples of shell scripts in the repository under the Runner-Images folder image.
To ensure these shell scripts are executable, add the following lines to your Dockerfile:
COPY scripts/* /scripts/
RUN find /scripts/ -type f -iname "*.sh" -exec dos2unix '{}' '+'
RUN find /scripts/ -type f -iname "*.sh" -exec chmod +x {} \;
Make the custom image accessible to ADE
You must build your Docker image and push it to your container registry to make it available for use in ADE. You can build your image using the Docker CLI, or by using a script provided by ADE.
Select the appropriate tab to learn more about each approach.
Before you build the image to be pushed to your registry, ensure the Docker Engine is installed on your computer. Then, navigate to the directory of your Dockerfile, and run the following command:
docker build . -t {YOUR_REGISTRY}.azurecr.io/{YOUR_REPOSITORY}:{YOUR_TAG}
For example, if you want to save your image under a repository within your registry named customImage, and upload with the tag version of 1.0.0, you would run:
docker build . -t {YOUR_REGISTRY}.azurecr.io/customImage:1.0.0
Push the image to a registry
In order to use custom images, you need to set up a publicly accessible image registry with anonymous image pull enabled. This way, Azure Deployment Environments can access your custom image to execute in our container.
Azure Container Registry is an Azure offering that stores container images and similar artifacts.
To create a registry, which can be done through the Azure CLI, the Azure portal, PowerShell commands, and more, follow one of the quickstarts.
To set up your registry to have anonymous image pull enabled, run the following commands in the Azure CLI:
az login
az acr login -n {YOUR_REGISTRY}
az acr update -n {YOUR_REGISTRY} --public-network-enabled true
az acr update -n {YOUR_REGISTRY} --anonymous-pull-enabled true
When you're ready to push your image to your registry, run the following command:
docker push {YOUR_REGISTRY}.azurecr.io/{YOUR_IMAGE_LOCATION}:{YOUR_TAG}
Connect the image to your environment definition
When authoring environment definitions to use your custom image in their deployment, edit the runner property on the manifest file (environment.yaml or manifest.yaml).
runner: "{YOUR_REGISTRY}.azurecr.io/{YOUR_REPOSITORY}:{YOUR_TAG}"
Access operation logs and error details
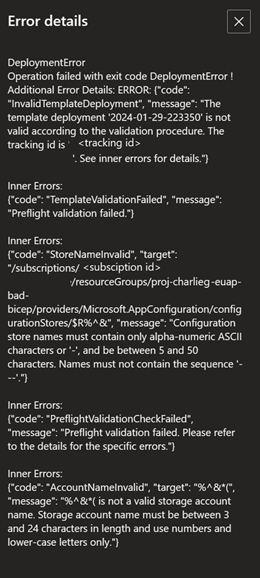
ADE stores error details for a failed deployment in the $ADE_ERROR_LOG file within the container.
To troubleshoot a failed deployment:
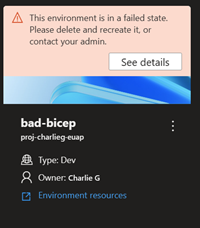
Sign in to the Developer Portal.
Identify the environment that failed to deploy, and select See details.
Review the error details in the Error Details section.
Additionally, you can use the Azure CLI to view an environment's error details using the following command:
az devcenter dev environment show --environment-name {YOUR_ENVIRONMENT_NAME} --project {YOUR_PROJECT_NAME}
To view the operation logs for an environment deployment or deletion, use the Azure CLI to retrieve the latest operation for your environment, and then view the logs for that operation ID.
# Get list of operations on the environment, choose the latest operation
az devcenter dev environment list-operation --environment-name {YOUR_ENVIRONMENT_NAME} --project {YOUR_PROJECT_NAME}
# Using the latest operation ID, view the operation logs
az devcenter dev environment show-logs-by-operation --environment-name {YOUR_ENVIRONMENT_NAME} --project {YOUR_PROJECT_NAME} --operation-id {LATEST_OPERATION_ID}
Related content
Feedback
Coming soon: Throughout 2024 we will be phasing out GitHub Issues as the feedback mechanism for content and replacing it with a new feedback system. For more information see: https://aka.ms/ContentUserFeedback.
Submit and view feedback for

