Configure ADE to execute deployments with Pulumi
In this article, you learn how to utilize Pulumi for deployments in Azure Deployment Environments (ADE). You learn how to use a standard image provided by Pulumi or how to configure a custom image to provision infrastructure using the Pulumi Infrastructure-as-Code (IaC) framework.
ADE supports an extensibility model that enables you to create custom images that you can use in your environment definitions. To use this extensibility model, you can create your own custom images, and store them in a public container registry. You can then reference these images in your environment definitions to deploy your environments.
An environment definition comprises at least two files: a Pulumi project file, Pulumi.yaml, and a manifest file named environment.yaml. It may also contain a user program written in your preferred programming language: C#, TypeScript, Python, etc. ADE uses containers to deploy environment definitions.
Prerequisites
- An Azure account with an active subscription. Create an account for free.
- Azure Deployment Environments set up in your Azure subscription.
- To set up ADE, follow the Quickstart: Configure Azure Deployment Environments.
Use a standard Docker image provided by Pulumi
The Pulumi team provides a prebuilt image to get you started, which you can see in the Runner-Image folder. This image is publicly available at Pulumi's Docker Hub as pulumi/azure-deployment-environments, so you can use it directly from your ADE environment definitions.
Here's a sample environment.yaml file that utilizes the prebuilt image:
name: SampleDefinition
version: 1.0.0
summary: First Pulumi-Enabled Environment
description: Deploys a Storage Account with Pulumi
runner: pulumi/azure-deployment-environments:0.1.0
templatePath: Pulumi.yaml
You can find a few sample environment definitions in the Environments folder.
Build and utilize a custom Docker image
You can build custom images based on the ADE sample images by using the ADE CLI tool. Use the ADE CLI to customize your deployments and deletions to fit your workflow. The ADE CLI is preinstalled on the sample images. To learn more about the ADE CLI, see the CLI Custom Runner Image reference.
In this example, you learn how to build a Docker image to utilize ADE deployments and access the ADE CLI, basing your image on one of the ADE authored images.
Select a sample container image by using the FROM statement
Include a FROM statement within a created DockerFile for your new image pointing to a sample image hosted on Microsoft Artifact Registry.
Here's an example FROM statement, referencing the sample core image:
FROM mcr.microsoft.com/deployment-environments/runners/core:latest
This statement pulls the most recently published core image, and makes it a basis for your custom image.
The ADE sample images are based on the Azure CLI image, and have the ADE CLI and JQ packages preinstalled. You can learn more about the Azure CLI, and the JQ package.
To install any more packages you need within your image, use the RUN statement.
Install Pulumi in a Dockerfile
You can install the Pulumi CLI to an executable location so that it can be used in your deployment and deletion scripts.
Here's an example of that process, installing the latest version of the Pulumi CLI:
RUN apk add curl
RUN curl -fsSL https://get.pulumi.com | sh
ENV PATH="${PATH}:/root/.pulumi/bin"
Depending on which programming language you intend to use for Pulumi programs, you might need to install one or more corresponding runtime. The Python runtime is already available in the base image.
Here's an example of installing Node.js and TypeScript:
# install node.js, npm, and typescript
RUN apk add nodejs npm
RUN npm install typescript -g
Execute operation shell scripts
Within the sample images, operations are determined and executed based on the operation name. Currently, the two operation names supported are deploy and delete.
To set up your custom image to utilize this structure, specify a folder at the level of your Dockerfile named scripts, and specify two files, deploy.sh, and delete.sh. The deploy shell script runs when your environment is created or redeployed, and the delete shell script runs when your environment is deleted. You can see examples of shell scripts in the repository under the Runner-Image/scripts folder.
To ensure these shell scripts are executable, add the following lines to your Dockerfile:
COPY scripts/* /scripts/
RUN find /scripts/ -type f -iname "*.sh" -exec dos2unix '{}' '+'
RUN find /scripts/ -type f -iname "*.sh" -exec chmod +x {} \;
Author operation shell scripts to use the Pulumi CLI
There are four steps to deploy infrastructure via Pulumi:
pulumi login- connect to the state storage, either in local file system or in Pulumi Cloudpulumi stack select- create or select the stack to use for the particular environmentpulumi config set- pass deployment parameters as Pulumi configuration valuespulumi up- run the deployment to create new or update existing infrastructure in Azure
During the core image's entrypoint, any existing local state files are pulled into the container and the directory saved under the environment variable $ADE_STORAGE. In order to access the existing state file, run the following commands:
mkdir -p $ADE_STORAGE
export PULUMI_CONFIG_PASSPHRASE=
pulumi login file://$ADE_STORAGE
To log in to Pulumi Cloud instead, set your Pulumi access token as an environment variable, and run the following commands:
export PULUMI_ACCESS_TOKEN=YOUR_PULUMI_ACCESS_TOKEN
pulumi login
Any parameters set for the current environment are stored under the variable $ADE_OPERATION_PARAMETERS. Additionally, the selected Azure region and resource group name are passed in ADE_ENVIRONMENT_LOCATION and ADE_RESOURCE_GROUP_NAME respectively. In order to set your Pulumi stack config, run the following commands:
# Create or select the stack for the current environment
pulumi stack select $ADE_ENVIRONMENT_NAME --create

# Store configuration values in durable storage
export PULUMI_CONFIG_FILE=$ADE_STORAGE/Pulumi.$ADE_ENVIRONMENT_NAME.yaml

# Set the Pulumi stack config
pulumi config set azure-native:location $ADE_ENVIRONMENT_LOCATION --config-file $PULUMI_CONFIG_FILE
pulumi config set resource-group-name $ADE_RESOURCE_GROUP_NAME --config-file $PULUMI_CONFIG_FILE
echo "$ADE_OPERATION_PARAMETERS" | jq -r 'to_entries|.[]|[.key, .value] | @tsv' |
  while IFS=$'\t' read -r key value; do
    pulumi config set $key $value --config-file $PULUMI_CONFIG_FILE
  done
Additionally, to utilize ADE privileges to deploy infrastructure inside your subscription, your script needs to use ADE Managed Service Identity (MSI) when provisioning infrastructure by using the Pulumi Azure Native or Azure Classic provider. If your deployment needs special permissions to complete your deployment, such as particular roles, assign those permissions to the project environment type's identity that is being used for your environment deployment. ADE sets the relevant environment variables, such as the client, tenant, and subscription IDs within the core image's entrypoint, so run the following commands to ensure the provider uses ADE MSI:
export ARM_USE_MSI=true
export ARM_CLIENT_ID=$ADE_CLIENT_ID
export ARM_TENANT_ID=$ADE_TENANT_ID
export ARM_SUBSCRIPTION_ID=$ADE_SUBSCRIPTION_ID
Now, you can run the pulumi up command to execute the deployment:
pulumi up --refresh --yes --config-file $PULUMI_CONFIG_FILE
During your deletion script, you can instead run the destroy command, as shown in the following example:
pulumi destroy --refresh --yes --config-file $PULUMI_CONFIG_FILE
Finally, to make the outputs of your deployment uploaded and accessible when accessing your environment via the Azure CLI, transform the output object from Pulumi to the ADE-specified format through the JQ package. Set the value to the $ADE_OUTPUTS environment variable, as shown in the following example:
stackout=$(pulumi stack output --json | jq -r 'to_entries|.[]|{(.key): {type: "string", value: (.value)}}')
echo "{\"outputs\": ${stackout:-{\}}}" > $ADE_OUTPUTS
Build the image
Before you build the image to be pushed to your registry, ensure the Docker Engine is installed on your computer. Then, navigate to the directory of your Dockerfile, and run the following command:
docker build . -t {YOUR_REGISTRY}.azurecr.io/{YOUR_REPOSITORY}:{YOUR_TAG}
For example, if you want to save your image under a repository within your registry named customImage, and upload with the tag version of 1.0.0, you would run:
docker build . -t {YOUR_REGISTRY}.azurecr.io/customImage:1.0.0
Push the Docker image to a registry
In order to use custom images, you need to set up a publicly accessible image registry with anonymous image pull enabled. This way, Azure Deployment Environments can access your custom image to execute in our container.
Create an Azure Container Registry and publish your image with Pulumi
Azure Container Registry is an Azure offering that stores container images and similar artifacts.
You can use Pulumi to create an Azure Container Registry and publish your image to it. Refer to the Provisioning/custom-image example for a self-contained Pulumi project that creates all the required resources in your Azure account.
Create an Azure Container Registry and publish your image manually via CLI
To create a registry, which can be done through the Azure CLI, the Azure portal, PowerShell commands, and more, follow one of the quickstarts.
To set up your registry to have anonymous image pull enabled, run the following commands in the Azure CLI:
az login
az acr login -n {YOUR_REGISTRY}
az acr update -n {YOUR_REGISTRY} --public-network-enabled true
az acr update -n {YOUR_REGISTRY} --anonymous-pull-enabled true
When you're ready to push your image to your registry, run the following command:
docker push {YOUR_REGISTRY}.azurecr.io/{YOUR_IMAGE_LOCATION}:{YOUR_TAG}
Connect the image to your environment definition
When authoring environment definitions to use your custom image in their deployment, edit the runner property on the manifest file (environment.yaml or manifest.yaml).
runner: "{YOUR_REGISTRY}.azurecr.io/{YOUR_REPOSITORY}:{YOUR_TAG}"
Access operation logs and error details
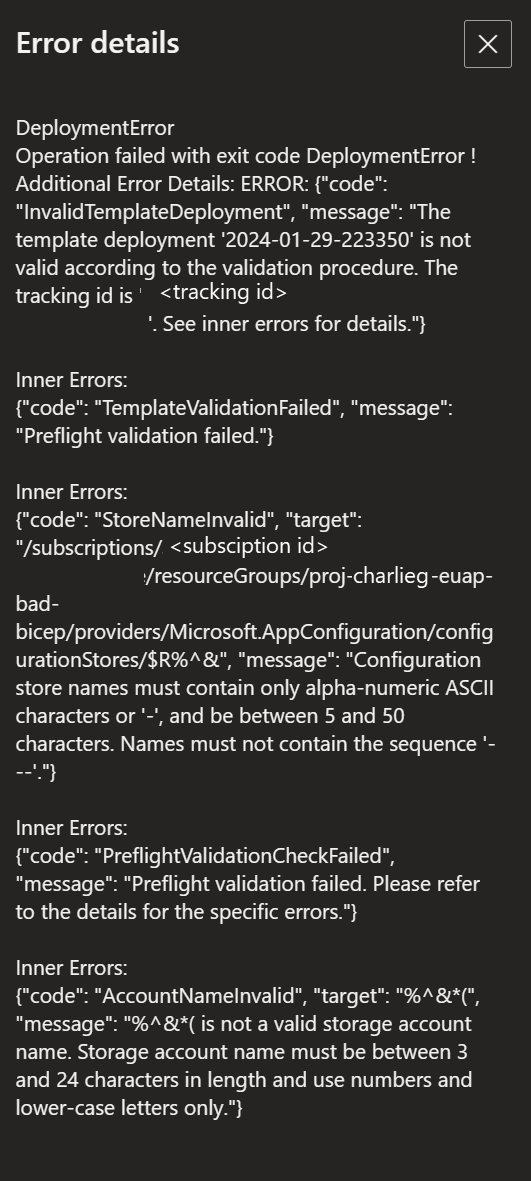
ADE stores error details for a failed deployment the $ADE_ERROR_LOG file.
To troubleshoot a failed deployment:
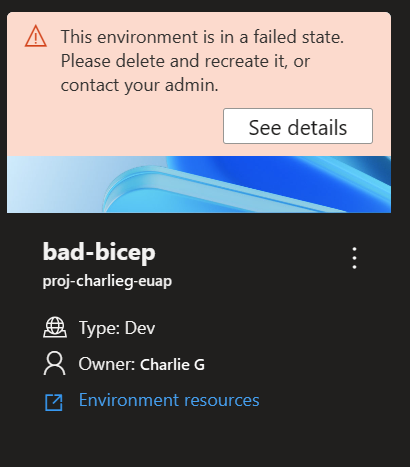
Sign in to the Developer Portal.
Identify the environment that failed to deploy, and select See details.
Review the error details in the Error Details section.
Additionally, you can use the Azure CLI to view an environment's error details using the following command:
az devcenter dev environment show --environment-name {YOUR_ENVIRONMENT_NAME} --project {YOUR_PROJECT_NAME}
To view the operation logs for an environment deployment or deletion, use the Azure CLI to retrieve the latest operation for your environment, and then view the logs for that operation ID.
# Get list of operations on the environment, choose the latest operation
az devcenter dev environment list-operation --environment-name {YOUR_ENVIRONMENT_NAME} --project {YOUR_PROJECT_NAME}
# Using the latest operation ID, view the operation logs
az devcenter dev environment show-logs-by-operation --environment-name {YOUR_ENVIRONMENT_NAME} --project {YOUR_PROJECT_NAME} --operation-id {LATEST_OPERATION_ID}
Related content
Feedback
Coming soon: Throughout 2024 we will be phasing out GitHub Issues as the feedback mechanism for content and replacing it with a new feedback system. For more information see: https://aka.ms/ContentUserFeedback.
Submit and view feedback for

