Configure Grafana teams with Microsoft Entra groups and Grafana team sync
In this guide, you learn how to useMicrosoft Entra groups with Grafana Team Sync to manage dashboard permissions in Azure Managed Grafana.
In Azure Managed Grafana, you can use Azure's role-based access control (RBAC) roles for Grafana to define access rights. These permissions apply to all resources in your Grafana workspace by default, not per folder or dashboard. If you assign a user to the Grafana Editor role, that user can edit any dashboard in your Grafana workspace. However, with Grafana's granular permission model, you can adjust a user's default permission level for specific dashboards or dashboard folders.
Microsoft Entra group sync helps you manage this. With it, you can create a Grafana team in a Grafana workspace, link it to a Microsoft Entra group, and then configure your dashboard permissions for that team. For example, you can allow a Grafana viewer to modify a dashboard, or prevent a Grafana editor from making changes.
Prerequisites
Before you start, make sure you have:
- An Azure account with an active subscription. Create an account for free.
- An Azure Managed Grafana instance. If needed, create a new instance.
- A Microsoft Entra group. If needed, create a basic group and add members.
Assign a permission to a Microsoft Entra group
The Microsoft Entra group must have a Grafana role to access the Grafana instance.
In your Grafana workspace, open the Access control (IAM) menu select Add > Add new role assignment.
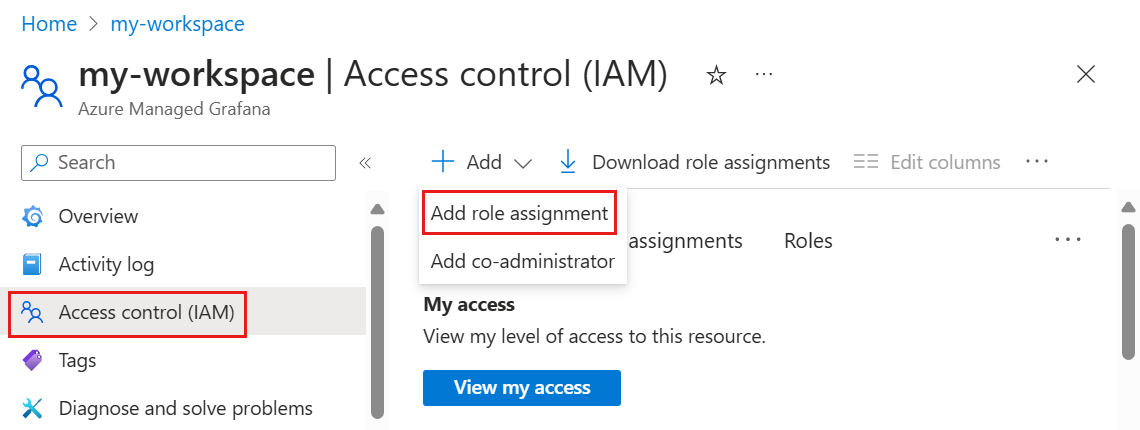
Assign a role, such as Grafana viewer, to the Microsoft Entra group. For more information about assigning a role, go to Grant access.
Create a Grafana team
Set up a Microsoft Entra ID-backed Grafana team.
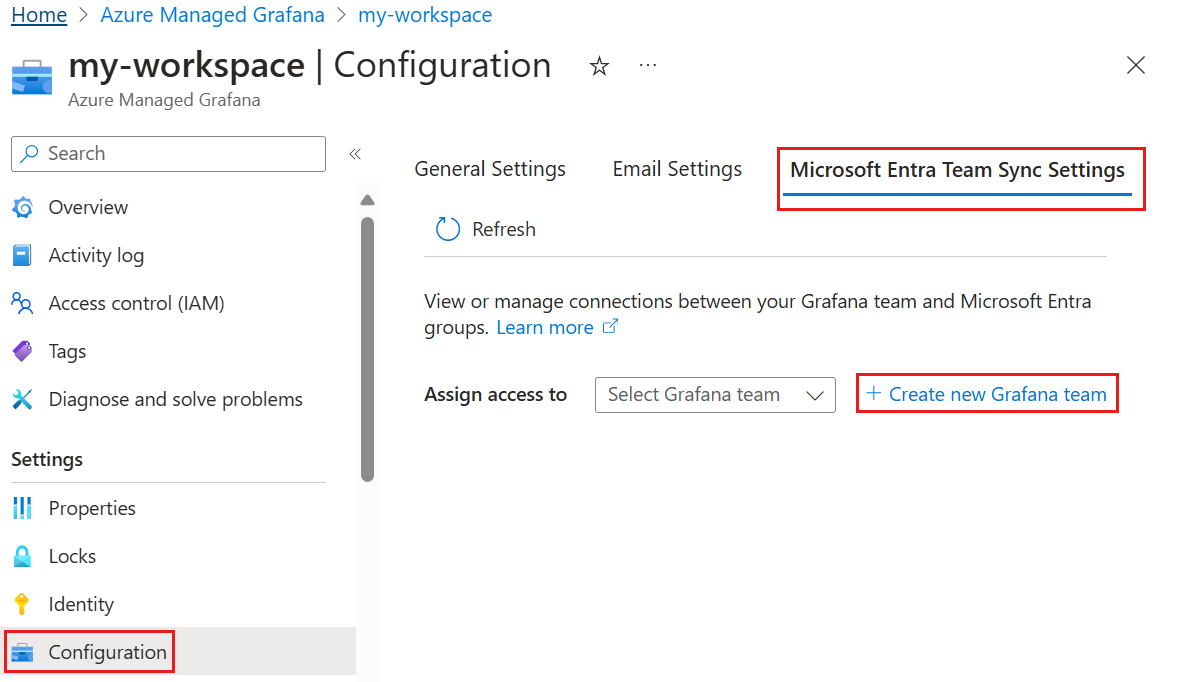
In the Azure portal, open your Grafana instance and select Configuration under Settings.
Select the Microsoft Entra Team Sync Settings tab.
Select Create new Grafana team.
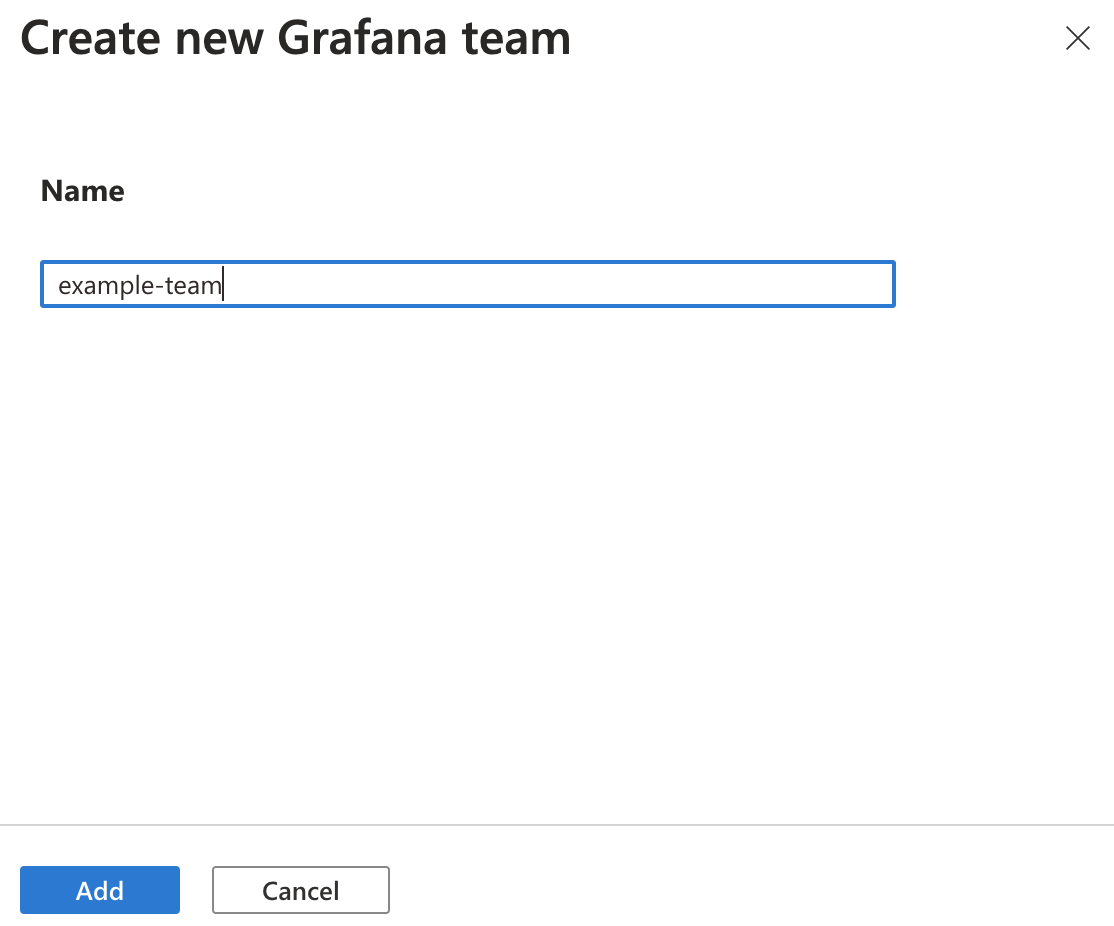
Enter a name for the Grafana team and select Add.
Assign a Microsoft Entra group to a Grafana team
In Assign access to, select the newly created Grafana team.
Select + Add a Microsoft Entra group.
In the search box, enter a Microsoft Entra group name and select the group name in the results. Click Select to confirm.
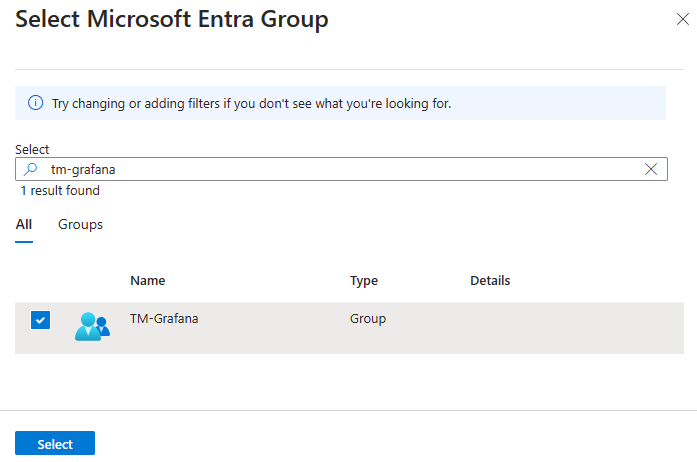
Optionally repeat the previous three steps to add more Microsoft Entra groups to the Grafana team.
Assign access to a Grafana folder or dashboard
In the Grafana UI, open a folder or a dashboard.
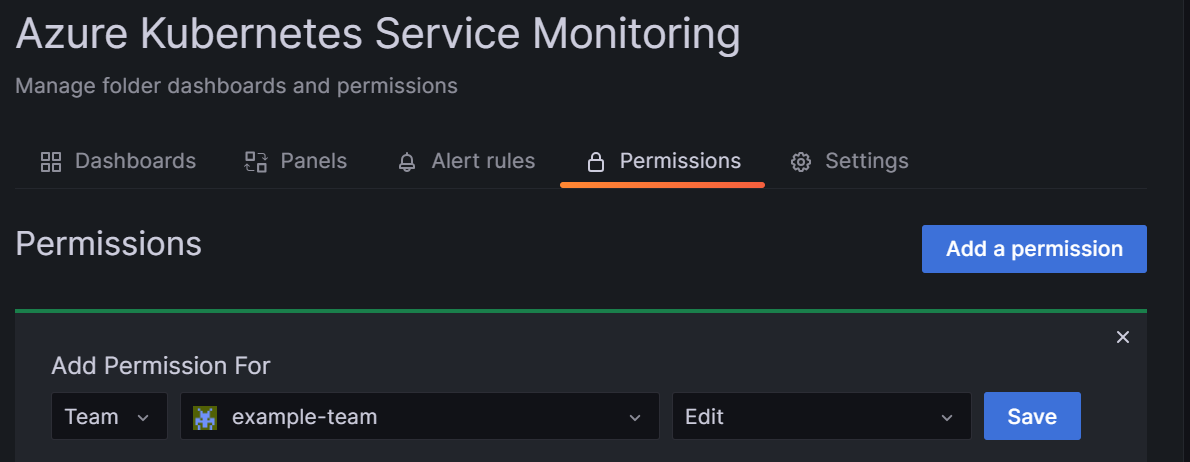
In the Permissions tab, select Add a permission.
Under Add permission for, select Team, then select the team name, the View, Edit or Admin permission, and save. You can add permissions for a user, a team or a role.
Tip
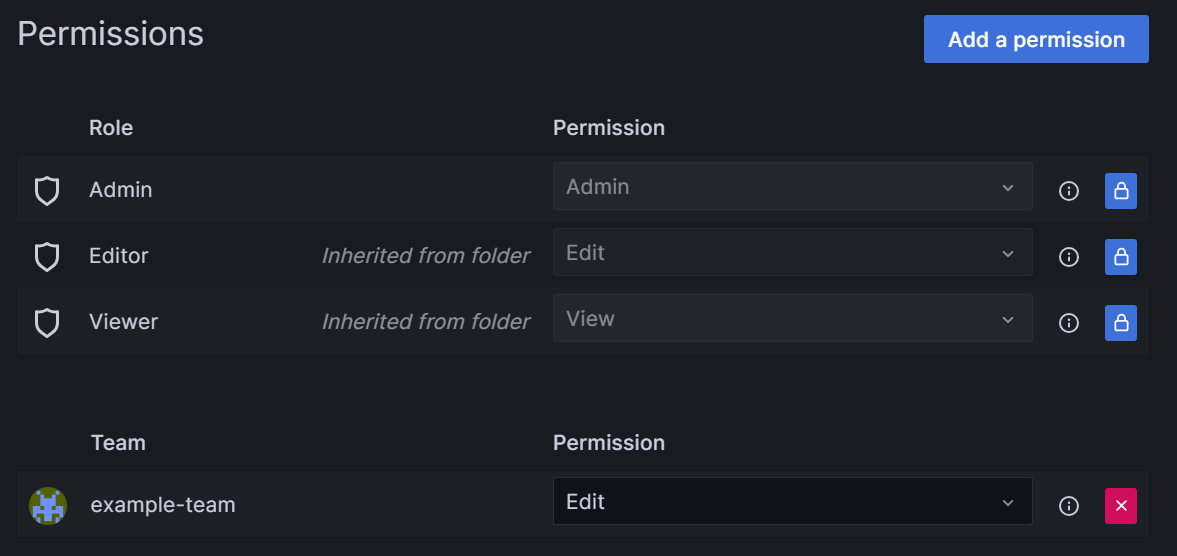
To check existing access permissions for a dashboard, open a dashboard and go to the Permissions tab. This page shows all permissions assigned for this dashboard and all inherited permissions.
Scope down access
You can limit access by removing permissions to access one or more folders.
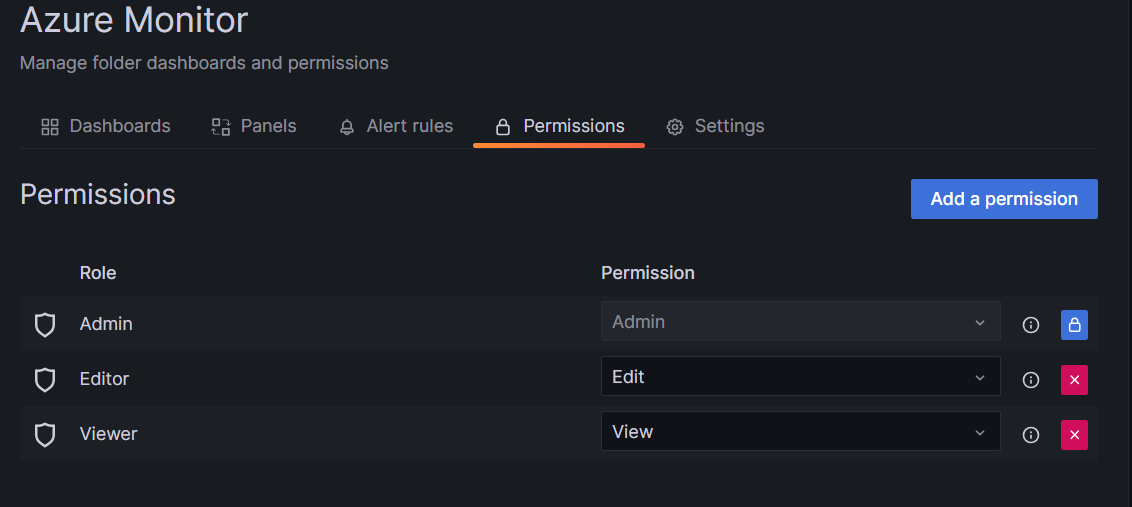
For example, to disable access to a user who has the Grafana Viewer role on a Grafana instance, remove their access to a Grafana folder by following these steps:
In the Grafana UI, go to a folder you want to hide from the user.
In the Permissions tab, select the X button to the right of the Viewer permission to remove this permission from this folder.
Repeat this step for all folders you want to hide from the user.
Remove Microsoft Entra group sync
If you no longer need a Grafana team, follow these steps to delete it. Deleting a Grafana team also removes the link to the Microsoft Entra group.
In the Azure portal, open your Azure Managed Grafana workspace.
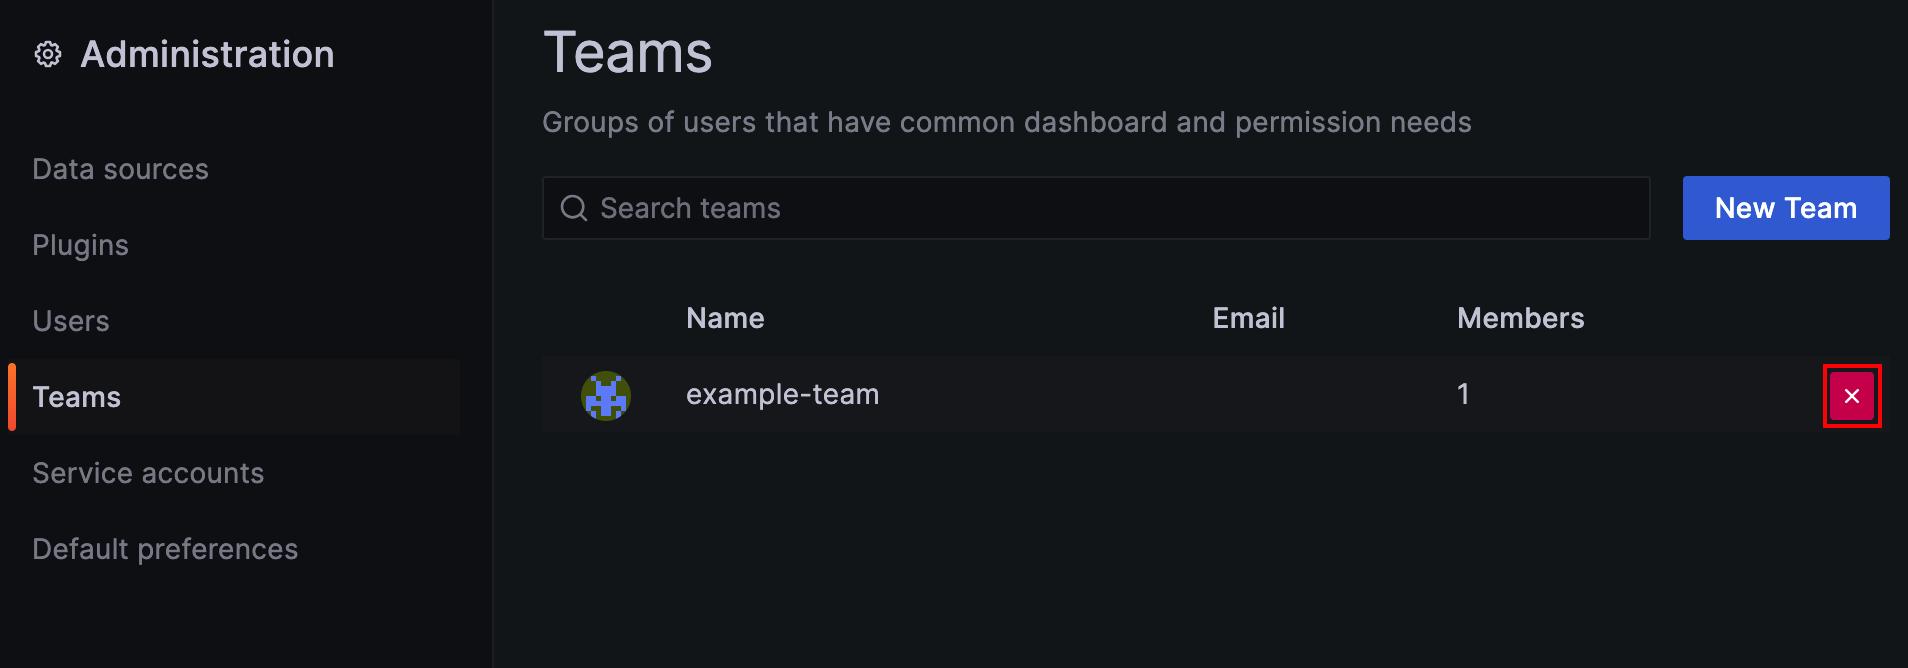
Select Administration > Teams.
Select the X button to the right of a team you're deleting.
Select Delete to confirm.
Next steps
In this how-to guide, you learned how to set up Grafana teams backed by Microsoft Entra groups. To learn how to use teams to control access to dashboards in your workspace, see Manage dashboard permissions.
Feedback
Coming soon: Throughout 2024 we will be phasing out GitHub Issues as the feedback mechanism for content and replacing it with a new feedback system. For more information see: https://aka.ms/ContentUserFeedback.
Submit and view feedback for
