Quickstart: Send an SMS message
Important
SMS capabilities depend on the phone number you use and the country/region that you're operating within as determined by your Azure billing address. For more information, see Subscription eligibility.
Note
Please share your thoughts and feedback about Azure Communication Services with us by taking this short survey.
Get started with Azure Communication Services by using the Communication module in Azure CLI to send SMS messages.
Completing this quickstart incurs a small cost of a few USD cents or less in your Azure account.
Prerequisites
- An Azure account with an active subscription. Create an account for free.
- An active Communication Services resource and connection string. Create a Communication Services resource.
- An SMS-enabled telephone number. Get a phone number.
- The latest Azure CLI version for your operating system.
Prerequisite check
- In a terminal or command window, run
az --versionto check that Azure CLI is installed.
Setting up
Install the communication module
Run the following command in a terminal or command window to install the communication module.
az extension add --name communication
Sign in to Azure CLI
You'll need to sign in to Azure CLI. You can sign in running the az login command from the terminal and providing your credentials.
Make sure you're using the correct subscription
If you have multiple subscriptions in your account, make sure that you're using the correct one for this tutorial.
In a terminal or command windows, run the following command to check the current subscription.
az account show
If you need to change subscription, you can do that by running the following command.
az account set --subscription "<yourSubcriptionId>"
You need to replace <yourSubscriptionId> with your actual subscription ID, which you can find in the Subscriptions section in Azure portal.
(Optional) Use Azure CLI sms operations without passing in a connection string
You can configure the AZURE_COMMUNICATION_CONNECTION_STRING environment variable to use Azure CLI sms operations without having to use --connection_string to pass in the connection string. To configure an environment variable, open a console window and select your operating system from the below tabs. Replace <yourConnectionString> with your actual connection string.
Open a console window and enter the following command:
setx AZURE_COMMUNICATION_CONNECTION_STRING "<yourConnectionString>"
After you add the environment variable, you may need to restart any running programs that will need to read the environment variable, including the console window. For example, if you're using Visual Studio as your editor, restart Visual Studio before running the example.
Operations
Send a 1:1 SMS message
To send an SMS message to a single recipient, call the send method from the sms module with a single recipient phone number.
az communication sms send --sender "<fromPhoneNumber>" --recipient "<toPhoneNumber>" --message "Hello world via SMS for Azure CLI!" --connection-string "<yourConnectionString>"
Make these replacements in the code:
- Replace
<fromPhoneNumber>with an SMS-enabled phone number that's associated with your Communication Services resource. - Replace
<toPhoneNumber>with a phone number that you'd like to send a message to. - Replace
<yourConnectionString>with your connection string.
Warning
Provide phone numbers in E.164 international standard format, for example, +14255550123. The value for <fromPhoneNumber> can also be a short code, for example, 23456 or an alphanumeric sender ID, for example, CONTOSO.
Send a 1:N SMS message
To send an SMS message to a list of recipients, call the send method from the sms module with multiple recipient phone numbers.
az communication sms send --sender "<fromPhoneNumber>" --recipient "<toPhoneNumber1>" "<toPhoneNumber2>" "<toPhoneNumber3>" --message "Hello world via SMS for Azure CLI!" --connection-string "<yourConnectionString>"
Make these replacements in the code:
- Replace
<fromPhoneNumber>with an SMS-enabled phone number that's associated with your Communication Services resource. - Replace
<toPhoneNumberN>with the N'th phone number that you'd like to send a message to. - Replace
<yourConnectionString>with your connection string.
Warning
Provide phone numbers in E.164 international standard format, for example, +14255550123. The value for <fromPhoneNumber> can also be a short code, for example, 23456 or an alphanumeric sender ID, for example, CONTOSO.
Get started with Azure Communication Services by using the Communication Services C# SMS SDK to send SMS messages.
Completing this quickstart incurs a small cost of a few USD cents or less in your Azure account.
Note
Find the finalized code for this quickstart on GitHub.
Prerequisites
- An Azure account with an active subscription. Create an account for free.
- The latest version of .NET Core SDK for your operating system.
- An active Communication Services resource and connection string. Create a Communication Services resource.
- An SMS-enabled telephone number. Get a phone number.
Prerequisite check
- In a terminal or command window, run the
dotnetcommand to check that the .NET SDK is installed. - To view the phone numbers that are associated with your Communication Services resource, sign in to the Azure portal and locate your Communication Services resource. In the navigation pane on the left, select Phone numbers.
Set up the application environment
To set up an environment for sending messages, take the steps in the following sections.
Create a new C# application
In a console window, such as cmd, PowerShell, or Bash, use the
dotnet newcommand to create a new console app with the nameSmsQuickstart. This command creates a simple "Hello World" C# project with a single source file, Program.cs.dotnet new console -o SmsQuickstartChange your directory to the newly created app folder and use the
dotnet buildcommand to compile your application.cd SmsQuickstart dotnet build
Install the package
While still in the application directory, install the Azure Communication Services SMS SDK for .NET package by using the following command.
dotnet add package Azure.Communication.Sms --version 1.0.0Add a
usingdirective to the top of Program.cs to include theAzure.Communicationnamespace.using System; using System.Collections.Generic; using Azure; using Azure.Communication; using Azure.Communication.Sms;
Object model
The following classes and interfaces handle some of the major features of the Azure Communication Services SMS SDK for C#.
| Name | Description |
|---|---|
| SmsClient | This class is needed for all SMS functionality. You instantiate it with your subscription information, and use it to send SMS messages. |
| SmsSendOptions | This class provides options for configuring delivery reporting. If enable_delivery_report is set to True, an event is emitted when delivery is successful. |
| SmsSendResult | This class contains the result from the SMS service. |
Authenticate the client
Open Program.cs in a text editor and replace the body of the Main method with code to initialize an SmsClient with your connection string. The following code retrieves the connection string for the resource from an environment variable named COMMUNICATION_SERVICES_CONNECTION_STRING. Learn how to manage your resource's connection string.
// This code retrieves your connection string
// from an environment variable.
string connectionString = Environment.GetEnvironmentVariable("COMMUNICATION_SERVICES_CONNECTION_STRING");

SmsClient smsClient = new SmsClient(connectionString);
Send a 1:1 SMS message
To send an SMS message to a single recipient, call the Send or SendAsync function from the SmsClient. Add this code to the end of the Main method in Program.cs:
SmsSendResult sendResult = smsClient.Send(
    from: "<from-phone-number>",
    to: "<to-phone-number>",
    message: "Hello World via SMS"
);

Console.WriteLine($"Sms id: {sendResult.MessageId}");
Make these replacements in the code:
- Replace
<from-phone-number>with an SMS-enabled phone number that's associated with your Communication Services resource. - Replace
<to-phone-number>with the phone number that you'd like to send a message to.
Warning
Provide phone numbers in E.164 international standard format, for example, +14255550123. The value for <from-phone-number> can also be a short code, for example, 23456 or an alphanumeric sender ID, for example, CONTOSO.
Send a 1:N SMS message with options
To send an SMS message to a list of recipients, call the Send or SendAsync function from the SmsClient with a list of recipient phone numbers. You can also provide optional parameters to specify whether the delivery report should be enabled and to set custom tags.
Response<IReadOnlyList<SmsSendResult>> response = smsClient.Send(
    from: "<from-phone-number>",
    to: new string[] { "<to-phone-number-1>", "<to-phone-number-2>" },
    message: "Weekly Promotion!",
    options: new SmsSendOptions(enableDeliveryReport: true) // OPTIONAL
    {
        Tag = "marketing", // custom tags
    });

IEnumerable<SmsSendResult> results = response.Value;
foreach (SmsSendResult result in results)
{
    Console.WriteLine($"Sms id: {result.MessageId}");
    Console.WriteLine($"Send Result Successful: {result.Successful}");
}
Make these replacements in the code:
- Replace
<from-phone-number>with an SMS-enabled phone number that's associated with your Communication Services resource. - Replace
<to-phone-number-1>and<to-phone-number-2>with phone numbers that you'd like to send a message to.
Warning
Provide phone numbers in E.164 international standard format, for example, +14255550123. The value for <from-phone-number> can also be a short code, for example, 23456 or an alphanumeric sender ID, for example, CONTOSO.
The enableDeliveryReport parameter is an optional parameter that you can use to configure delivery reporting. This functionality is useful when you want to emit events when SMS messages are delivered. See the Handle SMS Events quickstart to configure delivery reporting for your SMS messages.
You can use the Tag parameter to apply a tag to the delivery report.
Run the code
Run the application from your application directory with the dotnet run command.
dotnet run
Sample code
You can download the sample app from GitHub.
Get started with Azure Communication Services by using the Communication Services JavaScript SMS SDK to send SMS messages.
Completing this quickstart incurs a small cost of a few USD cents or less in your Azure account.
Note
Find the finalized code for this quickstart on GitHub.
Prerequisites
- An Azure account with an active subscription. Create an account for free.
- Node.js Active LTS and Maintenance LTS versions (8.11.1 and 10.14.1 are recommended).
- An active Communication Services resource and connection string. Create a Communication Services resource.
- An SMS-enabled telephone number. Get a phone number.
Prerequisite check
- In a terminal or command window, run
node --versionto check that Node.js is installed. - To view the phone numbers that are associated with your Communication Services resource, sign in to the Azure portal and locate your Communication Services resource. In the navigation pane on the left, select Phone numbers.
Set up the application environment
To set up an environment for sending messages, take the steps in the following sections.
Create a new Node.js application
Open your terminal or command window, and then run the following command to create a new directory for your app and navigate to it.
mkdir sms-quickstart && cd sms-quickstartRun the following command to create a package.json file with default settings.
npm init -yUse a text editor to create a file called send-sms.js in the project root directory.
In the following sections, you'll add all the source code for this quickstart to the send-sms.js file that you just created.
Install the package
Use the npm install command to install the Azure Communication Services SMS SDK for JavaScript.
npm install @azure/communication-sms --save
The --save option lists the library as a dependency in your package.json file.
Object model
The following classes and interfaces handle some of the major features of the Azure Communication Services SMS SDK for Node.js.
| Name | Description |
|---|---|
| SmsClient | This class is needed for all SMS functionality. You instantiate it with your subscription information, and use it to send SMS messages. |
| SmsSendRequest | This interface is the model for building the SMS request. You use it to configure the to and from phone numbers and the SMS content. |
| SmsSendOptions | This interface provides options for configuring delivery reporting. If enableDeliveryReport is set to true, an event is emitted when delivery is successful. |
| SmsSendResult | This class contains the result from the SMS service. |
Authenticate the client
To authenticate a client, you import the SmsClient from the SDK and instantiate it with your connection string. You can retrieve the connection string for the resource from an environment variable. For instance, the code in this section retrieves the connection string from the COMMUNICATION_SERVICES_CONNECTION_STRING environment variable. Learn how to manage your resource's connection string.
To import the client and instantiate it:
Create a file named send-sms.js.
Add the following code to send-sms.js.
const { SmsClient } = require('@azure/communication-sms');

// This code retrieves your connection string
// from an environment variable.
const connectionString = process.env['COMMUNICATION_SERVICES_CONNECTION_STRING'];

// Instantiate the SMS client.
const smsClient = new SmsClient(connectionString);
Send a 1:N SMS message
To send an SMS message to a list of recipients, call the send function from the SmsClient with a list of recipient phone numbers. If you'd like to send a message to a single recipient, include only one number in the list. Add this code to the end of send-sms.js:
async function main() {
  const sendResults = await smsClient.send({
    from: "<from-phone-number>",
    to: ["<to-phone-number-1>", "<to-phone-number-2>"],
    message: "Hello World 👋🏻 via SMS"
  });

  // Individual messages can encounter errors during sending.
  // Use the "successful" property to verify the status.
  for (const sendResult of sendResults) {
    if (sendResult.successful) {
      console.log("Success: ", sendResult);
    } else {
      console.error("Something went wrong when trying to send this message: ", sendResult);
    }
  }
}

main();
Make these replacements in the code:
- Replace
<from-phone-number>with an SMS-enabled phone number that's associated with your Communication Services resource. - Replace
<to-phone-number-1>and<to-phone-number-2>with the phone numbers that you'd like to send a message to.
Warning
Provide phone numbers in E.164 international standard format, for example, +14255550123. The value for <from-phone-number> can also be a short code, for example, 23456 or an alphanumeric sender ID, for example, CONTOSO.
Send a 1:N SMS message with options
You can also provide an options object to specify whether the delivery report should be enabled and to set custom tags.
async function main() {
  const sendResults = await smsClient.send({
    from: "<from-phone-number>",
    to: ["<to-phone-number-1>", "<to-phone-number-2>"],
    message: "Weekly Promotion!"
  }, {
    // Optional parameters
    enableDeliveryReport: true,
    tag: "marketing"
  });

  // Individual messages can encounter errors during sending.
  // Use the "successful" property to verify the status.
  for (const sendResult of sendResults) {
    if (sendResult.successful) {
      console.log("Success: ", sendResult);
    } else {
      console.error("Something went wrong when trying to send this message: ", sendResult);
    }
  }
}

main();
Make these replacements in the code:
- Replace
<from-phone-number>with an SMS-enabled phone number that's associated with your Communication Services resource. - Replace
<to-phone-number-1>and<to-phone-number-2>with phone numbers that you'd like to send a message to.
Warning
Provide phone numbers in E.164 international standard format, for example, +14255550123. The value for <from-phone-number> can also be a short code, for example, 23456 or an alphanumeric sender ID, for example, CONTOSO.
The enableDeliveryReport parameter is an optional parameter that you can use to configure delivery reporting. This functionality is useful when you want to emit events when SMS messages are delivered. See the Handle SMS Events quickstart to configure delivery reporting for your SMS messages.
The tag parameter is optional. You can use it to apply a tag to the delivery report.
Run the code
Use the node command to run the code that you added to the send-sms.js file.
node ./send-sms.js
Get started with Azure Communication Services by using the Communication Services Python SMS SDK to send SMS messages.
Completing this quickstart incurs a small cost of a few USD cents or less in your Azure account.
Note
Find the finalized code for this quickstart on GitHub.
Prerequisites
- An Azure account with an active subscription. Create an account for free.
- Python 3.7+.
- An active Communication Services resource and connection string. Create a Communication Services resource.
- An SMS-enabled telephone number. Get a phone number.
Prerequisite check
- In a terminal or command window, run the
python --versioncommand to check that Python is installed. - To view the phone numbers that are associated with your Communication Services resource, sign in to the Azure portal and locate your Communication Services resource. In the navigation pane on the left, select Phone numbers.
Set up the application environment
To set up an environment for sending messages, take the steps in the following sections.
Create a new Python application
Open your terminal or command window. Then use the following command to create a new directory for your app and navigate to it.
mkdir sms-quickstart && cd sms-quickstartUse a text editor to create a file called send-sms.py in the project root directory and add the structure for the program, including basic exception handling.
import os
from azure.communication.sms import SmsClient

try:
    # Quickstart code goes here.
except Exception as ex:
    print('Exception:')
    print(ex)
In the following sections, you'll add all the source code for this quickstart to the send-sms.py file that you just created.
Install the package
While still in the application directory, install the Azure Communication Services SMS SDK for Python package by using the following command.
pip install azure-communication-sms
Object model
The following classes and interfaces handle some of the major features of the Azure Communication Services SMS SDK for Python.
| Name | Description |
|---|---|
| SmsClient | This class is needed for all SMS functionality. You instantiate it with your subscription information, and use it to send SMS messages. |
| SmsSendResult | This class contains the result from the SMS service. |
Authenticate the client
Instantiate an SmsClient with your connection string. Learn how to manage your resource's connection string.
# Create the SmsClient object that you use to send SMS messages.
sms_client = SmsClient.from_connection_string(<connection_string>)
For simplicity, this quickstart uses connection strings, but in production environments, we recommend using service principals.
Send a 1:1 SMS message
To send an SMS message to a single recipient, call the send method from the SmsClient with a single recipient phone number. You can also provide optional parameters to specify whether the delivery report should be enabled and to set custom tags. Add this code to the end of the try block in send-sms.py:
# Call send() with SMS values.
sms_responses = sms_client.send(
    from_="<from-phone-number>",
    to="<to-phone-number>",
    message="Hello World via SMS",
    enable_delivery_report=True, # optional property
    tag="custom-tag") # optional property
Make these replacements in the code:
- Replace
<from-phone-number>with an SMS-enabled phone number that's associated with your communication service. - Replace
<to-phone-number>with the phone number that you'd like to send a message to.
Warning
Provide phone numbers in E.164 international standard format, for example, +14255550123. The value for <from-phone-number> can also be a short code, for example, 23456 or an alphanumeric sender ID, for example, CONTOSO.
Send a 1:N SMS message
To send an SMS message to a list of recipients, call the send method from the SmsClient with a list of recipient phone numbers. You can also provide optional parameters to specify whether the delivery report should be enabled and to set custom tags. Add this code to the end of the try block in send-sms.py:
# Call send() with SMS values.
sms_responses = sms_client.send(
    from_="<from-phone-number>",
    to=["<to-phone-number-1>", "<to-phone-number-2>"],
    message="Hello World via SMS",
    enable_delivery_report=True, # optional property
    tag="custom-tag") # optional property
Make these replacements in the code:
- Replace
<from-phone-number>with an SMS-enabled phone number that's associated with your communication service. - Replace
<to-phone-number-1>and<to-phone-number-2>with phone numbers that you'd like to send a message to.
Warning
Provide phone numbers in E.164 international standard format, for example, +14255550123. The value for <from-phone-number> can also be a short code, for example, 23456 or an alphanumeric sender ID, for example, CONTOSO.
Optional parameters
The enable_delivery_report parameter is an optional parameter that you can use to configure delivery reporting. This functionality is useful when you want to emit events when SMS messages are delivered. See the Handle SMS Events quickstart to configure delivery reporting for your SMS messages.
The tag parameter is an optional parameter that you can use to apply a tag to the delivery report.
Run the code
Run the application from your application directory with the python command.
python send-sms.py
The complete Python script should look something like the following code:
import os
from azure.communication.sms import SmsClient

try:
    # Create the SmsClient object that you use to send SMS messages.
    sms_client = SmsClient.from_connection_string("<connection string>")
    # Call send() with SMS values.
    sms_responses = sms_client.send(
       from_="<from-phone-number>",
       to="<to-phone-number>",
       message="Hello World via SMS",
       enable_delivery_report=True, # optional property
       tag="custom-tag") # optional property

except Exception as ex:
    print('Exception:')
    print(ex)
Get started with Azure Communication Services by using the Communication Services Java SMS SDK to send SMS messages.
Completing this quickstart incurs a small cost of a few USD cents or less in your Azure account.
Note
Find the finalized code for this quickstart on GitHub.
Prerequisites
- An Azure account with an active subscription. Create an account for free.
- Java Development Kit (JDK) version 8 or later.
- Apache Maven.
- An active Communication Services resource and connection string. Create a Communication Services resource.
- An SMS-enabled telephone number. Get a phone number.
Prerequisite check
- In a terminal or command window, run
mvn -vto check that Maven is installed. - To view the phone numbers that are associated with your Communication Services resource, sign in to the Azure portal and locate your Communication Services resource. In the navigation pane on the left, select Phone numbers.
Set up the application environment
To set up an environment for sending messages, take the steps in the following sections.
Create a new Java application
Open your terminal or command window and navigate to the directory where you would like to create your Java application. Run the following command to generate the Java project from the maven-archetype-quickstart template.
- Command Prompt
mvn archetype:generate -DgroupId=com.communication.quickstart -DartifactId=communication-quickstart -DarchetypeArtifactId=maven-archetype-quickstart -DarchetypeVersion=1.4 -DinteractiveMode=false
- PowerShell
mvn archetype:generate "-DgroupId=com.communication.quickstart" "-DartifactId=communication-quickstart" "-DarchetypeArtifactId=maven-archetype-quickstart" "-DarchetypeVersion=1.4" "-DinteractiveMode=false"
The generate goal creates a directory with the same name as the artifactId value. Under this directory, the src/main/java directory contains the project source code, the src/test/java directory contains the test source, and the pom.xml file is the project's Project Object Model (POM).
Install the package
Open the pom.xml file in your text editor. Add the following dependency element to the group of dependencies.
<dependency>
    <groupId>com.azure</groupId>
    <artifactId>azure-communication-sms</artifactId>
    <version>1.0.1</version>
</dependency>
Set up the app framework
Open /src/main/java/com/communication/quickstart/App.java in a text editor, add import directives, and remove the System.out.println("Hello world!"); statement:
package com.communication.quickstart;

import com.azure.communication.sms.models.*;
import com.azure.core.credential.AzureKeyCredential;
import com.azure.communication.sms.*;
import com.azure.core.util.Context;
import java.util.Arrays;

public class App
{
    public static void main( String[] args )
    {
        // Quickstart code goes here.
    }
}
Object model
The following classes and interfaces handle some of the major features of the Azure Communication Services SMS SDK for Java.
| Name | Description |
|---|---|
| SmsClientBuilder | This class creates the SmsClient. You provide it with an endpoint, a credential, and an HTTP client. |
| SmsClient | This class is needed for all SMS functionality. You use it to send SMS messages. |
| SmsSendOptions | This class provides options to add custom tags and configure delivery reporting. If deliveryReportEnabled is set to true, an event is emitted when delivery is successful. |
| SmsSendResult | This class contains the result from the SMS service. |
Authenticate the client
To authenticate a client, you instantiate an SmsClient with your connection string. For the credential, use the Key from the Azure portal. Learn how to manage your resource's connection string. You can also initialize the client with any custom HTTP client that implements the com.azure.core.http.HttpClient interface.
To instantiate a client, add the following code to the main method:
// You can get your endpoint and access key from your resource in the Azure portal.
String endpoint = "https://<resource-name>.communication.azure.com/";
AzureKeyCredential azureKeyCredential = new AzureKeyCredential("<access-key-credential>");

SmsClient smsClient = new SmsClientBuilder()
                .endpoint(endpoint)
                .credential(azureKeyCredential)
                .buildClient();
You can also provide the entire connection string by using the connectionString function instead of providing the endpoint and access key.
// You can get your connection string from your resource in the Azure portal.
String connectionString = "endpoint=https://<resource-name>.communication.azure.com/;accesskey=<access-key>";

SmsClient smsClient = new SmsClientBuilder()
            .connectionString(connectionString)
            .buildClient();
Send a 1:1 SMS message
To send an SMS message to a single recipient, call the send method from the SmsClient with a single recipient phone number. You can also provide optional parameters to specify whether the delivery report should be enabled and to set custom tags.
SmsSendResult sendResult = smsClient.send(
                "<from-phone-number>",
                "<to-phone-number>",
                "Weekly Promotion");

System.out.println("Message Id: " + sendResult.getMessageId());
System.out.println("Recipient Number: " + sendResult.getTo());
System.out.println("Send Result Successful:" + sendResult.isSuccessful());
Make these replacements in the code:
- Replace
<from-phone-number>with an SMS-enabled phone number that's associated with your Communication Services resource. - Replace
<to-phone-number>with a phone number that you'd like to send a message to.
Warning
Provide phone numbers in E.164 international standard format, for example, +14255550123. The value for <from-phone-number> can also be a short code, for example, 23456 or an alphanumeric sender ID, for example, CONTOSO.
Send a 1:N SMS message with options
To send an SMS message to a list of recipients, call the send method with a list of recipient phone numbers. You can also provide optional parameters to specify whether the delivery report should be enabled and to set custom tags.
SmsSendOptions options = new SmsSendOptions();
options.setDeliveryReportEnabled(true);
options.setTag("Marketing");

Iterable<SmsSendResult> sendResults = smsClient.sendWithResponse(
    "<from-phone-number>",
    Arrays.asList("<to-phone-number1>", "<to-phone-number2>"),
    "Weekly Promotion",
    options /* Optional */,
    Context.NONE).getValue();

for (SmsSendResult result : sendResults) {
    System.out.println("Message Id: " + result.getMessageId());
    System.out.println("Recipient Number: " + result.getTo());
    System.out.println("Send Result Successful:" + result.isSuccessful());
}
Make these replacements in the code:
- Replace
<from-phone-number>with an SMS-enabled phone number that's associated with your Communication Services resource - Replace
<to-phone-number-1>and<to-phone-number-2>with phone numbers that you'd like to send a message to.
Warning
Provide phone numbers in E.164 international standard format, for example, +14255550123. The value for <from-phone-number> can also be a short code, for example, 23456 or an alphanumeric sender ID, for example, CONTOSO.
The setDeliveryReportEnabled method is used to configure delivery reporting. This functionality is useful when you want to emit events when SMS messages are delivered. See the Handle SMS Events quickstart to configure delivery reporting for your SMS messages.
You can use the setTag method to apply a tag to the delivery report.
Run the code
Navigate to the directory that contains the pom.xml file and compile the project by using the
mvncommand.mvn compileBuild the package.
mvn packageRun the following
mvncommand to execute the app.- Command Prompt
mvn exec:java -Dexec.mainClass="com.communication.quickstart.App" -Dexec.cleanupDaemonThreads=false- PowerShell
mvn exec:java "-Dexec.mainClass=com.communication.quickstart.App" "-Dexec.cleanupDaemonThreads=false"
By using the Azure Communication Services SMS connector and Azure Logic Apps, you can create automated workflows that can send SMS messages. This quickstart shows how to automatically send text messages in response to a trigger event, which is the first step in a logic app workflow. A trigger event can be an incoming email message, a recurrence schedule, an Azure Event Grid resource event, or any other trigger that's supported by Azure Logic Apps.
Although this quickstart focuses on using the connector to respond to a trigger, you can also use the connector to respond to other actions, which are the steps that follow the trigger in a workflow. If you're new to Logic Apps, review What is Azure Logic Apps before you get started.
Note
Completing this quickstart incurs a small cost of a few USD cents or less in your Azure account.
Prerequisites
An Azure account with an active subscription, or create an Azure account for free.
An active Azure Communication Services resource, or create a Communication Services resource.
An active Logic Apps resource (logic app), or create a blank logic app but with the trigger that you want to use. Currently, the Azure Communication Services SMS connector provides only actions, so your logic app requires a trigger, at minimum.
This quickstart uses the When a new email arrives trigger, which is available with the Office 365 Outlook connector.
An SMS enabled phone number, or get a phone number.
Important
SMS and PSTN capabilities depend on the phone number you use and the country/region that you're operating within as determined by your Azure billing address. For more information, visit the Subscription eligibility documentation.
Add an SMS action
To add the Send SMS action as a new step in your workflow by using the Azure Communication Services SMS connector, follow these steps in the Azure portal with your logic app workflow open in the Logic App Designer:
On the designer, under the step where you want to add the new action, select New step. Alternatively, to add the new action between steps, move your pointer over the arrow between those steps, select the plus sign (+), and select Add an action.
In the Choose an operation search box, enter
Azure Communication Services. From the actions list, select Send SMS.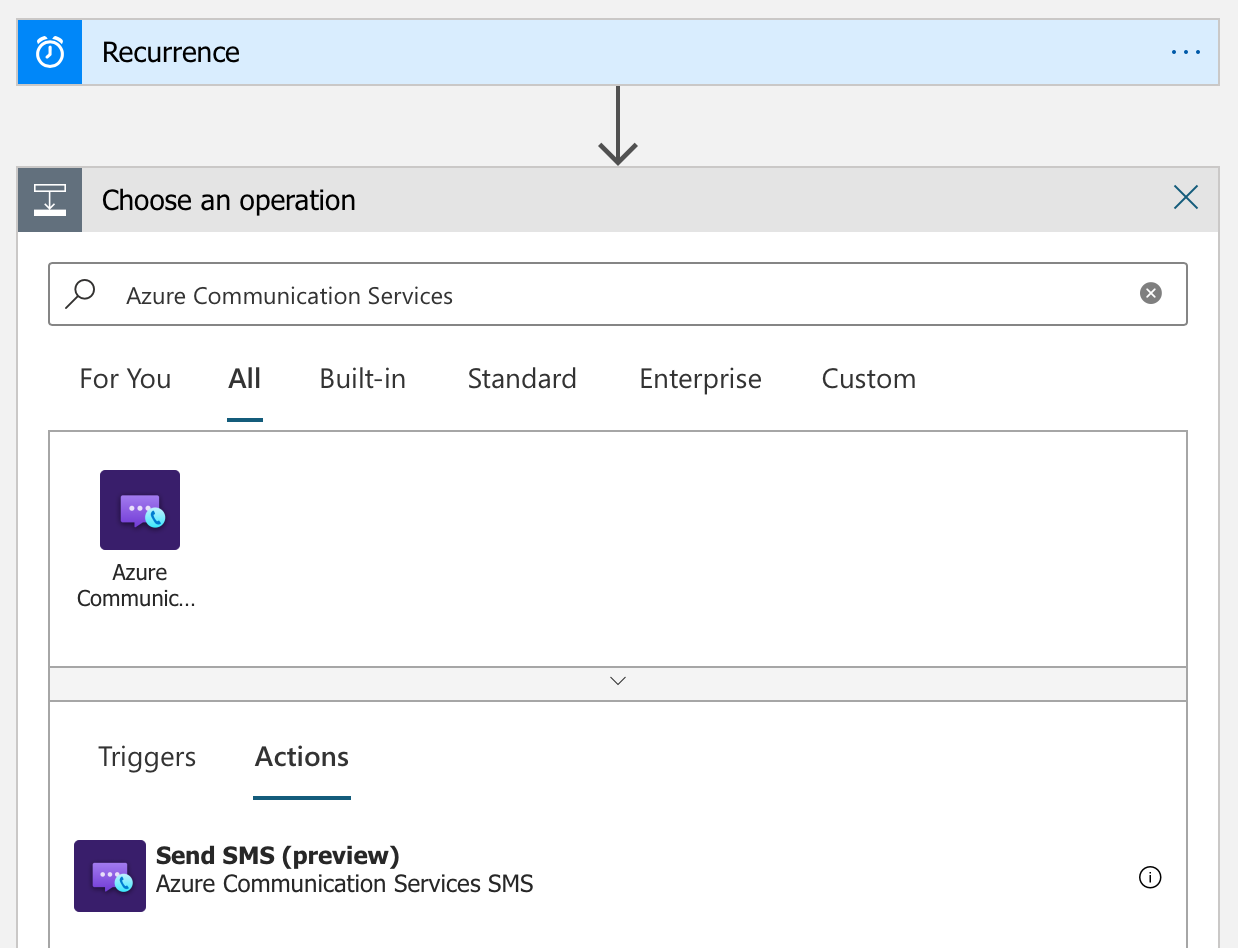
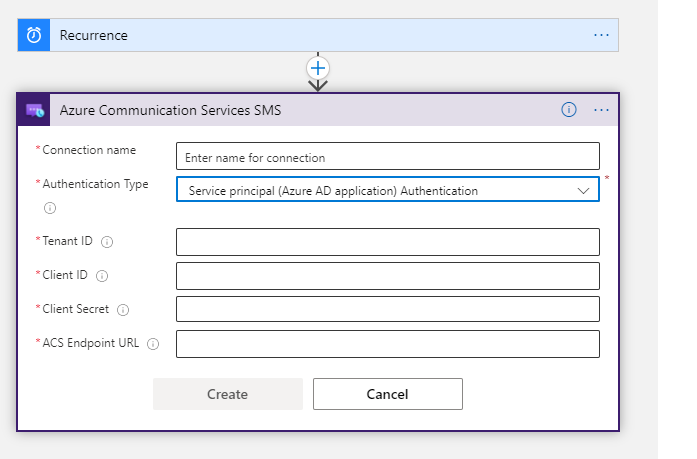
Now create a connection to your Communication Services resource.
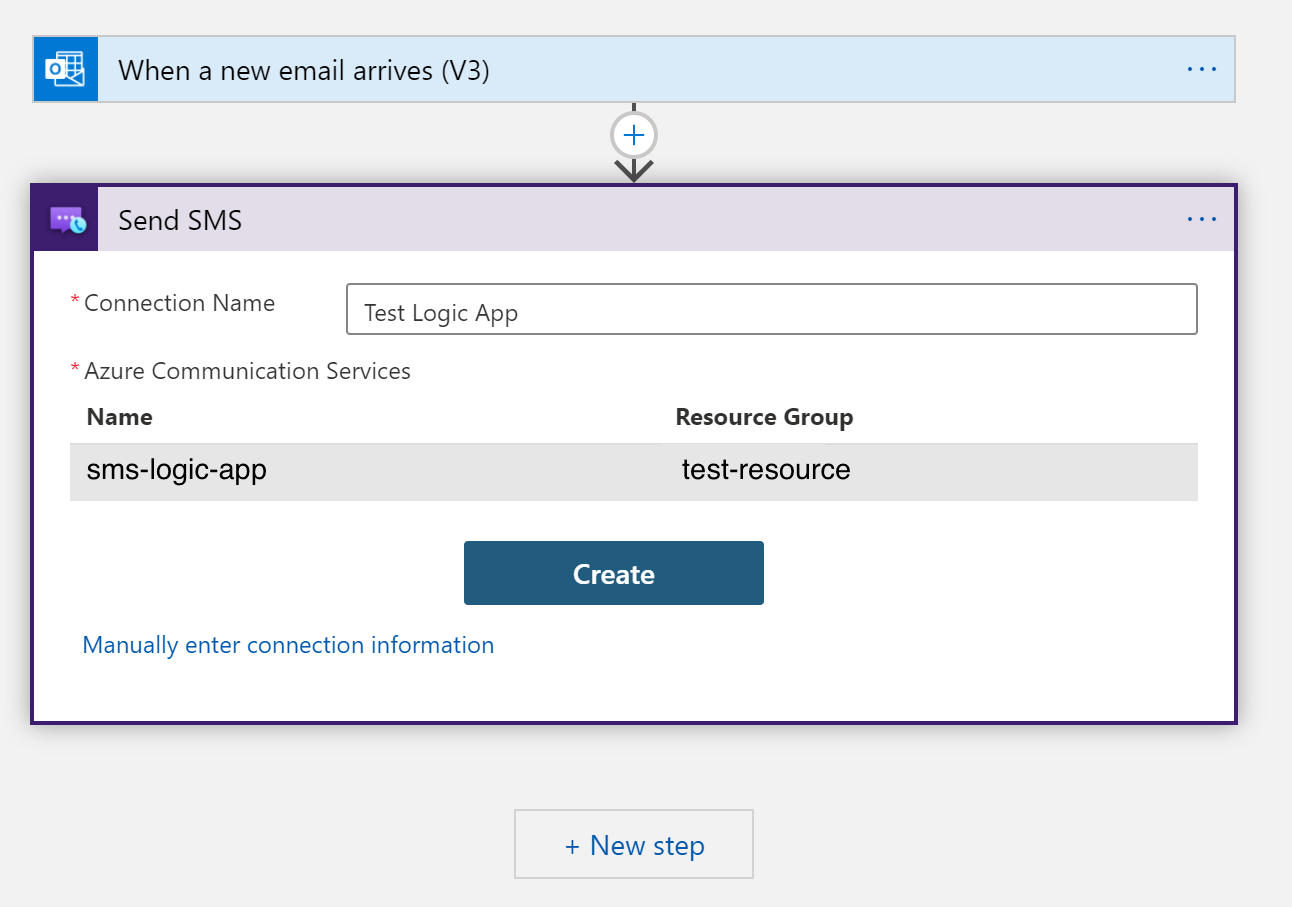
Within the same subscription:
Provide a name for the connection.
Select your Azure Communication Services resource.
Select Create.
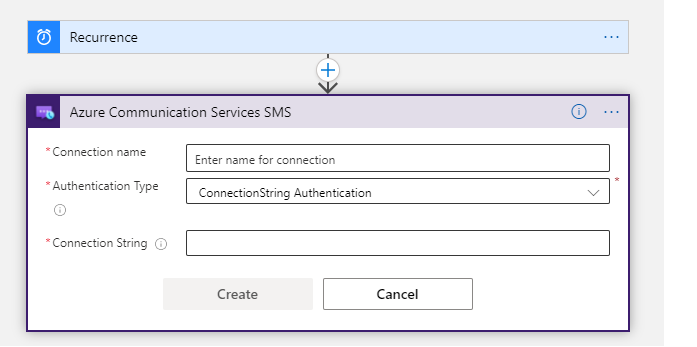
Using the connection string from your Communication Services resource:
Provide a name for the connection.
Select ConnectionString Authentication from the drop down options.
Enter the connection string of your Communication Services resource.
Select Create.
Using Service Principal (Refer Services Principal Creation):
Provide a name for the connection.
Select Service principal (Microsoft Entra application) Authentication from the drop down options.
Enter the Tenant ID, Client ID & Client Secret of your Service Principal.
Enter the Communication Services Endpoint URL value of your Communication Services resource.
Select Create.
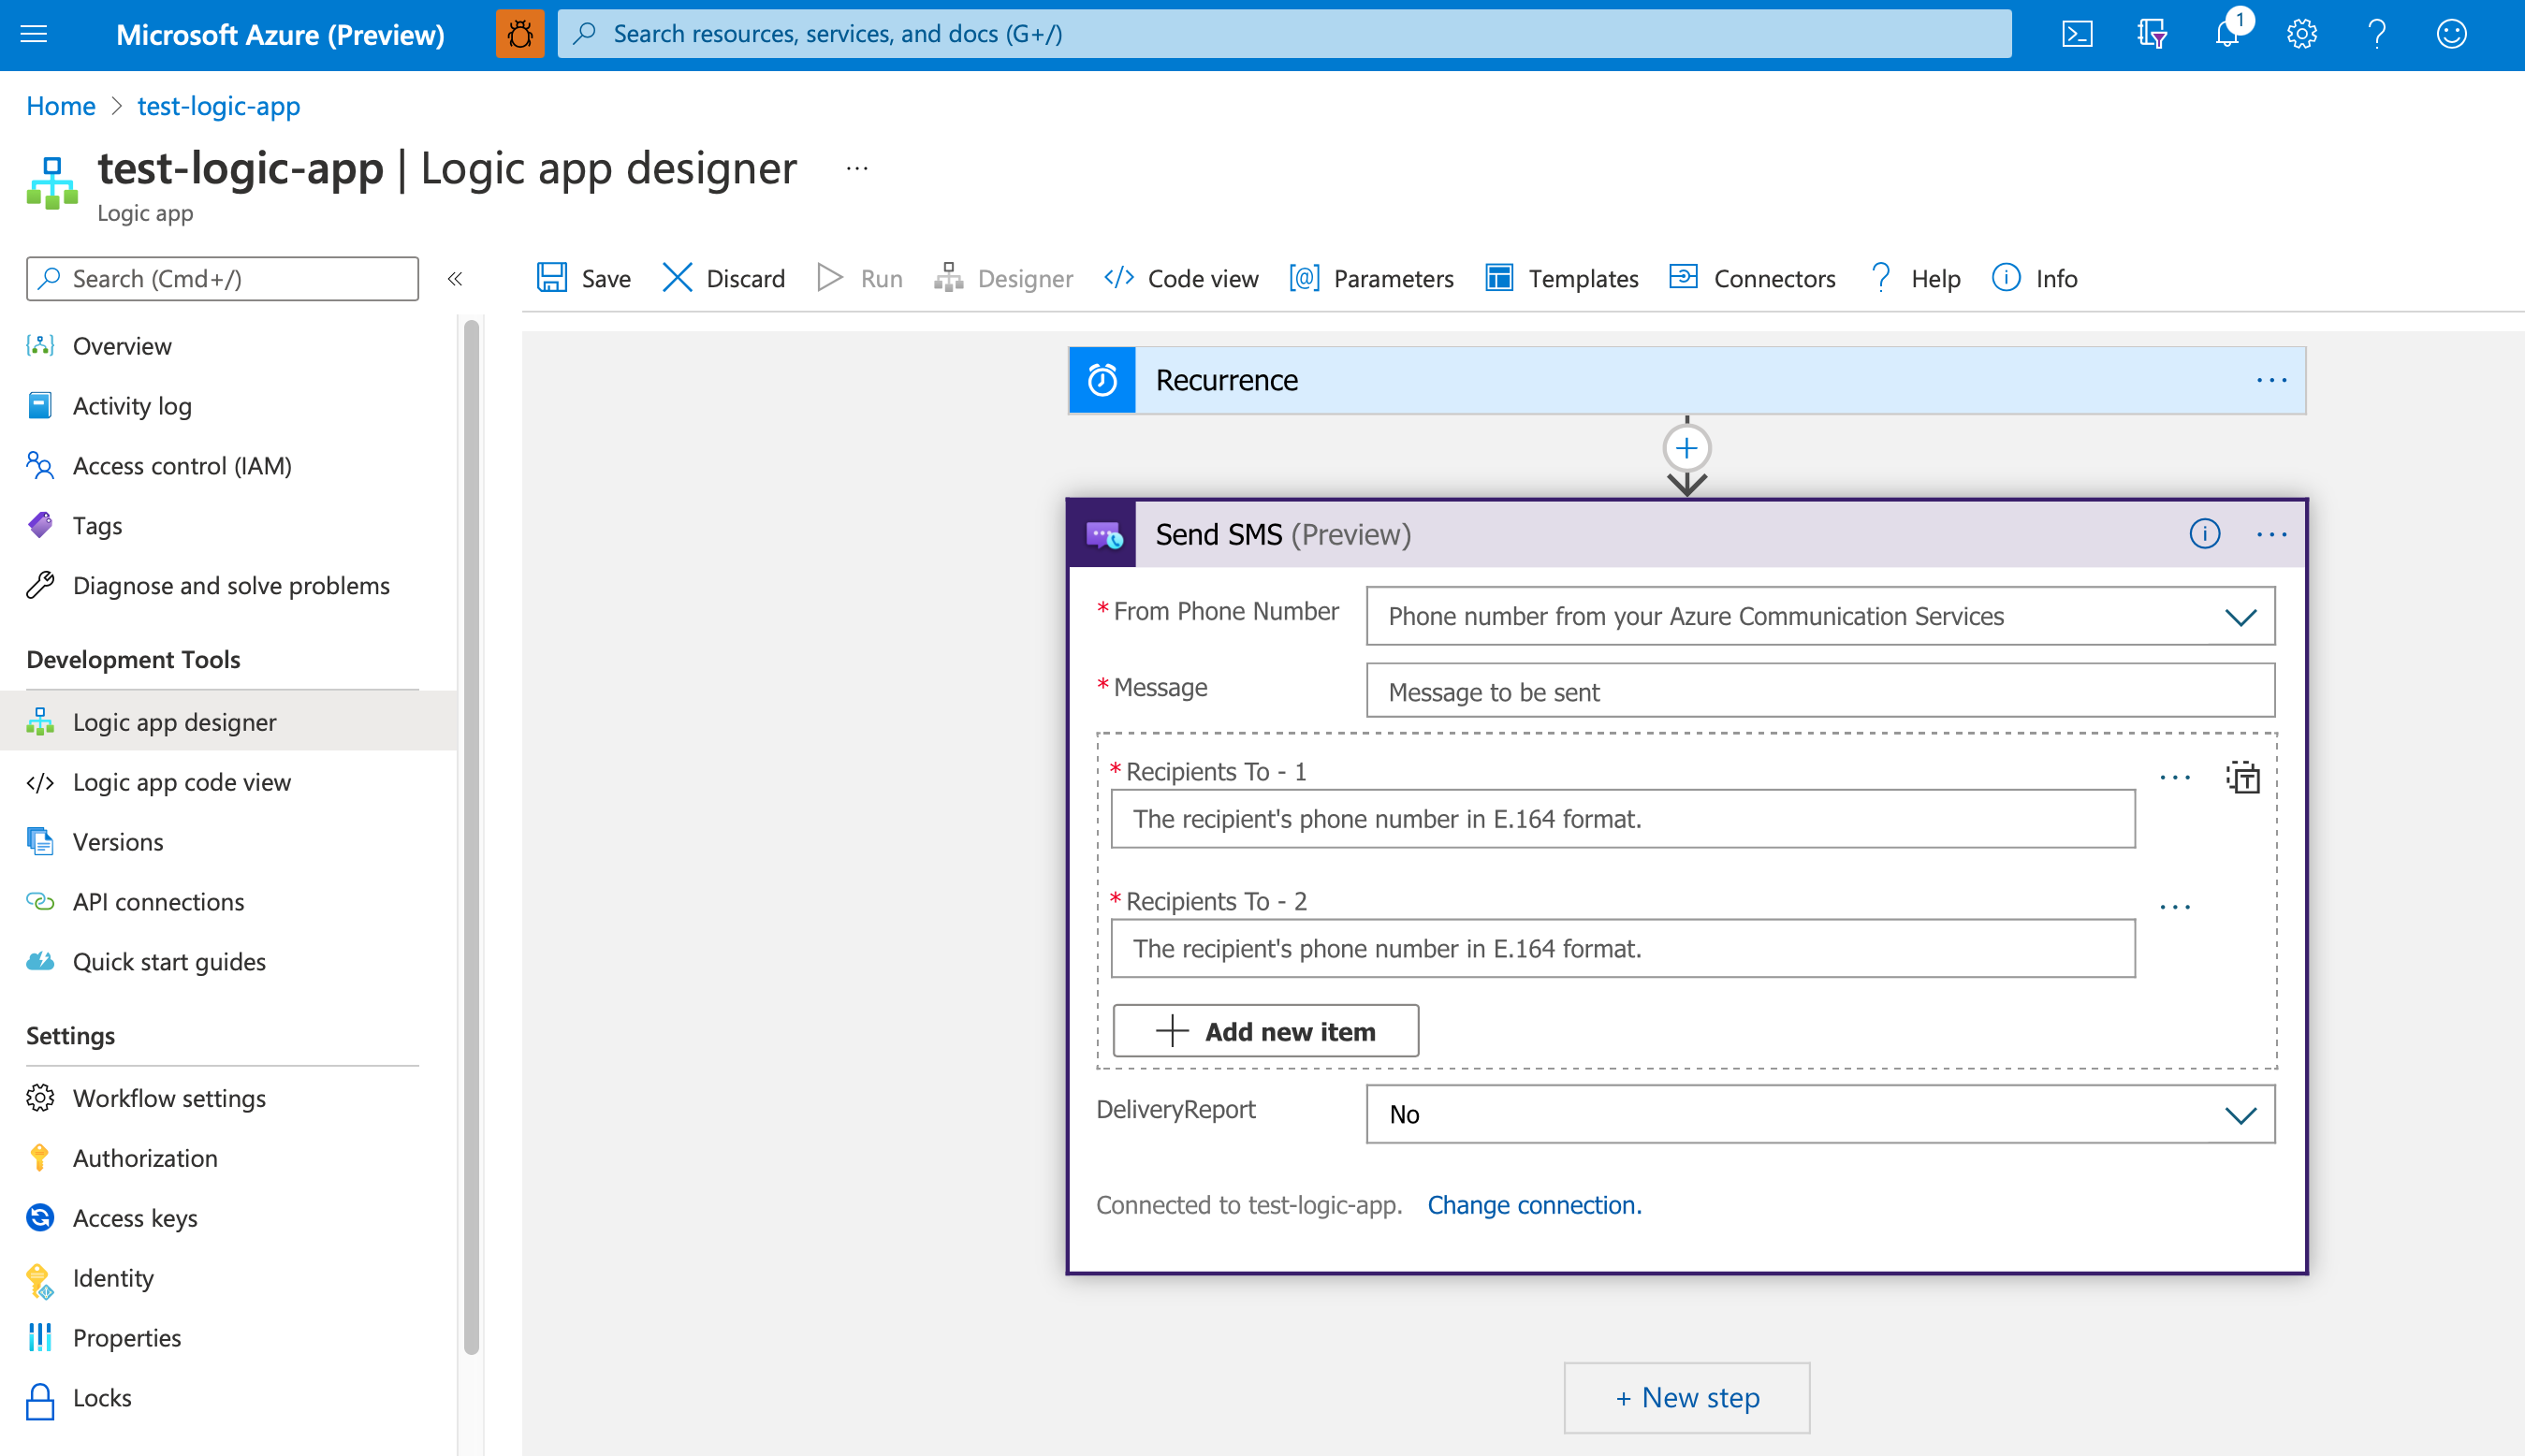
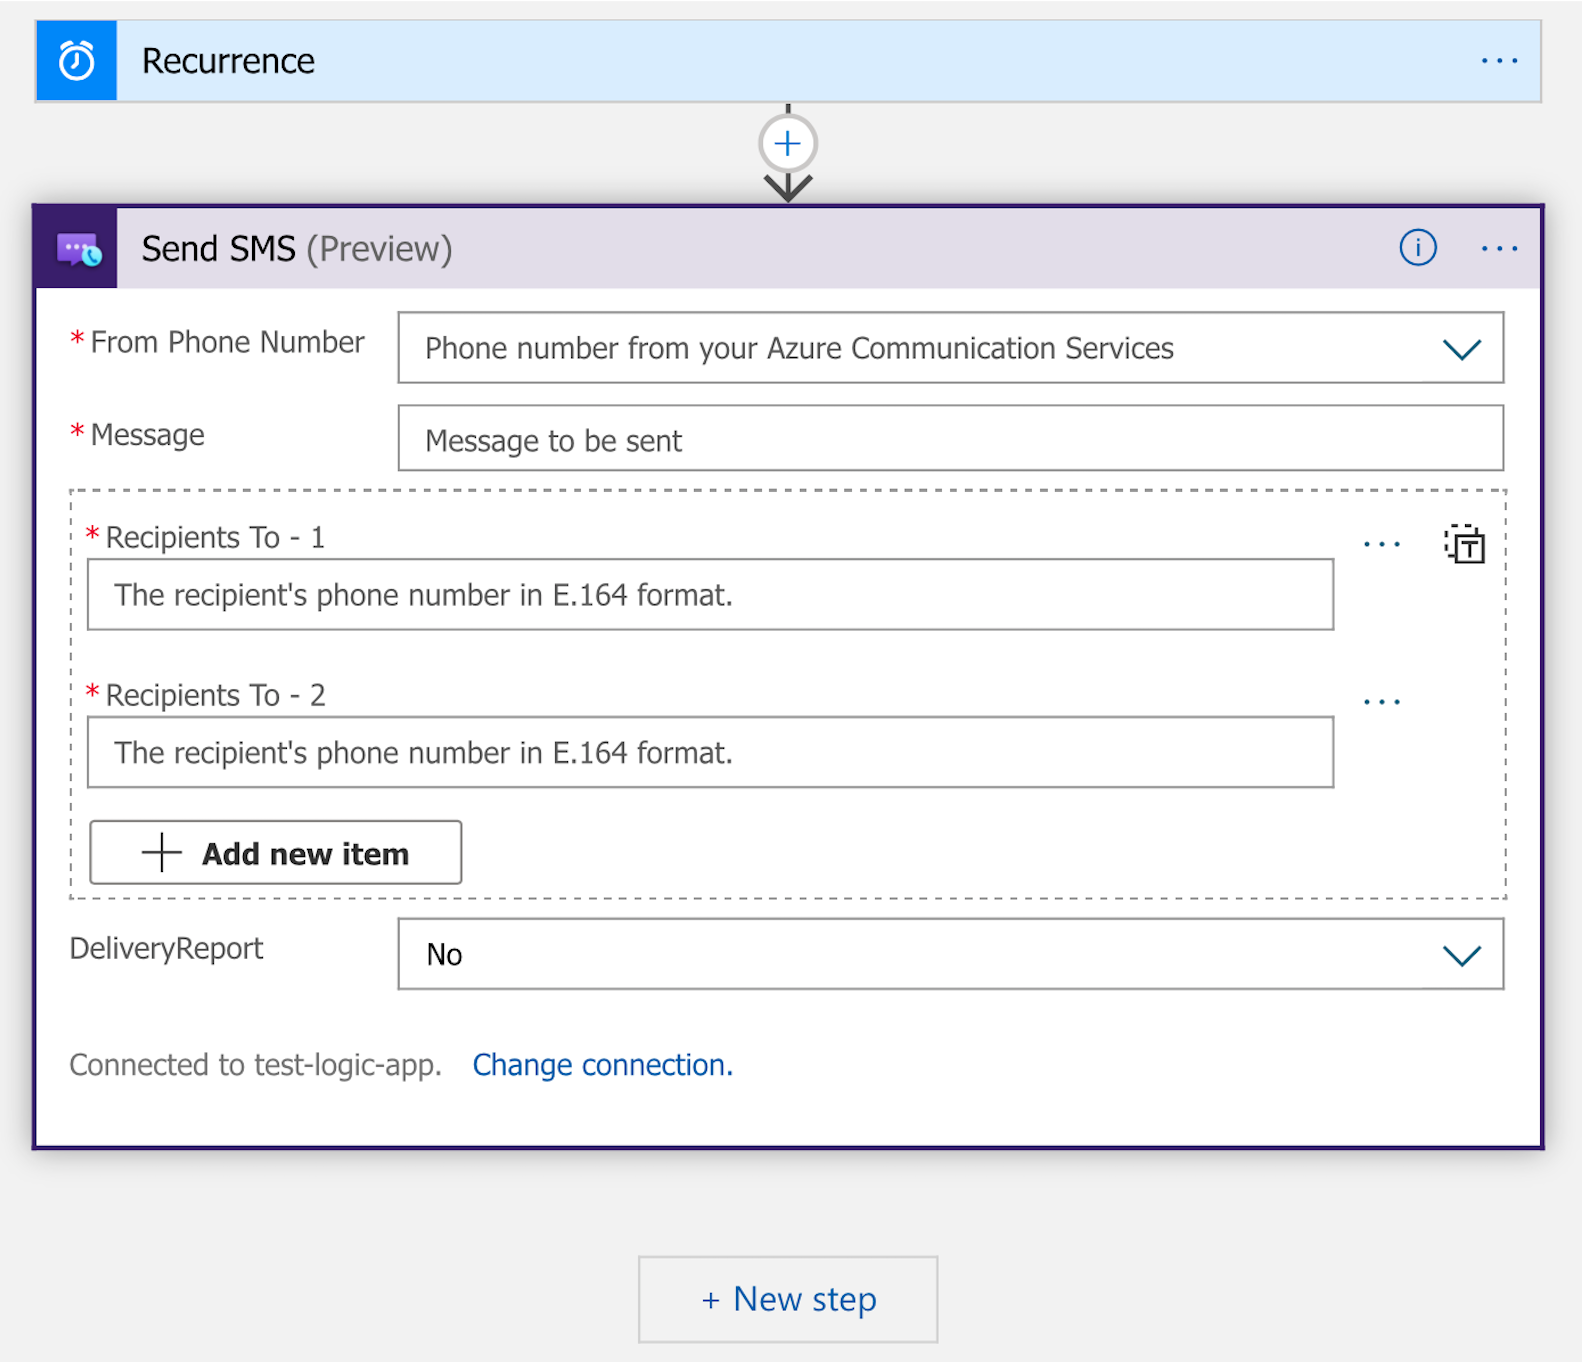
In the Send SMS action, provide the following information:
The source and destination phone numbers. For testing purposes, you can use your own phone number as the destination phone number.
The message content that you want to send, for example, "Hello from Logic Apps!".
Here's a Send SMS action with example information:
When you're done, on the designer toolbar, select Save.
Next, run your workflow for testing.
Test your workflow
To manually start your workflow, on the designer toolbar, select Run. Or, you can wait for the trigger to fire. In both cases, the workflow should send an SMS message to your specified destination phone number. For more information, review how to run your workflow.
Clean up workflow resources
To clean up your logic app workflow and related resources, review how to clean up Logic Apps resources.
Troubleshooting
To troubleshoot issues related to SMS delivery, you can enable delivery reporting with Event Grid to capture delivery details.
Clean up resources
If you want to clean up and remove a Communication Services subscription, you can delete the resource or resource group. Deleting the resource group also deletes any other resources associated with it. Learn more about cleaning up resources.
Toll-free verification
If you have a new toll-free number and want to send a high volume of SMS messages or send SMS messages to Canadian phone numbers, see SMS FAQ > How do I submit a toll-free verification to learn how to verify your toll-free number.
Next steps
In this quickstart, you learned how to send SMS messages using Azure Communication Services.
Feedback
Coming soon: Throughout 2024 we will be phasing out GitHub Issues as the feedback mechanism for content and replacing it with a new feedback system. For more information see: https://aka.ms/ContentUserFeedback.
Submit and view feedback for