Get started with Azure Service Bus topics and subscriptions (.NET)
This quickstart shows how to send messages to a Service Bus topic and receive messages from a subscription to that topic by using the Azure.Messaging.ServiceBus .NET library.
In this quickstart, you'll do the following steps:
- Create a Service Bus namespace, using the Azure portal.
- Create a Service Bus topic, using the Azure portal.
- Create a Service Bus subscription to that topic, using the Azure portal.
- Write a .NET console application to send a set of messages to the topic.
- Write a .NET console application to receive those messages from the subscription.
Note
This quick start provides step-by-step instructions to implement a simple scenario of sending a batch of messages to a Service Bus topic and receiving those messages from a subscription of the topic. For more samples on other and advanced scenarios, see Service Bus .NET samples on GitHub.
- This quick start shows you two ways of connecting to Azure Service Bus: connection string and passwordless. The first option shows you how to use a connection string to connect to a Service Bus namespace. The second option shows you how to use your security principal in Microsoft Entra ID and the role-based access control (RBAC) to connect to a Service Bus namespace. You don't need to worry about having hard-coded connection string in your code or in a configuration file or in secure storage like Azure Key Vault. If you are new to Azure, you might find the connection string option easier to follow. We recommend using the passwordless option in real-world applications and production environments. For more information, see Authentication and authorization.
Prerequisites
If you're new to the service, see Service Bus overview before you do this quickstart.
- Azure subscription. To use Azure services, including Azure Service Bus, you need a subscription. If you don't have an existing Azure account, you can sign up for a free trial.
- Visual Studio 2022. The sample application makes use of new features that were introduced in C# 10. You can still use the Service Bus client library with previous C# language versions, but the syntax might vary. To use the latest syntax, we recommend that you install .NET 6.0, or higher and set the language version to
latest. If you're using Visual Studio, versions before Visual Studio 2022 aren't compatible with the tools needed to build C# 10 projects.
Create a namespace in the Azure portal
To begin using Service Bus messaging entities in Azure, you must first create a namespace with a name that is unique across Azure. A namespace provides a scoping container for Service Bus resources (queues, topics, etc.) within your application.
To create a namespace:
Sign in to the Azure portal.
Navigate to the All services page.
On the left navigation bar, select Integration from the list of categories, hover the mouse over Service Bus, and then select + button on the Service Bus tile.

In the Basics tag of the Create namespace page, follow these steps:
For Subscription, choose an Azure subscription in which to create the namespace.
For Resource group, choose an existing resource group in which the namespace will live, or create a new one.
Enter a name for the namespace. The namespace name should adhere to the following naming conventions:
- The name must be unique across Azure. The system immediately checks to see if the name is available.
- The name length is at least 6 and at most 50 characters.
- The name can contain only letters, numbers, hyphens “-“.
- The name must start with a letter and end with a letter or number.
- The name doesn't end with “-sb“ or “-mgmt“.
For Location, choose the region in which your namespace should be hosted.
For Pricing tier, select the pricing tier (Basic, Standard, or Premium) for the namespace. For this quickstart, select Standard.
Important
If you want to use topics and subscriptions, choose either Standard or Premium. Topics/subscriptions aren't supported in the Basic pricing tier.
If you selected the Premium pricing tier, specify the number of messaging units. The premium tier provides resource isolation at the CPU and memory level so that each workload runs in isolation. This resource container is called a messaging unit. A premium namespace has at least one messaging unit. You can select 1, 2, 4, 8 or 16 messaging units for each Service Bus Premium namespace. For more information, see Service Bus Premium Messaging.
Select Review + create at the bottom of the page.
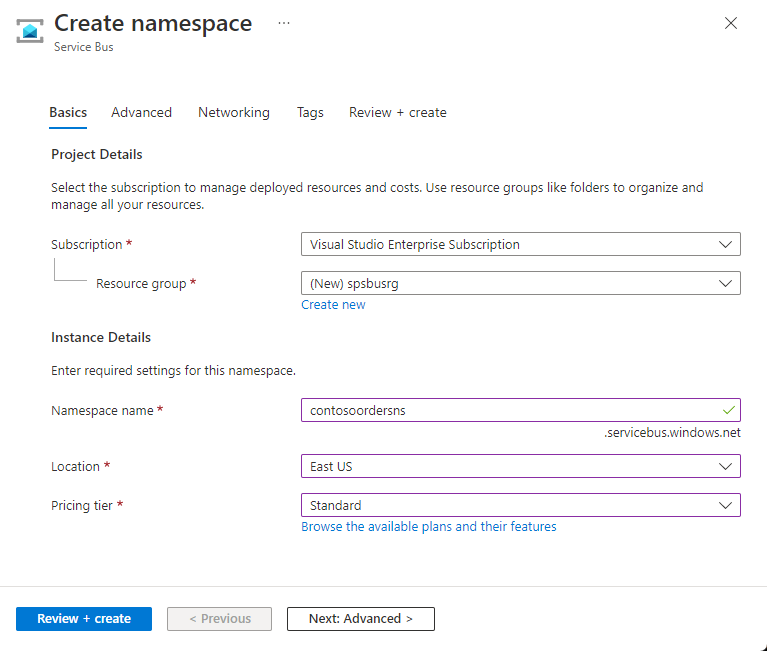
On the Review + create page, review settings, and select Create.
Once the deployment of the resource is successful, select Go to resource on the deployment page.
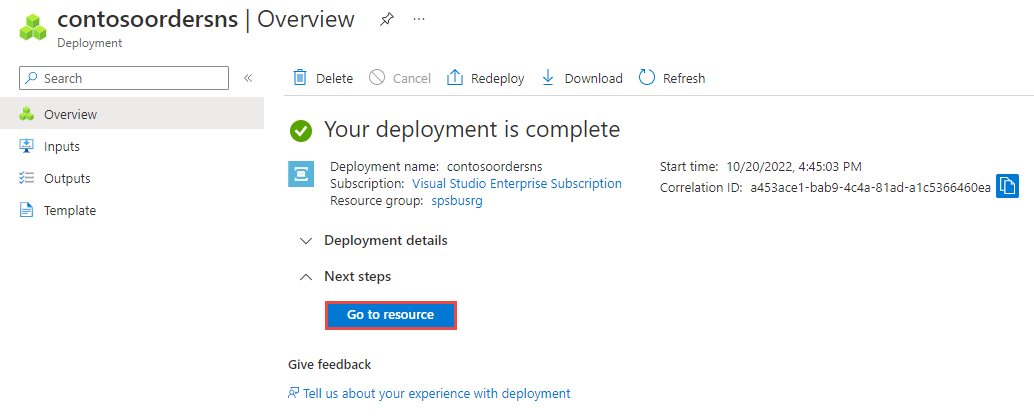
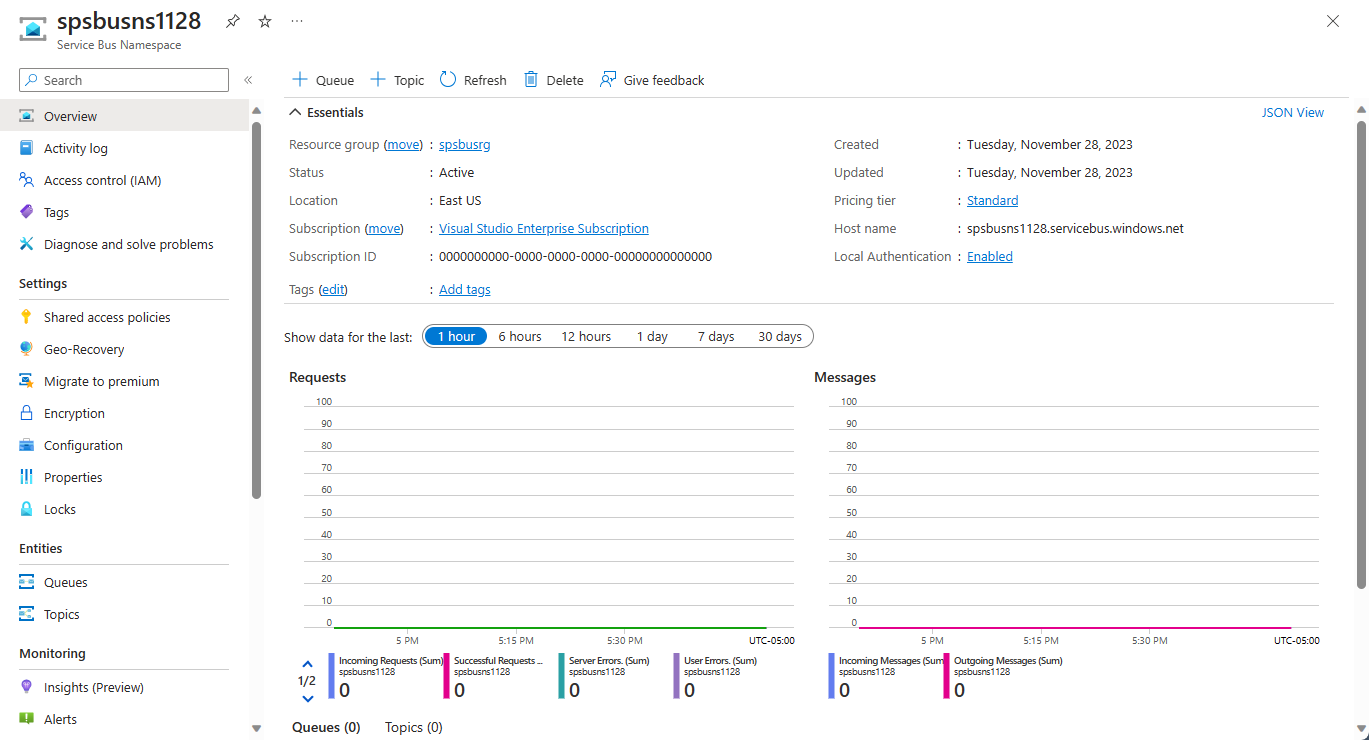
You see the home page for your service bus namespace.
Create a topic using the Azure portal
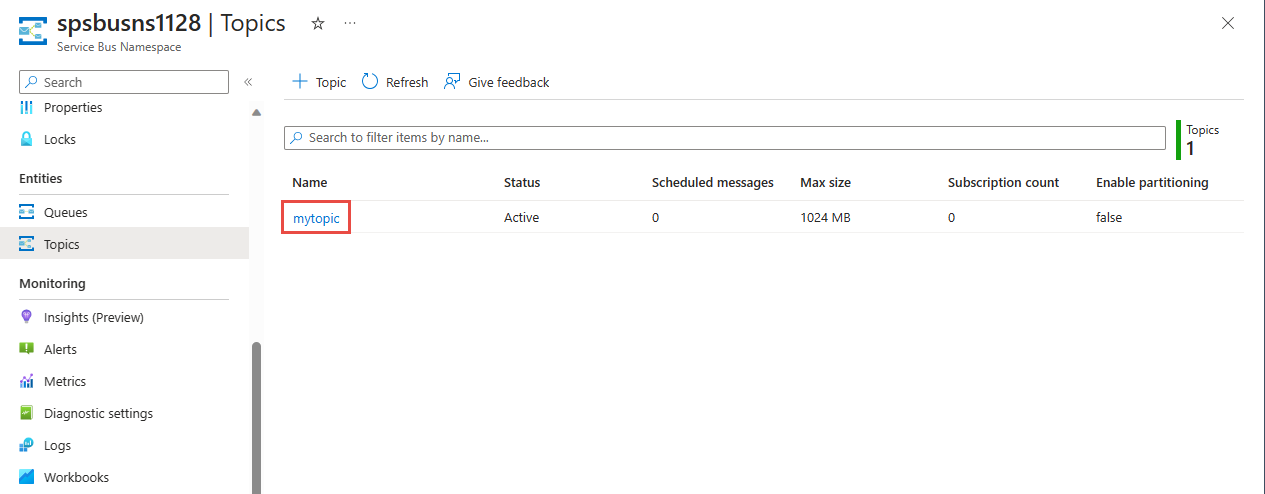
On the Service Bus Namespace page, select Topics on the left menu.
Select + Topic on the toolbar.
Enter a name for the topic. Leave the other options with their default values.
Select Create.

Create a subscription to the topic
Select the topic that you created in the previous section.
On the Service Bus Topic page, select + Subscription on the toolbar.
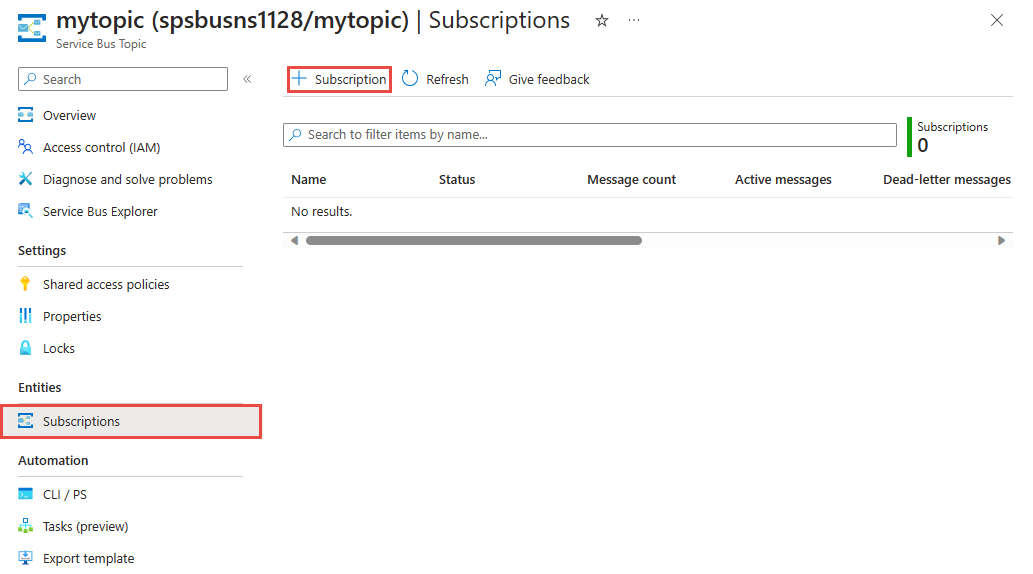
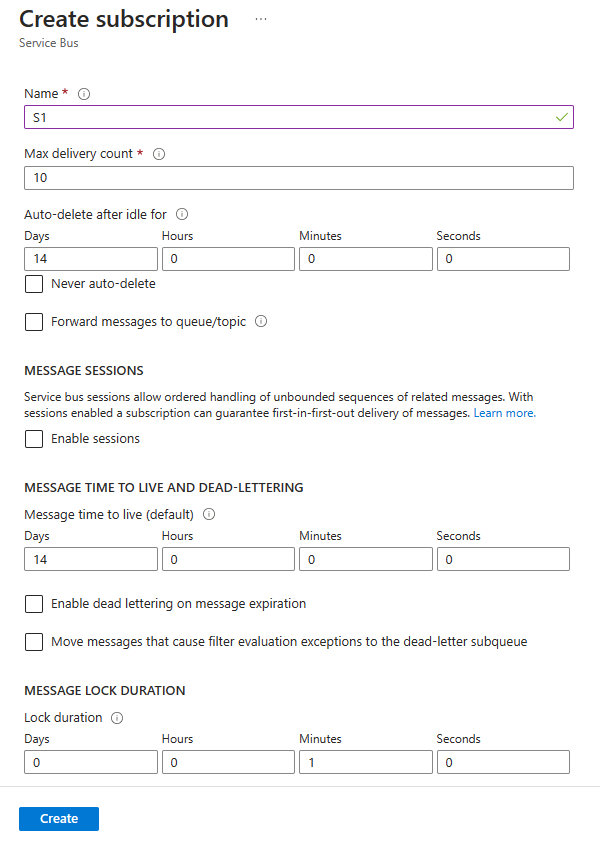
On the Create subscription page, follow these steps:
Enter S1 for name of the subscription.
Enter 3 for Max delivery count.
Then, select Create to create the subscription.
Authenticate the app to Azure
This quick start shows you two ways of connecting to Azure Service Bus: passwordless and connection string.
The first option shows you how to use your security principal in Microsoft Entra ID and role-based access control (RBAC) to connect to a Service Bus namespace. You don't need to worry about having hard-coded connection string in your code or in a configuration file or in a secure storage like Azure Key Vault.
The second option shows you how to use a connection string to connect to a Service Bus namespace. If you are new to Azure, you may find the connection string option easier to follow. We recommend using the passwordless option in real-world applications and production environments. For more information, see Authentication and authorization. You can also read more about passwordless authentication on the overview page.
Assign roles to your Microsoft Entra user
When developing locally, make sure that the user account that connects to Azure Service Bus has the correct permissions. You'll need the Azure Service Bus Data Owner role in order to send and receive messages. To assign yourself this role, you'll need the User Access Administrator role, or another role that includes the Microsoft.Authorization/roleAssignments/write action. You can assign Azure RBAC roles to a user using the Azure portal, Azure CLI, or Azure PowerShell. Learn more about the available scopes for role assignments on the scope overview page.
The following example assigns the Azure Service Bus Data Owner role to your user account, which provides full access to Azure Service Bus resources. In a real scenario, follow the Principle of Least Privilege to give users only the minimum permissions needed for a more secure production environment.
Azure built-in roles for Azure Service Bus
For Azure Service Bus, the management of namespaces and all related resources through the Azure portal and the Azure resource management API is already protected using the Azure RBAC model. Azure provides the below Azure built-in roles for authorizing access to a Service Bus namespace:
- Azure Service Bus Data Owner: Enables data access to Service Bus namespace and its entities (queues, topics, subscriptions, and filters). A member of this role can send and receive messages from queues or topics/subscriptions.
- Azure Service Bus Data Sender: Use this role to give the send access to Service Bus namespace and its entities.
- Azure Service Bus Data Receiver: Use this role to give the receive access to Service Bus namespace and its entities.
If you want to create a custom role, see Rights required for Service Bus operations.
Add Microsoft Entra user to Azure Service Bus Owner role
Add your Microsoft Entra user name to the Azure Service Bus Data Owner role at the Service Bus namespace level. It will allow an app running in the context of your user account to send messages to a queue or a topic, and receive messages from a queue or a topic's subscription.
Important
In most cases, it will take a minute or two for the role assignment to propagate in Azure. In rare cases, it may take up to eight minutes. If you receive authentication errors when you first run your code, wait a few moments and try again.
If you don't have the Service Bus Namespace page open in the Azure portal, locate your Service Bus namespace using the main search bar or left navigation.
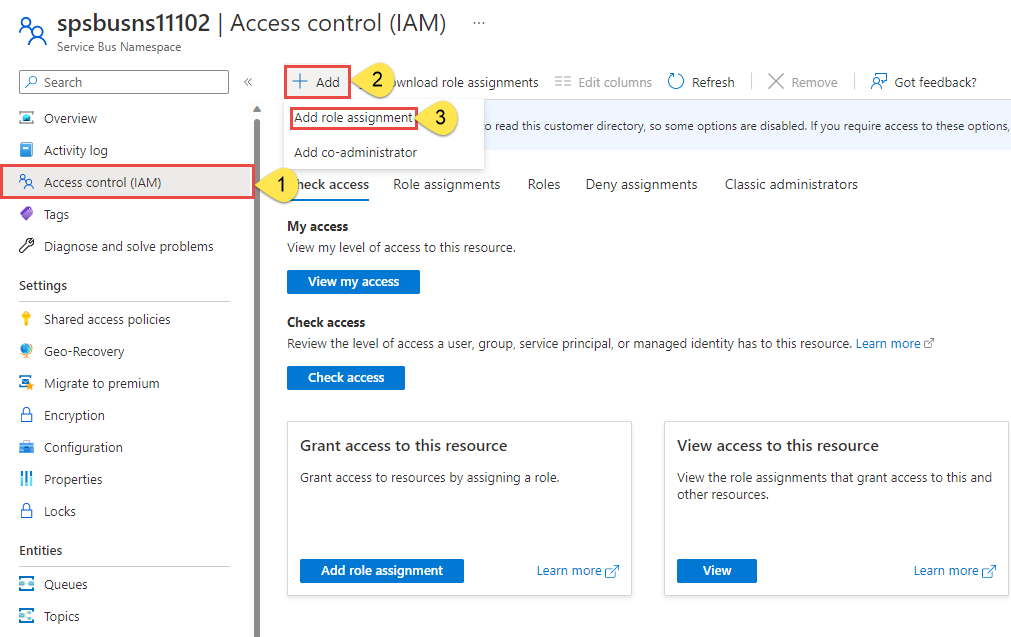
On the overview page, select Access control (IAM) from the left-hand menu.
On the Access control (IAM) page, select the Role assignments tab.
Select + Add from the top menu and then Add role assignment from the resulting drop-down menu.
Use the search box to filter the results to the desired role. For this example, search for
Azure Service Bus Data Ownerand select the matching result. Then choose Next.Under Assign access to, select User, group, or service principal, and then choose + Select members.
In the dialog, search for your Microsoft Entra username (usually your user@domain email address) and then choose Select at the bottom of the dialog.
Select Review + assign to go to the final page, and then Review + assign again to complete the process.
Launch Visual Studio and sign-in to Azure
You can authorize access to the service bus namespace using the following steps:
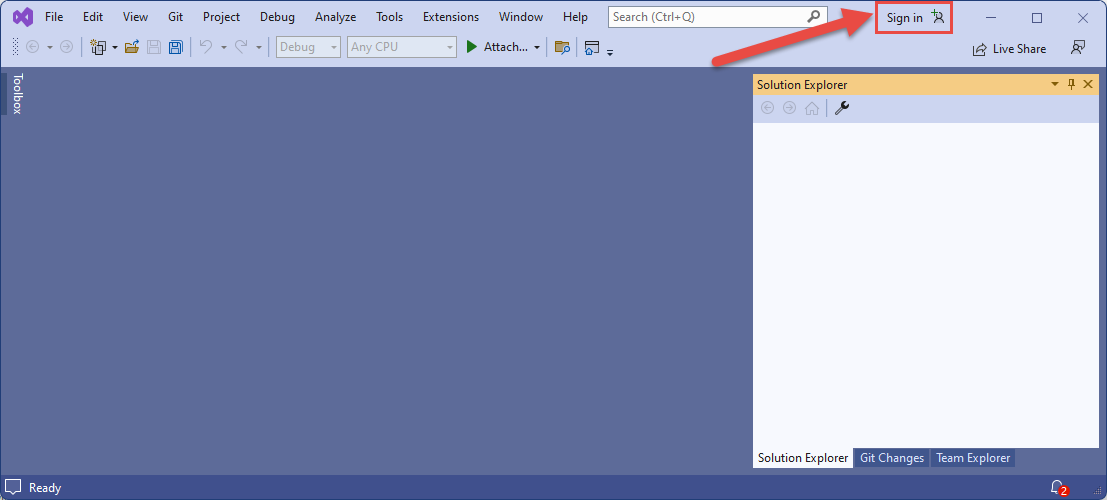
Launch Visual Studio. If you see the Get started window, select the Continue without code link in the right pane.
Select the Sign in button in the top right of Visual Studio.
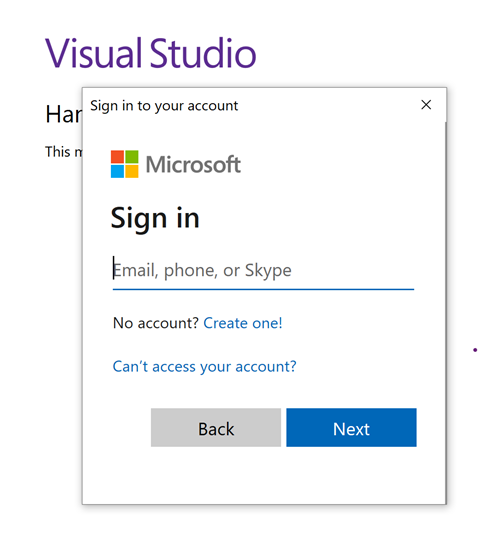
Sign-in using the Microsoft Entra account you assigned a role to previously.
Send messages to the topic
This section shows you how to create a .NET console application to send messages to a Service Bus topic.
Note
This quick start provides step-by-step instructions to implement a simple scenario of sending a batch of messages to a Service Bus topic and receiving those messages from a subscription of the topic. For more samples on other and advanced scenarios, see Service Bus .NET samples on GitHub.
Create a console application
- In Visual Studio, select File -> New -> Project menu.
- On the Create a new project dialog box, do the following steps: If you don't see this dialog box, select File on the menu, select New, and then select Project.
Select C# for the programming language.
Select Console for the type of the application.
Select Console App from the results list.
Then, select Next.
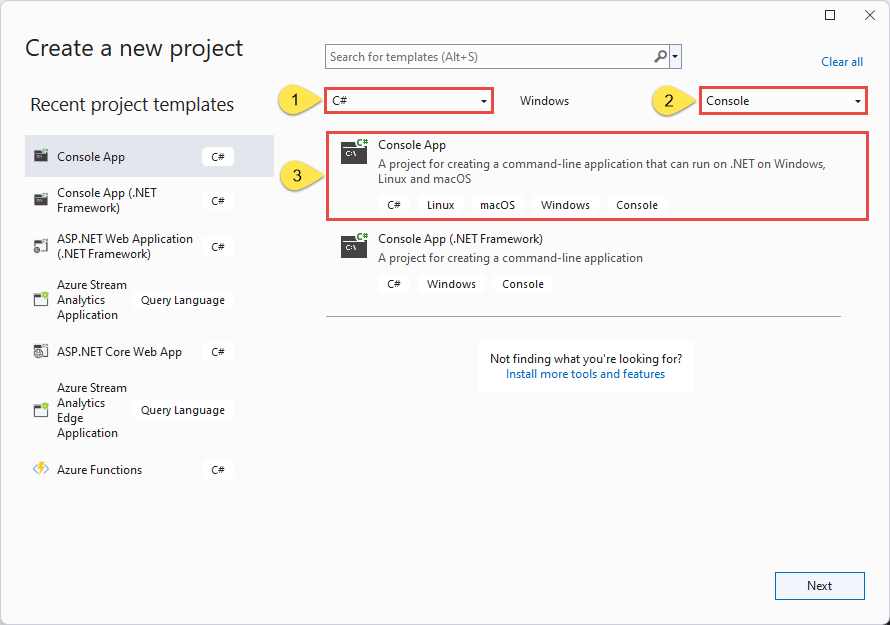
- Enter TopicSender for the project name, ServiceBusTopicQuickStart for the solution name, and then select Next.
- On the Additional information page, select Create to create the solution and the project.
Add the NuGet packages to the project
Select Tools > NuGet Package Manager > Package Manager Console from the menu.
Run the following command to install the Azure.Messaging.ServiceBus NuGet package.
Install-Package Azure.Messaging.ServiceBusRun the following command to install the Azure.Identity NuGet package.
Install-Package Azure.Identity
Add code to send messages to the topic
Replace the contents of Program.cs with the following code. The important steps are outlined in this section, with additional information in the code comments.
- Creates a ServiceBusClient object using the
DefaultAzureCredentialobject.DefaultAzureCredentialautomatically discovers and uses the credentials of your Visual Studio sign-in to authenticate to Azure Service Bus. - Invokes the CreateSender method on the
ServiceBusClientobject to create a ServiceBusSender object for the specific Service Bus topic. - Creates a ServiceBusMessageBatch object by using the ServiceBusSender.CreateMessageBatchAsync.
- Add messages to the batch using the ServiceBusMessageBatch.TryAddMessage.
- Sends the batch of messages to the Service Bus topic using the ServiceBusSender.SendMessagesAsync method.
Important
Update placeholder values (
<NAMESPACE-NAME>and<TOPIC-NAME>) in the code snippet with names of your Service Bus namespace and topic.using System.Threading.Tasks; using Azure.Messaging.ServiceBus; using Azure.Identity; // the client that owns the connection and can be used to create senders and receivers ServiceBusClient client; // the sender used to publish messages to the topic ServiceBusSender sender; // number of messages to be sent to the topic const int numOfMessages = 3; // The Service Bus client types are safe to cache and use as a singleton for the lifetime // of the application, which is best practice when messages are being published or read // regularly. //TODO: Replace the "<NAMESPACE-NAME>" and "<TOPIC-NAME>" placeholders. client = new ServiceBusClient( "<NAMESPACE-NAME>.servicebus.windows.net", new DefaultAzureCredential()); sender = client.CreateSender("<TOPIC-NAME>"); // create a batch using ServiceBusMessageBatch messageBatch = await sender.CreateMessageBatchAsync(); for (int i = 1; i <= numOfMessages; i++) { // try adding a message to the batch if (!messageBatch.TryAddMessage(new ServiceBusMessage($"Message {i}"))) { // if it is too large for the batch throw new Exception($"The message {i} is too large to fit in the batch."); } } try { // Use the producer client to send the batch of messages to the Service Bus topic await sender.SendMessagesAsync(messageBatch); Console.WriteLine($"A batch of {numOfMessages} messages has been published to the topic."); } finally { // Calling DisposeAsync on client types is required to ensure that network // resources and other unmanaged objects are properly cleaned up. await sender.DisposeAsync(); await client.DisposeAsync(); } Console.WriteLine("Press any key to end the application"); Console.ReadKey();- Creates a ServiceBusClient object using the
Build the project, and ensure that there are no errors.
Run the program and wait for the confirmation message.
A batch of 3 messages has been published to the topicImportant
In most cases, it will take a minute or two for the role assignment to propagate in Azure. In rare cases, it might take up to eight minutes. If you receive authentication errors when you first run your code, wait a few moments and try again.
In the Azure portal, follow these steps:
Navigate to your Service Bus namespace.
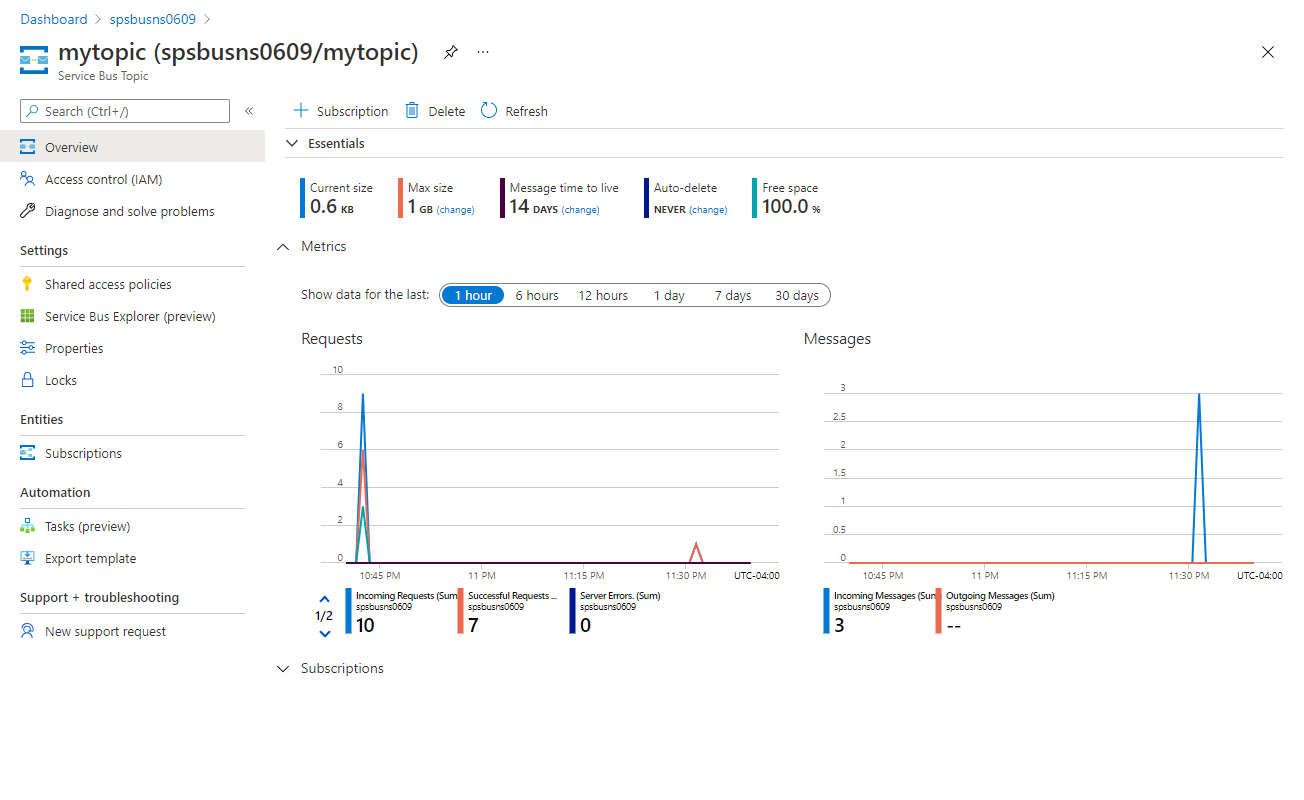
On the Overview page, in the bottom-middle pane, switch to the Topics tab, and select the Service Bus topic. In the following example, it's
mytopic.
On the Service Bus Topic page, In the Messages chart in the bottom Metrics section, you can see that there are three incoming messages for the topic. If you don't see the value, wait for a few minutes, and refresh the page to see the updated chart.
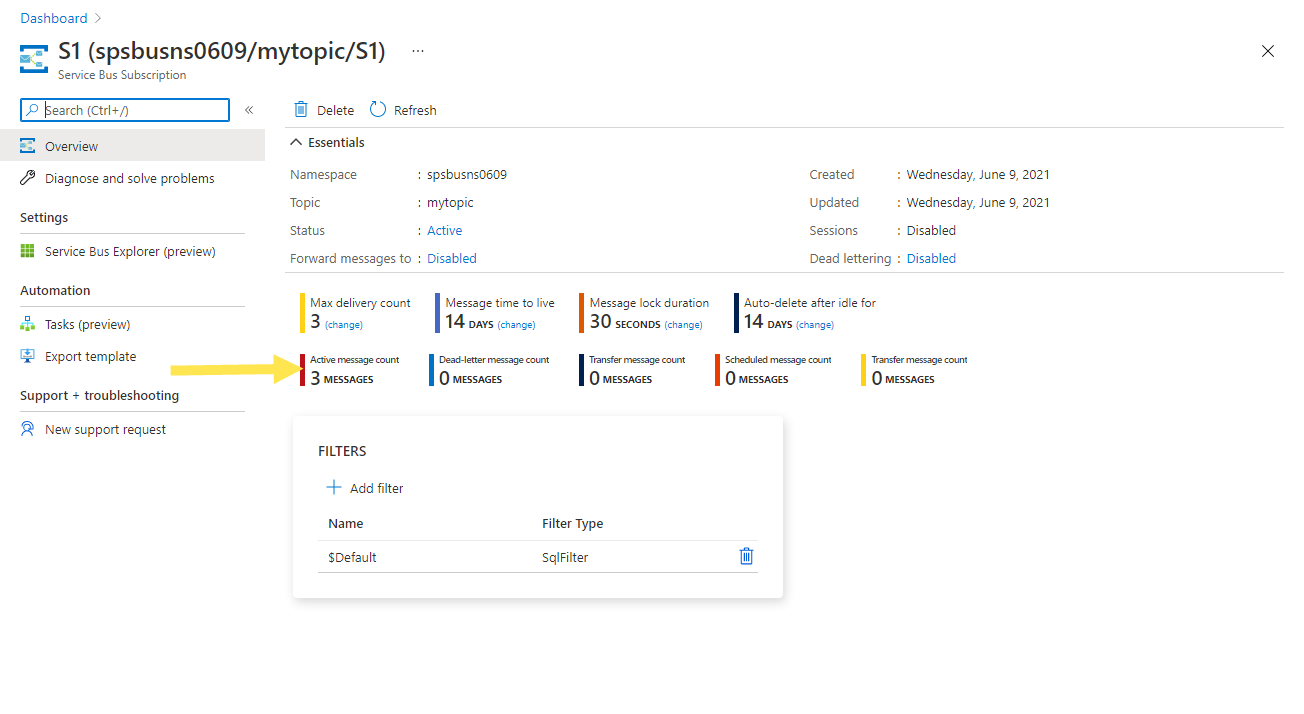
Select the subscription in the bottom pane. In the following example, it's S1. On the Service Bus Subscription page, you see the Active message count as 3. The subscription has received the three messages that you sent to the topic, but no receiver has picked them yet.
Receive messages from a subscription
In this section, you create a .NET console application that receives messages from the subscription to the Service Bus topic.
Note
This quick start provides step-by-step instructions to implement a simple scenario of sending a batch of messages to a Service Bus topic and receiving those messages from a subscription of the topic. For more samples on other and advanced scenarios, see Service Bus .NET samples on GitHub.
Create a project for the receiver
- In the Solution Explorer window, right-click the ServiceBusTopicQuickStart solution, point to Add, and select New Project.
- Select Console application, and select Next.
- Enter SubscriptionReceiver for the Project name, and select Next.
- On the Additional information page, select Create.
- In the Solution Explorer window, right-click SubscriptionReceiver, and select Set as a Startup Project.
Add the NuGet packages to the project
Select Tools > NuGet Package Manager > Package Manager Console from the menu.
Select SubscriptionReceiver for Default project drop-down list.
Run the following command to install the Azure.Messaging.ServiceBus NuGet package.
Install-Package Azure.Messaging.ServiceBusRun the following command to install the Azure.Identity NuGet package.
Install-Package Azure.Identity
Add code to receive messages from the subscription
In this section, you add code to retrieve messages from the subscription.
Replace the existing contents of
Program.cswith the following properties and methods:using System.Threading.Tasks; using Azure.Messaging.ServiceBus; using Azure.Identity; // the client that owns the connection and can be used to create senders and receivers ServiceBusClient client; // the processor that reads and processes messages from the subscription ServiceBusProcessor processor; // handle received messages async Task MessageHandler(ProcessMessageEventArgs args) { string body = args.Message.Body.ToString(); Console.WriteLine($"Received: {body} from subscription."); // complete the message. messages is deleted from the subscription. await args.CompleteMessageAsync(args.Message); } // handle any errors when receiving messages Task ErrorHandler(ProcessErrorEventArgs args) { Console.WriteLine(args.Exception.ToString()); return Task.CompletedTask; }Append the following code to the end of
Program.cs.- Creates a ServiceBusClient object using the
DefaultAzureCredentialobject.DefaultAzureCredentialautomatically discovers and uses the credentials of your Visual Studio sign-in to authenticate to Azure Service Bus. - Invokes the CreateProcessor method on the
ServiceBusClientobject to create a ServiceBusProcessor object for the specified Service Bus topic. - Specifies handlers for the ProcessMessageAsync and ProcessErrorAsync events of the
ServiceBusProcessorobject. - Starts processing messages by invoking the StartProcessingAsync on the
ServiceBusProcessorobject. - When user presses a key to end the processing, invokes the StopProcessingAsync on the
ServiceBusProcessorobject.
Important
Update placeholder values (
<NAMESPACE-NAME>,<TOPIC-NAME>,<SUBSCRIPTION-NAME>) in the code snippet with names of your Service Bus namespace, topic, and subscription.For more information, see code comments.
// The Service Bus client types are safe to cache and use as a singleton for the lifetime // of the application, which is best practice when messages are being published or read // regularly. // // Create the clients that we'll use for sending and processing messages. // TODO: Replace the <NAMESPACE-NAME> placeholder client = new ServiceBusClient( "<NAMESPACE-NAME>.servicebus.windows.net", new DefaultAzureCredential()); // create a processor that we can use to process the messages // TODO: Replace the <TOPIC-NAME> and <SUBSCRIPTION-NAME> placeholders processor = client.CreateProcessor("<TOPIC-NAME>", "<SUBSCRIPTION-NAME>", new ServiceBusProcessorOptions()); try { // add handler to process messages processor.ProcessMessageAsync += MessageHandler; // add handler to process any errors processor.ProcessErrorAsync += ErrorHandler; // start processing await processor.StartProcessingAsync(); Console.WriteLine("Wait for a minute and then press any key to end the processing"); Console.ReadKey(); // stop processing Console.WriteLine("\nStopping the receiver..."); await processor.StopProcessingAsync(); Console.WriteLine("Stopped receiving messages"); } finally { // Calling DisposeAsync on client types is required to ensure that network // resources and other unmanaged objects are properly cleaned up. await processor.DisposeAsync(); await client.DisposeAsync(); }- Creates a ServiceBusClient object using the
Here's what your
Program.csshould look like:using System; using System.Threading.Tasks; using Azure.Messaging.ServiceBus; using Azure.Identity; // the client that owns the connection and can be used to create senders and receivers ServiceBusClient client; // the processor that reads and processes messages from the subscription ServiceBusProcessor processor; // handle received messages async Task MessageHandler(ProcessMessageEventArgs args) { string body = args.Message.Body.ToString(); Console.WriteLine($"Received: {body} from subscription."); // complete the message. messages is deleted from the subscription. await args.CompleteMessageAsync(args.Message); } // handle any errors when receiving messages Task ErrorHandler(ProcessErrorEventArgs args) { Console.WriteLine(args.Exception.ToString()); return Task.CompletedTask; } // The Service Bus client types are safe to cache and use as a singleton for the lifetime // of the application, which is best practice when messages are being published or read // regularly. // // Create the clients that we'll use for sending and processing messages. // TODO: Replace the <NAMESPACE-NAME> placeholder client = new ServiceBusClient( "<NAMESPACE-NAME>.servicebus.windows.net", new DefaultAzureCredential()); // create a processor that we can use to process the messages // TODO: Replace the <TOPIC-NAME> and <SUBSCRIPTION-NAME> placeholders processor = client.CreateProcessor("<TOPIC-NAME>", "<SUBSCRIPTION-NAME>", new ServiceBusProcessorOptions()); try { // add handler to process messages processor.ProcessMessageAsync += MessageHandler; // add handler to process any errors processor.ProcessErrorAsync += ErrorHandler; // start processing await processor.StartProcessingAsync(); Console.WriteLine("Wait for a minute and then press any key to end the processing"); Console.ReadKey(); // stop processing Console.WriteLine("\nStopping the receiver..."); await processor.StopProcessingAsync(); Console.WriteLine("Stopped receiving messages"); } finally { // Calling DisposeAsync on client types is required to ensure that network // resources and other unmanaged objects are properly cleaned up. await processor.DisposeAsync(); await client.DisposeAsync(); }Build the project, and ensure that there are no errors.
Run the receiver application. You should see the received messages. Press any key to stop the receiver and the application.
Wait for a minute and then press any key to end the processing
Received: Message 1 from subscription: S1
Received: Message 2 from subscription: S1
Received: Message 3 from subscription: S1

Stopping the receiver...
Stopped receiving messages
Check the portal again.
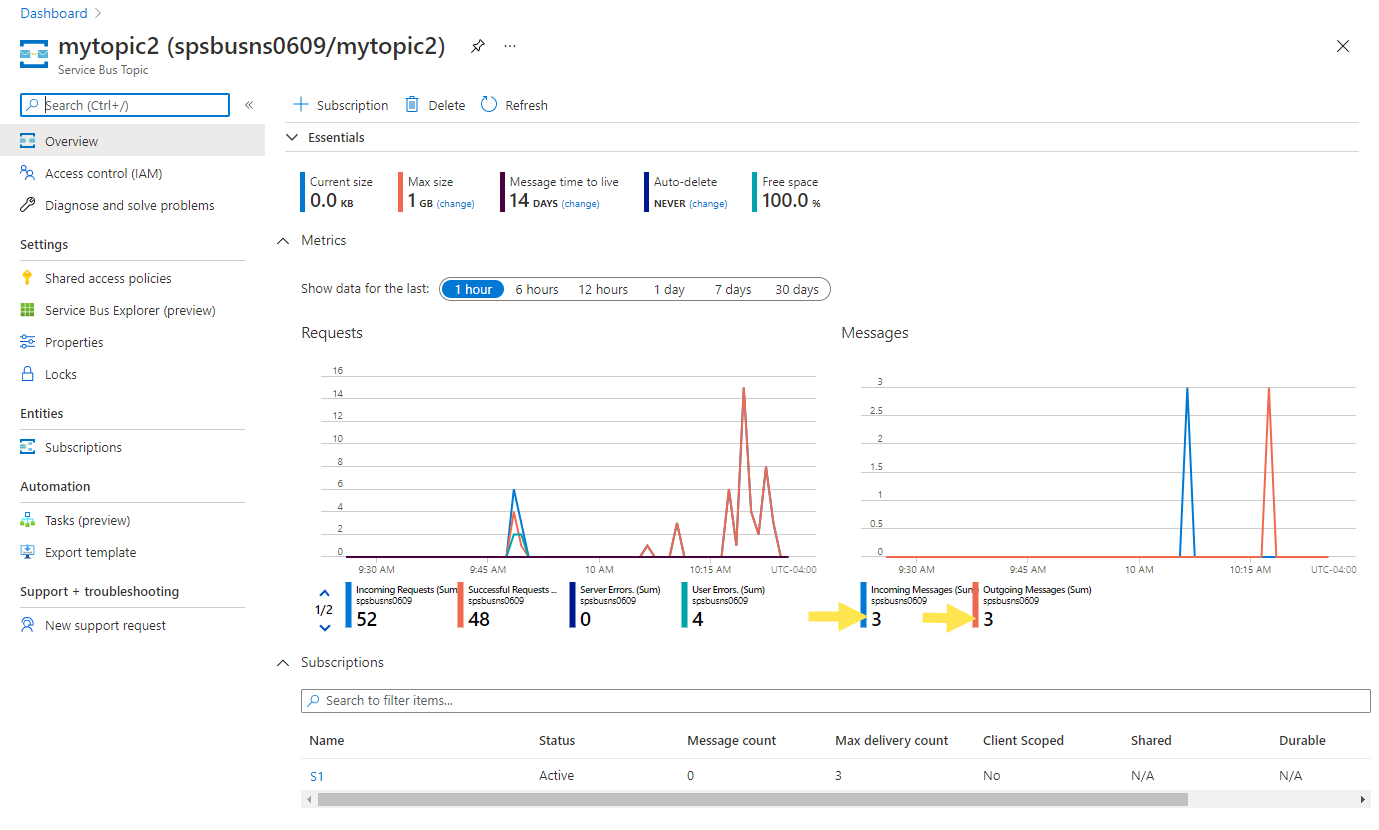
On the Service Bus Topic page, in the Messages chart, you see three incoming messages and three outgoing messages. If you don't see these numbers, wait for a few minutes, and refresh the page to see the updated chart.
On the Service Bus Subscription page, you see the Active message count as zero. It's because a receiver has received messages from this subscription and completed the messages.
Next steps
See the following documentation and samples:
Feedback
Coming soon: Throughout 2024 we will be phasing out GitHub Issues as the feedback mechanism for content and replacing it with a new feedback system. For more information see: https://aka.ms/ContentUserFeedback.
Submit and view feedback for
