Tutorial: Update inventory using Azure portal and topics/subscriptions
Azure Service Bus is a multi-tenant cloud messaging service that sends information between applications and services. Asynchronous operations give you flexible, brokered messaging, along with structured first-in, first-out (FIFO) messaging, and publish/subscribe capabilities. For detailed overview of Azure Service Bus, see What is Service Bus?.
This tutorial shows how to use Service Bus topics and subscriptions in a retail inventory scenario, with publish/subscribe channels using the Azure portal and .NET. An example of this scenario is an inventory assortment update for multiple retail stores. In this scenario, each store, or set of stores, gets messages intended for them to update their assortments. This tutorial shows how to implement this scenario using subscriptions and filters. First, you create a topic with three subscriptions, add some rules and filters, and then send and receive messages from the topic and subscriptions.

In this tutorial, you learn how to:
- Create a Service Bus topic and three subscriptions to that topic using the Azure portal
- Add filters for subscriptions using .NET code
- Create messages with different content
- Send messages and verify that they arrived in the expected subscriptions
- Receive messages from the subscriptions
Prerequisites
To complete this tutorial, make sure you have:
- Azure subscription. To use Azure services, including Azure Service Bus, you need a subscription. If you don't have an Azure subscription, you can create a free account before you begin.
- Visual Studio 2019 or later.
Service Bus topics and subscriptions
Each subscription to a topic can receive a copy of each message. Topics are fully protocol and semantically compatible with Service Bus queues. Service Bus topics support a wide array of selection rules with filter conditions, with optional actions that set or modify message properties. Each time a rule matches, it produces a message. To learn more about rules, filters, and actions, follow this link.
Create a namespace in the Azure portal
To begin using Service Bus messaging entities in Azure, you must first create a namespace with a name that is unique across Azure. A namespace provides a scoping container for Service Bus resources (queues, topics, etc.) within your application.
To create a namespace:
Sign in to the Azure portal.
Navigate to the All services page.
On the left navigation bar, select Integration from the list of categories, hover the mouse over Service Bus, and then select + button on the Service Bus tile.

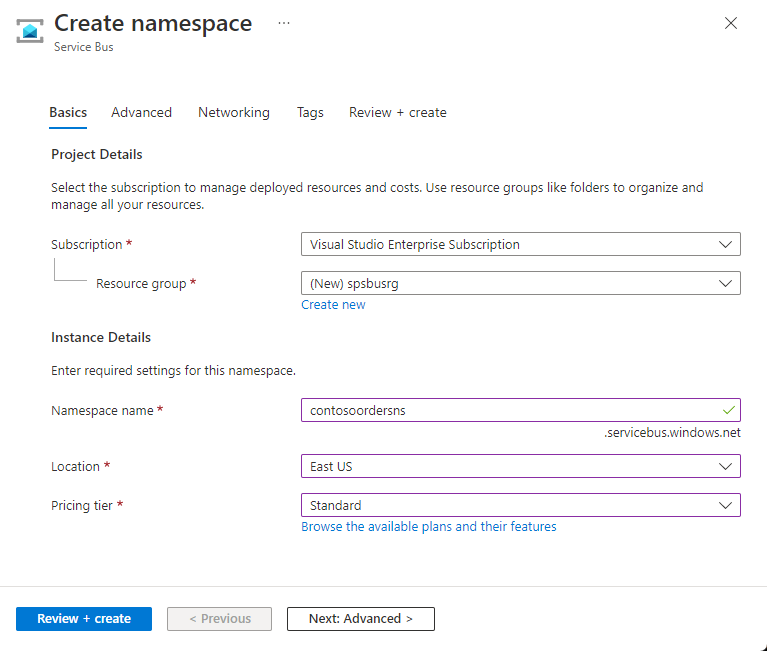
In the Basics tag of the Create namespace page, follow these steps:
For Subscription, choose an Azure subscription in which to create the namespace.
For Resource group, choose an existing resource group in which the namespace will live, or create a new one.
Enter a name for the namespace. The namespace name should adhere to the following naming conventions:
- The name must be unique across Azure. The system immediately checks to see if the name is available.
- The name length is at least 6 and at most 50 characters.
- The name can contain only letters, numbers, hyphens “-“.
- The name must start with a letter and end with a letter or number.
- The name doesn't end with “-sb“ or “-mgmt“.
For Location, choose the region in which your namespace should be hosted.
For Pricing tier, select the pricing tier (Basic, Standard, or Premium) for the namespace. For this quickstart, select Standard.
Important
If you want to use topics and subscriptions, choose either Standard or Premium. Topics/subscriptions aren't supported in the Basic pricing tier.
If you selected the Premium pricing tier, specify the number of messaging units. The premium tier provides resource isolation at the CPU and memory level so that each workload runs in isolation. This resource container is called a messaging unit. A premium namespace has at least one messaging unit. You can select 1, 2, 4, 8 or 16 messaging units for each Service Bus Premium namespace. For more information, see Service Bus Premium Messaging.
Select Review + create at the bottom of the page.
On the Review + create page, review settings, and select Create.
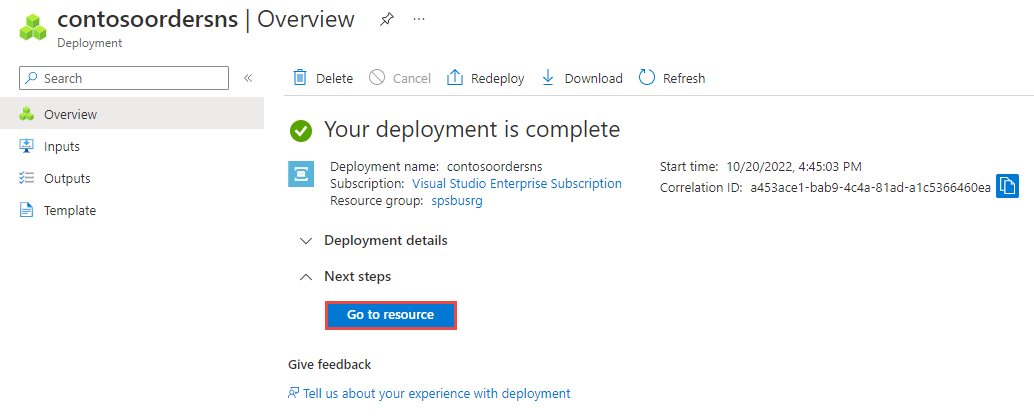
Once the deployment of the resource is successful, select Go to resource on the deployment page.
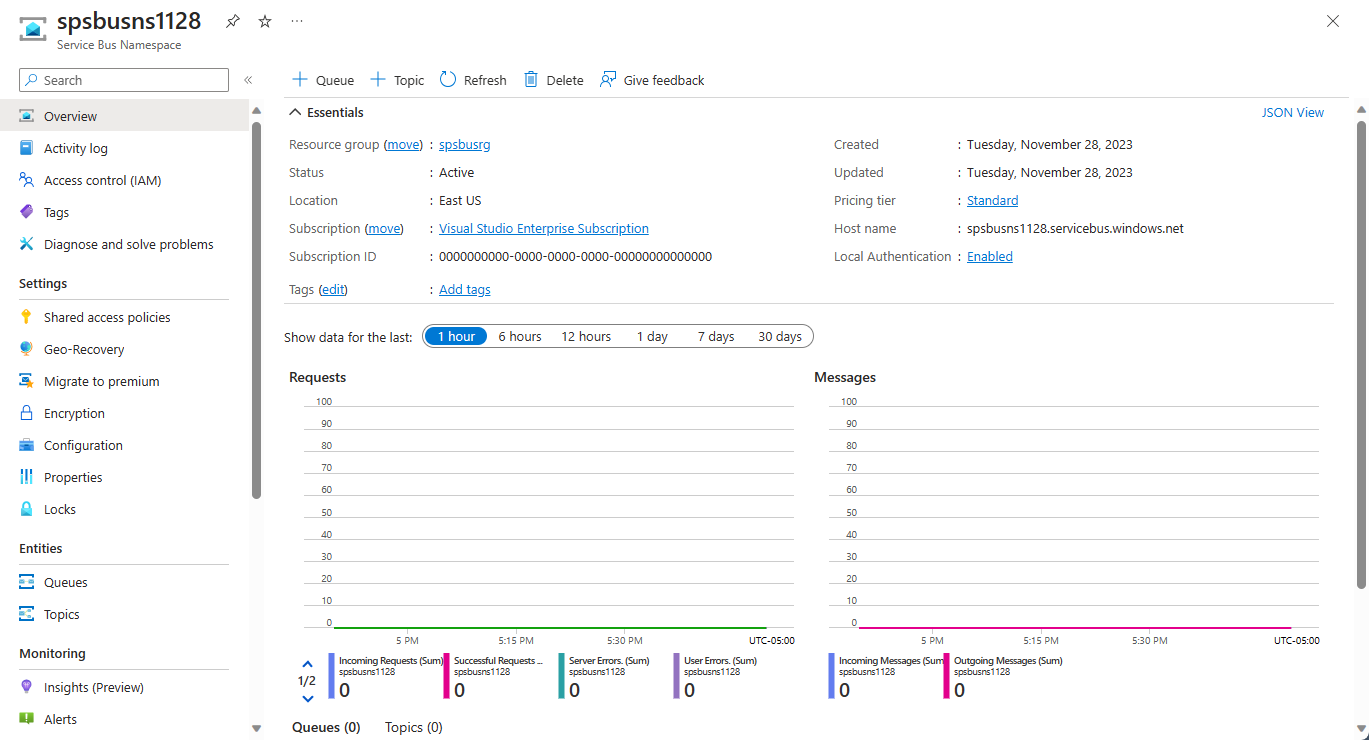
You see the home page for your service bus namespace.
Get connection string to the namespace (Azure portal)
Creating a new namespace automatically generates an initial Shared Access Signature (SAS) policy with primary and secondary keys, and primary and secondary connection strings that each grant full control over all aspects of the namespace. See Service Bus authentication and authorization for information about how to create rules with more constrained rights for regular senders and receivers.
A client can use the connection string to connect to the Service Bus namespace. To copy the primary connection string for your namespace, follow these steps:
On the Service Bus Namespace page, select Shared access policies on the left menu.
On the Shared access policies page, select RootManageSharedAccessKey.
In the Policy: RootManageSharedAccessKey window, select the copy button next to Primary Connection String, to copy the connection string to your clipboard for later use. Paste this value into Notepad or some other temporary location.
You can use this page to copy primary key, secondary key, primary connection string, and secondary connection string.
Create a topic using the Azure portal
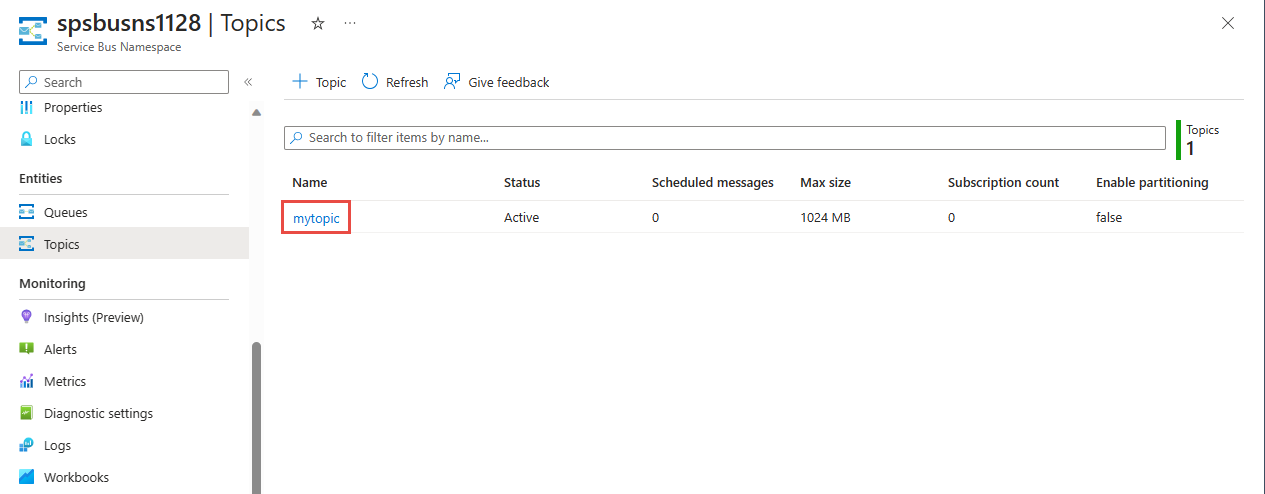
On the Service Bus Namespace page, select Topics on the left menu.
Select + Topic on the toolbar.
Enter a name for the topic. Leave the other options with their default values.
Select Create.
Create subscriptions to the topic
Select the topic that you created in the previous section.
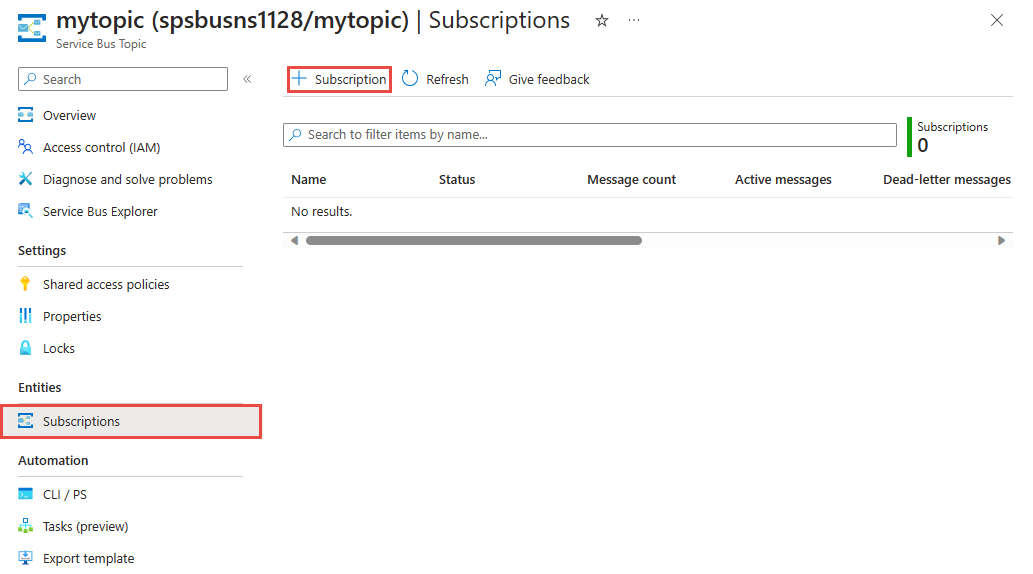
On the Service Bus Topic page, select Subscriptions from the left menu, and then select + Subscription on the toolbar.
On the Create subscription page, follow these steps:
Enter S1 for name of the subscription.
Then, select Create to create the subscription.
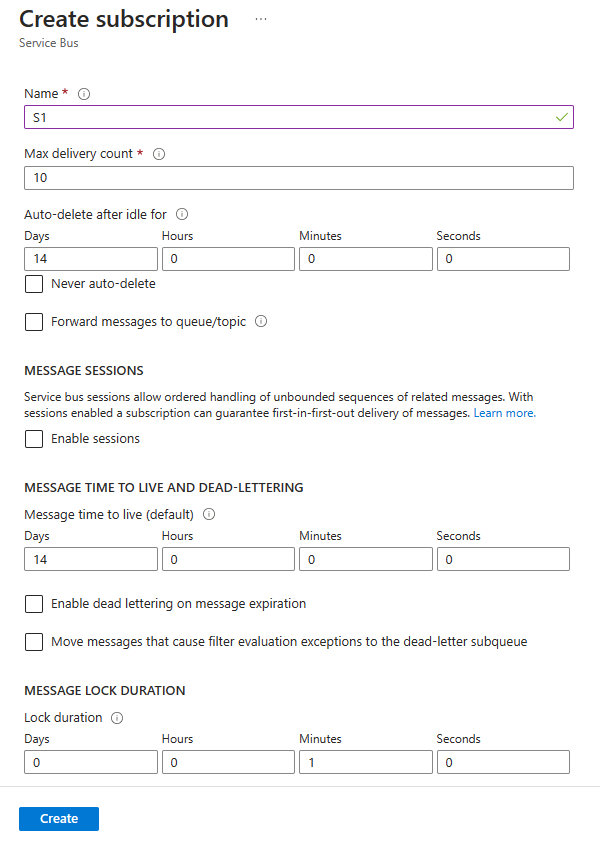
Repeat the previous step twice to create subscriptions named S2 and S3.
Create filter rules on subscriptions
After the namespace and topic/subscriptions are provisioned, and you have the connection string to the namespace, you're ready to create filter rules on the subscriptions, then send and receive messages. You can examine the code in this GitHub sample folder.
Send and receive messages
To run the code, follow these steps:
In a command prompt or PowerShell prompt, clone the Service Bus GitHub repository by issuing the following command:
git clone https://github.com/Azure/azure-service-bus.gitNavigate to the sample folder
azure-service-bus\samples\DotNet\Azure.Messaging.ServiceBus\BasicSendReceiveTutorialWithFilters.Obtain the connection string you copied to Notepad earlier in this tutorial. You also need the name of the topic you created in the previous section.
At the command prompt, type the following command:
dotnet buildNavigate to the
BasicSendReceiveTutorialWithFilters\bin\Debug\netcoreapp3.1folder.Type the following command to run the program. Be sure to replace
myConnectionStringwith the value you previously obtained, andmyTopicNamewith the name of the topic you created:dotnet --roll-forward Major BasicSendReceiveTutorialWithFilters.dll -ConnectionString "myConnectionString" -TopicName "myTopicName"Follow the instructions in the console to select filter creation first. Part of creating filters is to remove the default filters. When you use PowerShell or CLI you don't need to remove the default filter, but if you do it in code, you must remove them. The console commands 1 and 3 help you manage the filters on the subscriptions you previously created:
Execute 1: to remove the default filters.
Execute 2: to add your own filters.
Execute 3: Skip this step for the tutorial. This option optionally removes your own filters. It will not recreate the default filters.

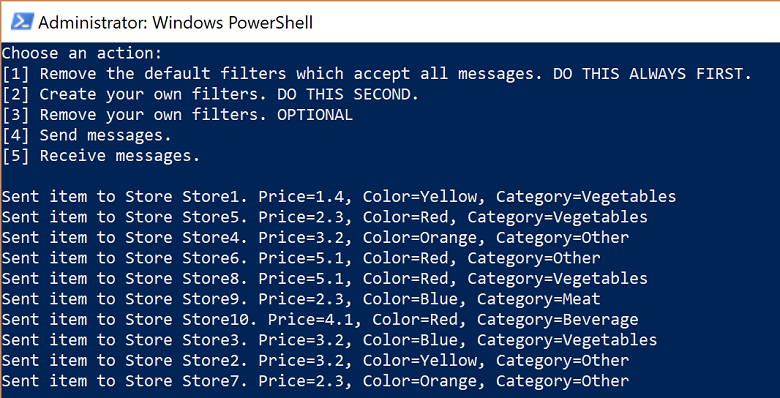
After filter creation, you can send messages. Press 4 and observe 10 messages being sent to the topic:
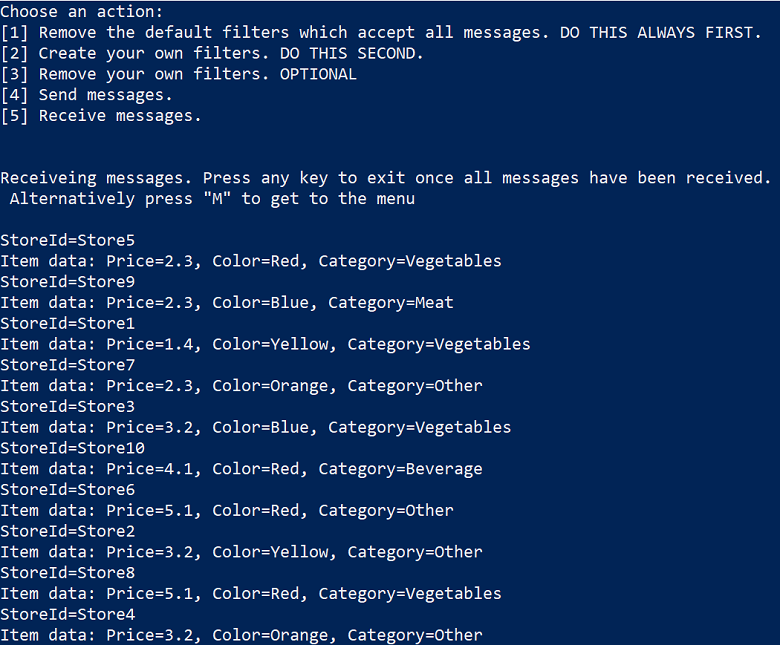
Press 5 and observe the messages being received. If you didn't get 10 messages back, press "m" to display the menu, then press 5 again.
Clean up resources
When no longer needed, follow these steps to clean up resources.
- Navigate to your namespace in the Azure portal.
- On the Service Bus Namespace page, select Delete from the command bar to delete the namespace and resources (queues, topics, and subscriptions) in it.
Understand the sample code
This section contains more details about what the sample code does.
Get connection string and topic
First, the code declares a set of variables, which drive the remaining execution of the program.
string ServiceBusConnectionString;
string TopicName;

static string[] Subscriptions = { "S1", "S2", "S3" };
static IDictionary<string, string[]> SubscriptionFilters = new Dictionary<string, string[]> {
    { "S1", new[] { "StoreId IN('Store1', 'Store2', 'Store3')", "StoreId = 'Store4'"} },
    { "S2", new[] { "sys.To IN ('Store5','Store6','Store7') OR StoreId = 'Store8'" } },
    { "S3", new[] { "sys.To NOT IN ('Store1','Store2','Store3','Store4','Store5','Store6','Store7','Store8') OR StoreId NOT IN ('Store1','Store2','Store3','Store4','Store5','Store6','Store7','Store8')" } }
};
// You can have only have one action per rule and this sample code supports only one action for the first filter, which is used to create the first rule.
static IDictionary<string, string> SubscriptionAction = new Dictionary<string, string> {
    { "S1", "" },
    { "S2", "" },
    { "S3", "SET sys.Label = 'SalesEvent'"  }
};
static string[] Store = { "Store1", "Store2", "Store3", "Store4", "Store5", "Store6", "Store7", "Store8", "Store9", "Store10" };
static string SysField = "sys.To";
static string CustomField = "StoreId";
static int NrOfMessagesPerStore = 1; // Send at least 1.
The connection string and topic name are passed in via command line parameters as shown, and then are read in the Main() method:
static void Main(string[] args)
{
    string ServiceBusConnectionString = "";
    string TopicName = "";

    for (int i = 0; i < args.Length; i++)
    {
        if (args[i] == "-ConnectionString")
        {
            Console.WriteLine($"ConnectionString: {args[i + 1]}");
            ServiceBusConnectionString = args[i + 1]; // Alternatively enter your connection string here.
        }
        else if (args[i] == "-TopicName")
        {
            Console.WriteLine($"TopicName: {args[i + 1]}");
            TopicName = args[i + 1]; // Alternatively enter your queue name here.
        }
    }

    if (ServiceBusConnectionString != "" && TopicName != "")
    {
        Program P = StartProgram(ServiceBusConnectionString, TopicName);
        P.PresentMenu().GetAwaiter().GetResult();
    }
    else
    {
        Console.WriteLine("Specify -Connectionstring and -TopicName to execute the example.");
        Console.ReadKey();
    }
}
Remove default filters
When you create a subscription, Service Bus creates a default filter per subscription. This filter enables receiving every message sent to the topic. If you want to use custom filters, you can remove the default filter, as shown in the following code:
private async Task RemoveDefaultFilters()
{
    Console.WriteLine($"Starting to remove default filters.");

    try
    {
        var client = new ServiceBusAdministrationClient(ServiceBusConnectionString);
        foreach (var subscription in Subscriptions)
        {
            await client.DeleteRuleAsync(TopicName, subscription, CreateRuleOptions.DefaultRuleName);
            Console.WriteLine($"Default filter for {subscription} has been removed.");
        }

        Console.WriteLine("All default Rules have been removed.\n");
    }
    catch (Exception ex)
    {
        Console.WriteLine(ex.ToString());
    }

    await PresentMenu();
}
Create filters
The following code adds the custom filters defined in this tutorial:
private async Task CreateCustomFilters()
{
    try
    {
        for (int i = 0; i < Subscriptions.Length; i++)
        {
            var client = new ServiceBusAdministrationClient(ServiceBusConnectionString);
            string[] filters = SubscriptionFilters[Subscriptions[i]];
            if (filters[0] != "")
            {
                int count = 0;
                foreach (var myFilter in filters)
                {
                    count++;

                    string action = SubscriptionAction[Subscriptions[i]];
                    if (action != "")
                    {
                        await client.CreateRuleAsync(TopicName, Subscriptions[i], new CreateRuleOptions
                        {
                            Filter = new SqlRuleFilter(myFilter),
                            Action = new SqlRuleAction(action),
                            Name = $"MyRule{count}"
                        });
                    }
                    else
                    {
                        await client.CreateRuleAsync(TopicName, Subscriptions[i], new CreateRuleOptions
                        {
                            Filter = new SqlRuleFilter(myFilter),
                            Name = $"MyRule{count}"
                        });
                    }
                }
            }

            Console.WriteLine($"Filters and actions for {Subscriptions[i]} have been created.");
        }

        Console.WriteLine("All filters and actions have been created.\n");
    }
    catch (Exception ex)
    {
        Console.WriteLine(ex.ToString());
    }

    await PresentMenu();
}
Remove your custom created filters
If you want to remove all filters on your subscription, the following code shows how to do that:
private async Task CleanUpCustomFilters()
{
    foreach (var subscription in Subscriptions)
    {
        try
        {
            var client = new ServiceBusAdministrationClient(ServiceBusConnectionString);
            IAsyncEnumerator<RuleProperties> rules = client.GetRulesAsync(TopicName, subscription).GetAsyncEnumerator();
            while (await rules.MoveNextAsync())
            {
                await client.DeleteRuleAsync(TopicName, subscription, rules.Current.Name);
                Console.WriteLine($"Rule {rules.Current.Name} has been removed.");
            }
        }
        catch (Exception ex)
        {
            Console.WriteLine(ex.ToString());
        }
    }
    Console.WriteLine("All default filters have been removed.\n");

    await PresentMenu();
}
Send messages
Sending messages to a topic is similar to sending messages to a queue. This example shows how to send messages, using a task list and asynchronous processing:
public async Task SendMessages()
{
    try
    {
        await using var client = new ServiceBusClient(ServiceBusConnectionString);
        var taskList = new List<Task>();
        for (int i = 0; i < Store.Length; i++)
        {
            taskList.Add(SendItems(client, Store[i]));
        }

        await Task.WhenAll(taskList);
    }
    catch (Exception ex)
    {
        Console.WriteLine(ex.ToString());
    }
    Console.WriteLine("\nAll messages sent.\n");
}

private async Task SendItems(ServiceBusClient client, string store)
{
    // create the sender
    ServiceBusSender tc = client.CreateSender(TopicName);

    for (int i = 0; i < NrOfMessagesPerStore; i++)
    {
        Random r = new Random();
        Item item = new Item(r.Next(5), r.Next(5), r.Next(5));

        // Note the extension class which is serializing an deserializing messages
        ServiceBusMessage message = item.AsMessage();
        message.To = store;
        message.ApplicationProperties.Add("StoreId", store);
        message.ApplicationProperties.Add("Price", item.GetPrice().ToString());
        message.ApplicationProperties.Add("Color", item.GetColor());
        message.ApplicationProperties.Add("Category", item.GetItemCategory());

        await tc.SendMessageAsync(message);
        Console.WriteLine($"Sent item to Store {store}. Price={item.GetPrice()}, Color={item.GetColor()}, Category={item.GetItemCategory()}"); ;
    }
}
Receive messages
Messages are again received via a task list, and the code uses batching. You can send and receive using batching, but this example only shows how to batch receive. In reality, you wouldn't break out of the loop, but keep looping and set a higher time span, such as one minute. The receive call to the broker is kept open for this amount of time and if messages arrive, they're returned immediately and a new receive call is issued. This concept is called long polling. Using the receive pump, which you can see in the quickstart, and in several other samples in the repository, is a more typical option.
public async Task Receive()
{
    var taskList = new List<Task>();
    for (var i = 0; i < Subscriptions.Length; i++)
    {
        taskList.Add(this.ReceiveMessages(Subscriptions[i]));
    }

    await Task.WhenAll(taskList);
}

private async Task ReceiveMessages(string subscription)
{
    await using var client = new ServiceBusClient(ServiceBusConnectionString);
    ServiceBusReceiver receiver = client.CreateReceiver(TopicName, subscription);

    // In reality you would not break out of the loop like in this example but would keep looping. The receiver keeps the connection open
    // to the broker for the specified amount of seconds and the broker returns messages as soon as they arrive. The client then initiates
    // a new connection. So in reality you would not want to break out of the loop.
    // Also note that the code shows how to batch receive, which you would do for performance reasons. For convenience you can also always
    // use the regular receive pump which we show in our Quick Start and in other GitHub samples.
    while (true)
    {
        try
        {
            //IList<Message> messages = await receiver.ReceiveAsync(10, TimeSpan.FromSeconds(2));
            // Note the extension class which is serializing an deserializing messages and testing messages is null or 0.
            // If you think you did not receive all messages, just press M and receive again via the menu.
            IReadOnlyList<ServiceBusReceivedMessage> messages = await receiver.ReceiveMessagesAsync(maxMessages: 100);

            if (messages.Any())
            {
                foreach (ServiceBusReceivedMessage message in messages)
                {
                    lock (Console.Out)
                    {
                        Item item = message.As<Item>();
                        IReadOnlyDictionary<string, object> myApplicationProperties = message.ApplicationProperties;
                        Console.WriteLine($"StoreId={myApplicationProperties["StoreId"]}");
                        if (message.Subject != null)
                        {
                            Console.WriteLine($"Subject={message.Subject}");
                        }
                        Console.WriteLine(
                            $"Item data: Price={item.GetPrice()}, Color={item.GetColor()}, Category={item.GetItemCategory()}");
                    }

                    await receiver.CompleteMessageAsync(message);
                }
            }
            else
            {
                break;
            }
        }
        catch (Exception ex)
        {
            Console.WriteLine(ex.ToString());
        }
    }
}
Note
You can manage Service Bus resources with Service Bus Explorer. The Service Bus Explorer allows users to connect to a Service Bus namespace and administer messaging entities in an easy manner. The tool provides advanced features like import/export functionality or the ability to test topic, queues, subscriptions, relay services, notification hubs and events hubs.
Next steps
In this tutorial, you provisioned resources using the Azure portal, then sent and received messages from a Service Bus topic and its subscriptions. You learned how to:
- Create a Service Bus topic and one or more subscriptions to that topic using the Azure portal
- Add topic filters using .NET code
- Create two messages with different content
- Send the messages and verify they arrived in the expected subscriptions
- Receive messages from the subscriptions
For more examples of sending and receiving messages, get started with the Service Bus samples on GitHub.
Advance to the next tutorial to learn more about using the publish/subscribe capabilities of Service Bus.
Feedback
Coming soon: Throughout 2024 we will be phasing out GitHub Issues as the feedback mechanism for content and replacing it with a new feedback system. For more information see: https://aka.ms/ContentUserFeedback.
Submit and view feedback for
