Tutorial: Create a simple Visual Basic (VB) console app
This article shows how you use Visual Studio to create a simple Visual Basic application, a console app. In this app, you ask the user for their name, and then display it back with the current time. You also explore some features of the Visual Studio integrated development environment (IDE), including source control in Git. Visual Basic is a type-safe programming language that's designed to be easy to learn. A console app takes input and displays output in a command-line window, also known as a console.
In this tutorial, you learn how to:
- Create a Visual Studio project
- Run the default application
- Add code to ask for user input
- Extra credit: Add two numbers
- Add Git source control
- Clean up resources
Prerequisites
If you haven't already installed Visual Studio, go to the Visual Studio downloads page to install it for free.
Create a project
First, you create a Visual Basic app project. The default project template includes all the files you need for a runnable app.
Note
Some of the screenshots in this tutorial use the dark theme. If you aren't using the dark theme but would like to, see the Change fonts, colors, and themes in Visual Studio page to learn how.
Open Visual Studio 2019.
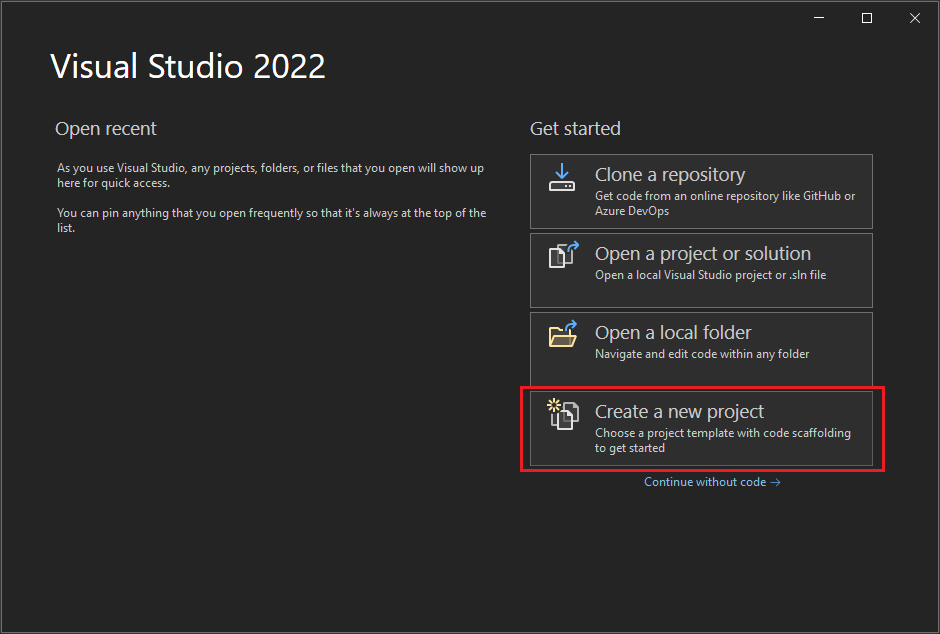
In the start window, choose Create a new project.

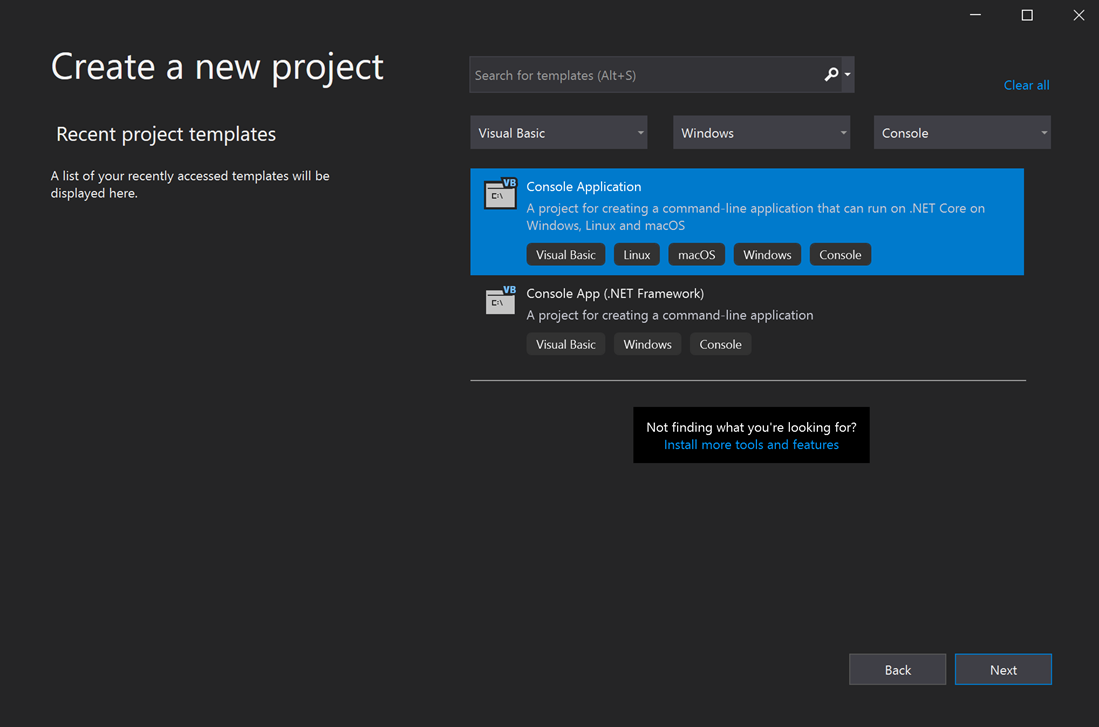
In the Create a new project window, choose Visual Basic from the Language list. Next, choose Windows from the Platform list and Console from the project types list.
After you apply the language, platform, and project type filters, choose the Console Application template, and then choose Next.
Note
If you do not see the Console Application template, you can install it from the Create a new project window. In the Not finding what you're looking for? message, choose the Install more tools and features link.

Then, in the Visual Studio Installer, choose the .NET Core cross-platform development workload.

After that, choose the Modify button in the Visual Studio Installer. You might be prompted to save your work. Next, choose Continue to install the workload. Then, return to step 2 in this Create a project procedure.
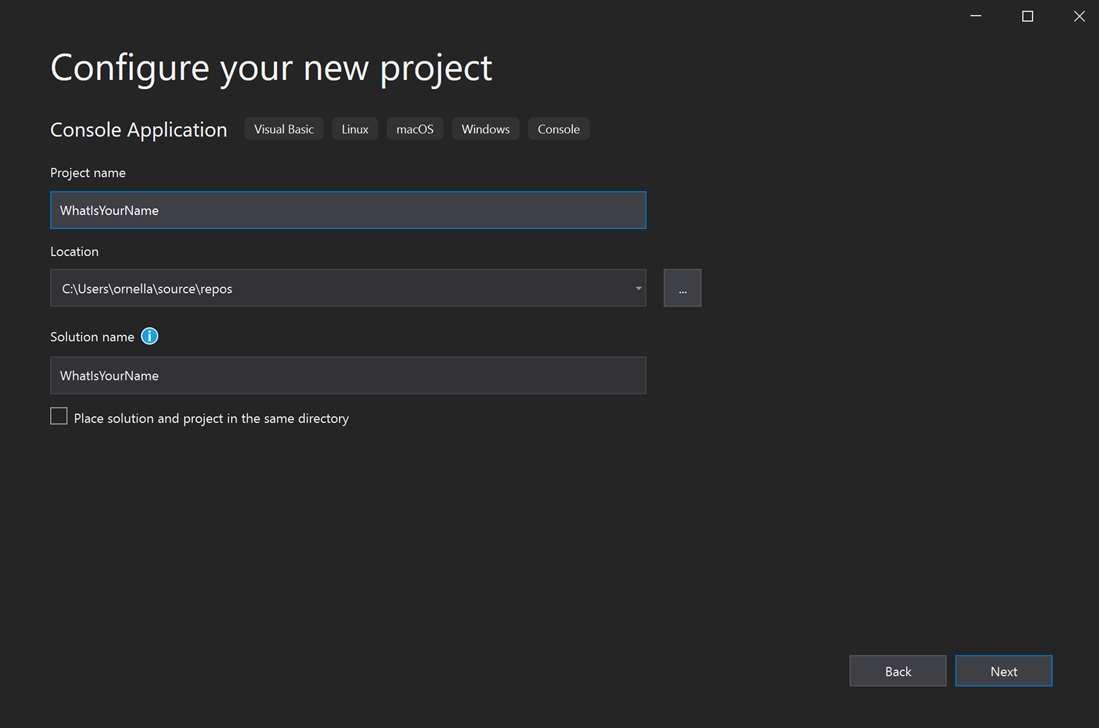
In the Configure your new project window, enter WhatIsYourName in the Project name box. Then, choose Next.
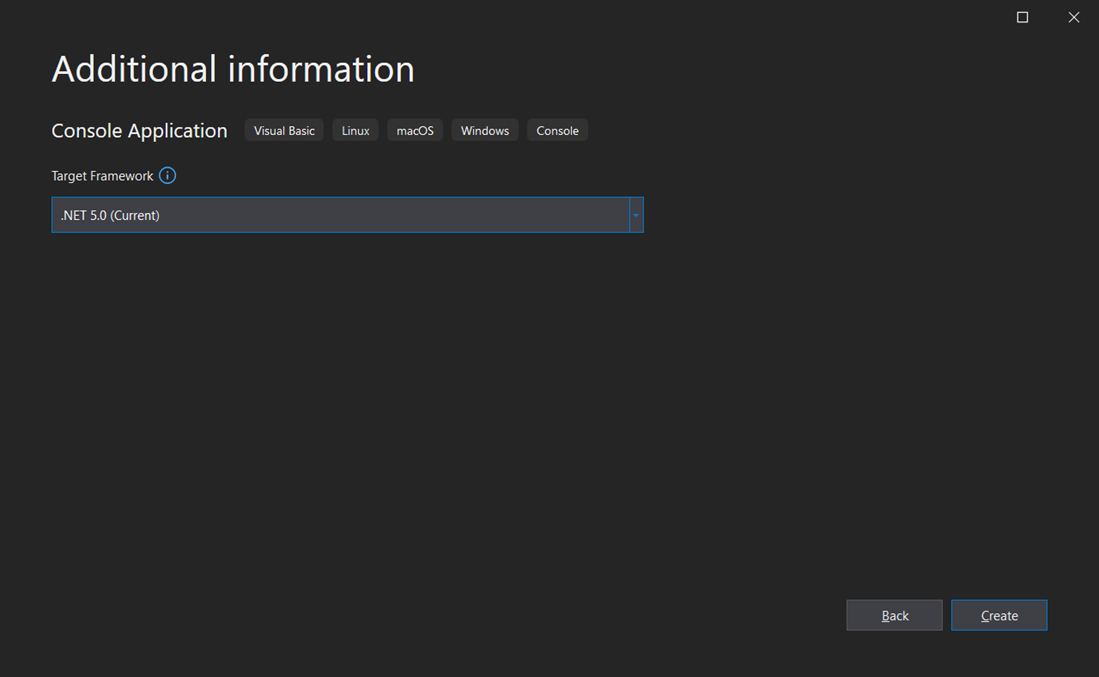
In the Additional information window, .NET 5.0 (Current) should already be selected for your target framework. If not, select .NET 5.0 (Current). Then, choose Create.
Visual Studio opens your new project.
Open Visual Studio.
On the start window, choose Create a new project.
In the Create a new project window, choose Visual Basic from the Language list. Next, choose Windows from the Platform list and Console from the Project types list.
After you apply the language, platform, and project type filters, choose the Console App template, and then choose Next.

Note
If you do not see the Console App template, you can install it from the Create a new project window. In the Not finding what you're looking for? message, choose the Install more tools and features link.

Then, in the Visual Studio Installer, choose the .NET desktop development workload.

After that, choose the Modify button in the Visual Studio Installer. You might be prompted to save your work. Next, choose Continue to install the workload. Then, return to step 2 in this Create a project procedure.
In the Configure your new project window, enter WhatIsYourName in the Project name box. Then, choose Next.
In the Additional information window, .NET 8.0 should already be selected for your target framework. If not, select .NET 8.0. Then, choose Create.
Visual Studio opens your new project.
Run the app
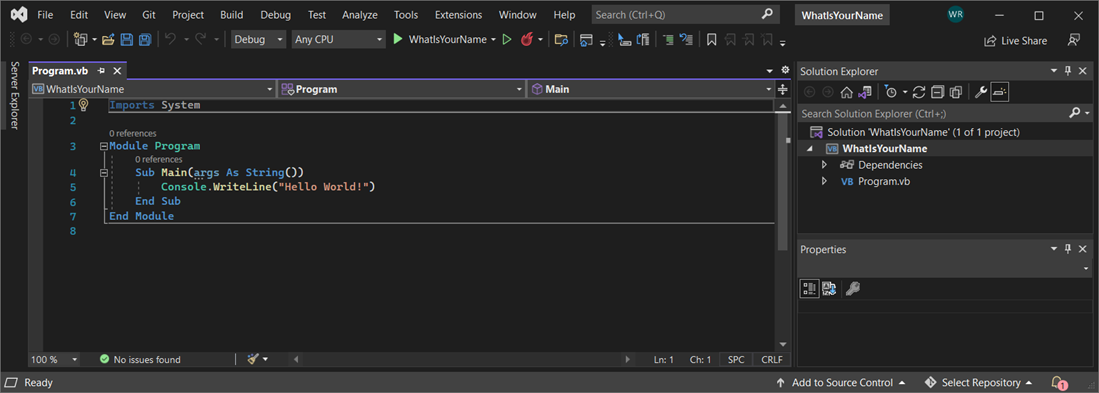
After you select your Visual Basic project template and name your project, Visual Studio creates a Program.vb file. The default code calls the WriteLine method to display the literal string "Hello World!" in the console window.
There are two ways to run this code, inside Visual Studio in debug mode, and from your computer as a regular standalone app.
Run the app in debug mode

Select the WhatIsYourName button or press F5 to run the default code in Debug mode.

When the app runs in the Microsoft Visual Studio Debug Console, "Hello World!" displays. Press any key to close the debug console window and end the app:

Run the app as a standalone
To see the output outside of Visual Studio, in a system console window, build and run the executable (.exe file).
In the Build menu, choose Build Solution.
In Solution Explorer, right-click on WhatIsYourName and choose Open File in File Explorer.
In File Explorer, navigate to the bin\Debug\net5.0 directory and run WhatIsYourName.exe.
The
Mainprocedure terminates after its single statement executes and the console window closes immediately. To keep the console visible until the user presses a key, see the next section.
In the Build menu, choose Build Solution.
In Solution Explorer, right-click on WhatIsYourName and choose Open File in File Explorer.
In File Explorer, navigate to the bin\Debug\net8.0 directory and run WhatIsYourName.exe.
The
Mainprocedure terminates after its single statement executes and the console window closes immediately. To keep the console visible until the user presses a key, see the next section.
Add code to ask for user input
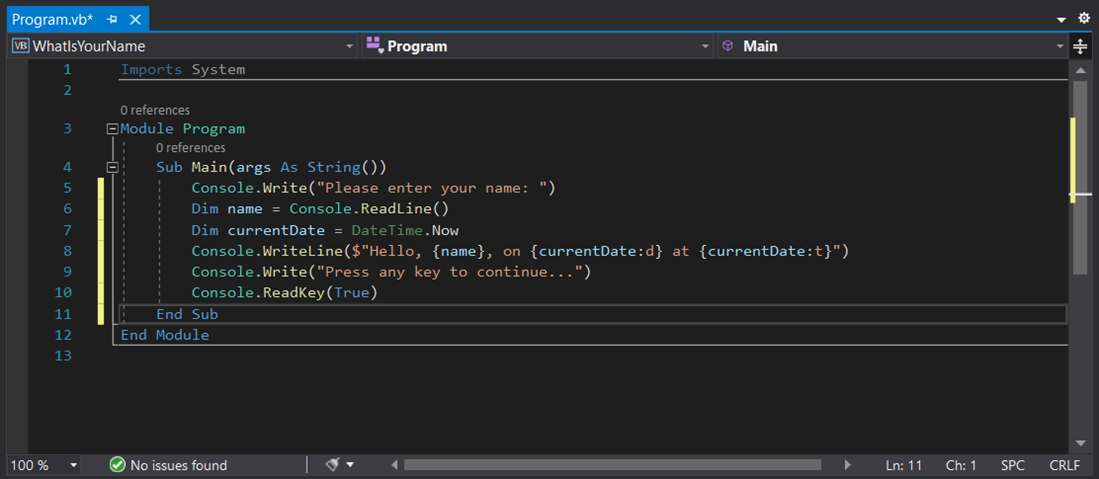
Next, you add Visual Basic code that prompts you for your name and then displays it along with the current date and time. In addition, you add code that pauses the console window until the user presses a key.
Enter the following Visual Basic code after the
Sub Main(args As String())line and before theEnd Subline, replacing the WriteLine line:Console.Write("Please enter your name: ") Dim name = Console.ReadLine() Dim currentDate = DateTime.Now Console.WriteLine($"Hello, {name}, on {currentDate:d} at {currentDate:t}") Console.Write("Press any key to continue...") Console.ReadKey(True)- Write and WriteLine write a string to the console.
- ReadLine reads input from the console, in this case a string.
- DateTime represents a datetime, and Now returns the current time.
- ReadKey() pauses the app and waits for a keypress.
Select the WhatIsYourName button or press F5 to build and run your first app in Debug mode.
When the debug console window opens, enter your name. Your console window should look similar to the following screenshot:

Press any key to end the app, and then press any key to close the debug console window.
Enter the following Visual Basic code after the
Sub Main(args As String())line and before theEnd Subline, replacing the WriteLine line:Console.Write("Please enter your name: ") Dim name = Console.ReadLine() Dim currentDate = DateTime.Now Console.WriteLine($"Hello, {name}, on {currentDate:d} at {currentDate:t}") Console.Write("Press any key to continue...") Console.ReadKey(True)- Write and WriteLine write a string to the console.
- ReadLine reads input from the console, in this case a string.
- DateTime represents a datetime, and Now returns the current time.
- ReadKey() pauses the app and waits for a keypress.

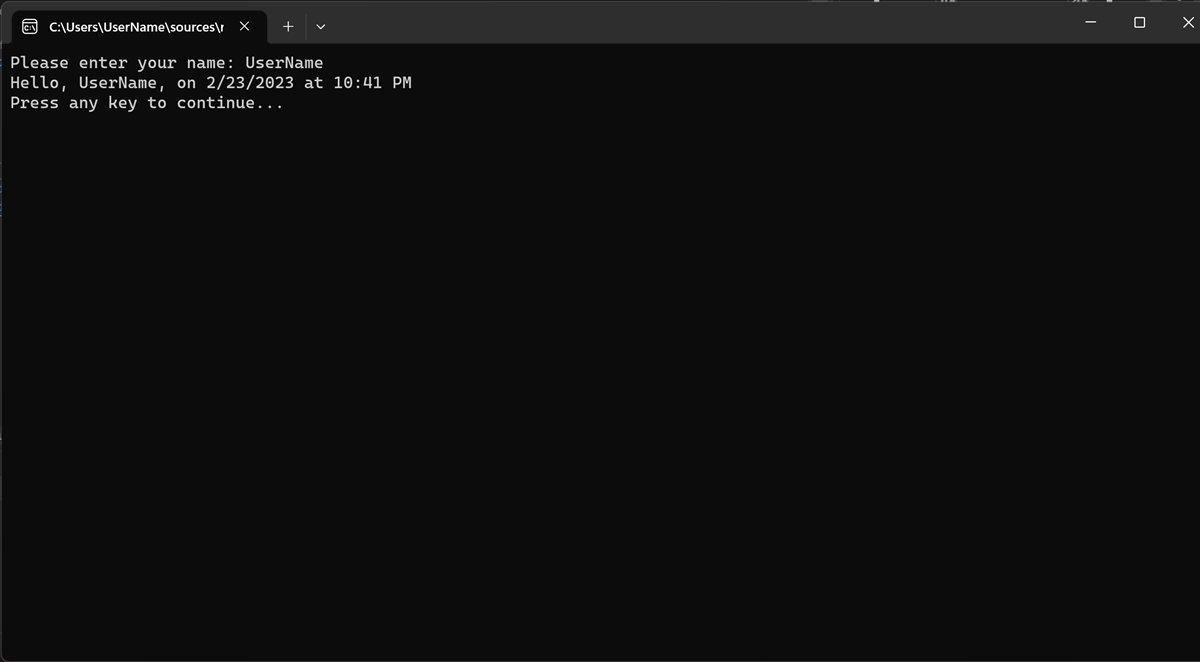
Select the WhatIsYourName button or press F5 to build and run your app in Debug mode.
When the debug console window opens, enter your name. Your console window should look similar to the following screenshot:
Press any key to end the app, and then press any key to close the debug console window.
Now that your new code is in the app, build and run the executable (.exe file) in a system console window, as described previously in Run the app as a standalone. Now when you press a key, the app exits, which closes the console window.
Extra credit: Add two numbers
This example shows how to read in numbers, rather than a string, and do some arithmetic. Try changing your code from:
Module Program
Sub Main(args As String())
Console.Write("Please enter your name: ")
Dim name = Console.ReadLine()
Dim currentDate = DateTime.Now
Console.WriteLine($"Hello, {name}, on {currentDate:d} at {currentDate:t}")
Console.Write("Press any key to continue...")
Console.ReadKey(True)
End Sub
End Module
to:
Module Program
    Public num1 As Integer
    Public num2 As Integer
    Public answer As Integer
    Sub Main(args As String())
        Console.Write("Type a number and press Enter")
        num1 = Console.ReadLine()
        Console.Write("Type another number to add to it and press Enter")
        num2 = Console.ReadLine()
        answer = num1 + num2
        Console.WriteLine("The answer is " & answer)
        Console.Write("Press any key to continue...")
        Console.ReadKey(True)
    End Sub
End Module
And then run the updated app as described in the earlier section, Run the app.
Add Git source control
Now that you have an application, you might want to add it to a Git repository. Visual Studio makes that process easy with Git tools you can use directly from the IDE.
Tip
Git is the most widely used modern version control system. Whether you're a professional developer or you're learning how to code, Git can be very useful. If you're new to Git, the https://git-scm.com/ website is a good place to start. You can find cheat sheets, a popular online book, and Git Basics videos.
To associate your code with Git, start by creating a new Git repository where your code is located:
In the status bar at the bottom-right of Visual Studio, select Add to Source Control, and then select Git.

In the Create a Git repository dialog box, sign in to GitHub:

The repository name autopopulates based on your folder location. Your new repository is private by default, which means you're the only one who can access it.
Tip
Whether your repository is public or private, it's best to have a remote backup of your code stored securely on GitHub. Even if you aren't working with a team, a remote repository makes your code available to you from any computer.
Select Create and Push. After you create your repository, you see status details in the status bar:

Use Git actions in Visual Studio
Here's a brief summary of Git actions available in the Visual Studio status bar:
The Up/Down arrows show how many outgoing/incoming commits are in your current branch. You can use this icon to pull any incoming commits or push any outgoing commits.
To view a specific commit, select the Up/Down arrow, and then select View Outgoing/Incoming.
The Pencil shows the number of uncommitted changes to your code. You can select this icon to view those changes in the Git Changes window.
The Git menu provides tools for repository actions on your files. You can use git fetch, pull, push, and sync for version control in Visual Studio.
To learn more about how to use Git with your app, see the Visual Studio version control documentation.
Clean up resources
If you're not going to continue to use this app, delete the project.
In Solution Explorer, right-click on WhatIsYourName to open the context menu for your project. Then, select Open Folder in File Explorer.
Close Visual Studio.
In the File Explorer dialog, go up two levels of folders.
Right-click on the WhatIsYourName folder and select Delete.
Next steps
Congratulations on completing this tutorial! To learn more, see the following tutorial.
See also
Feedback
Coming soon: Throughout 2024 we will be phasing out GitHub Issues as the feedback mechanism for content and replacing it with a new feedback system. For more information see: https://aka.ms/ContentUserFeedback.
Submit and view feedback for
