Tutorial: Deploy a Spring Boot application on AKS cluster with Azure Database for MySQL - Flexible Server in a VNet
APPLIES TO:  Azure Database for MySQL - Flexible Server
In this tutorial, you'll learn how to deploy a Spring Boot application on Azure Kubernetes Service (AKS) cluster with Azure Database for MySQL flexible server in the backend, securely communicating with each other within an Azure virtual network.
Note
This tutorial assumes a basic understanding of Kubernetes concepts, Java Spring Boot and MySQL. For Spring Boot applications, we recommend using Azure Spring Apps. However, you can still use Azure Kubernetes Services as a destination. See Java Workload Destination Guidance for advice.
Prerequisites
- An Azure subscription If you don't have an Azure subscription, create an Azure free account before you begin. Currently, with an Azure free account, you can try Azure Database for MySQL - Flexible Server free for 12 months. For more information, see Try Azure Database for MySQL - Flexible Server for free.
- The Azure Command-Line Interface (CLI).
- A supported Java Development Kit, version 8 (included in Azure Cloud Shell).
- The Apache Maven build tool.
- A Git client.
- A Docker client.
Create an Azure Database for MySQL flexible server
Create a resource group
An Azure resource group is a logical group in which Azure resources are deployed and managed. Let's create a resource group rg-mysqlaksdemo using the az group create command in the eastus location.
- Open command prompt.
- Sign in to your Azure account.
az login - Choose your Azure subscription.
az account set -s <your-subscription-ID> - Create the resource group.
az group create --name rg-mysqlaksdemo --location eastus
Create an Azure Database for MySQL flexible server instance
We'll now create an Azure Database for MySQL flexible server instance in a virtual network (private access connectivity method).
Create an Azure virtual network vnet-mysqlaksdemo for all the resources in this tutorial, and a subnet subnet-mysql for the Azure Database for MySQL flexible server instance.
az network vnet create \
--resource-group rg-mysqlaksdemo \
--name vnet-mysqlaksdemo \
--address-prefixes 155.55.0.0/16 \
--subnet-name subnet-mysql \
--subnet-prefix 155.55.1.0/24
Create an Azure Database for MySQL flexible server instance mysql-mysqlaksdemo in the above created subnet, using the az mysql flexible-server create command. Replace your values for admin username and password.
az mysql flexible-server create \
--name mysql-mysqlaksdemo \
--resource-group rg-mysqlaksdemo \
--location eastus \
--admin-user <your-admin-username> \
--admin-password <your-admin-password> \
--vnet vnet-mysqlaksdemo \
--subnet subnet-mysql
You have now created an Azure Database for MySQL flexible server instance in the eastus region with Burstable B1MS compute, 32 GB storage, 7 days backup retention period, and in the provided subnet subnet-mysql. This subnet should not have any other resource deployed in it and will be delegated to Microsoft.DBforMySQL/flexibleServers.
Configure a new Azure Database for MySQL flexible server database
demoto be used with the Spring Boot Application.az mysql flexible-server db create \ --resource-group rg-mysqlaksdemo \ --server-name mysql-mysqlaksdemo \ --database-name demo
Create an Azure container registry
Create a private Azure container registry in the resource group. This tutorial pushes the sample app as a Docker image to this registry in later steps. Replace mysqlaksdemoregistry with a unique name for your registry.
az acr create --resource-group rg-mysqlaksdemo \
--location eastus \
--name mysqlaksdemoregistry \
--sku Basic
Code the application
In this section, we'll code the demo application. If you want to go faster, you can download the coded application available at https://github.com/Azure-Samples/tutorial-springboot-mysql-aks and skip to the next section - Build the image and push to ACR.
Generate the application using Spring Initializr.
curl https://start.spring.io/starter.tgz \
-d dependencies=web,data-jdbc,mysql \
-d baseDir=springboot-mysql-aks \
-d bootVersion=2.5.6.RELEASE \
-d artifactId=springboot-mysql-aks \
-d description="Spring Boot on AKS connecting to Azure DB for MySQL" \
-d javaVersion=1.8 | tar -xzvf -
A base Spring Boot application will be generated inside the
springboot-mysql-aksfolder.Use your favorite text editor like VSCode or any IDE for the following steps.
Configure Spring Boot to use Azure Database for MySQL flexible server.
Open the src/main/resources/application.properties file, and add the below snippet. This code is reading the database host, database name, username, and password from the Kubernetes manifest file.
logging.level.org.springframework.jdbc.core=DEBUG
spring.datasource.url=jdbc:mysql://${DATABASE_HOST}:3306/${DATABASE_NAME}?serverTimezone=UTC
spring.datasource.username=${DATABASE_USERNAME}
spring.datasource.password=${DATABASE_PASSWORD}
spring.datasource.initialization-mode=always
Warning
The configuration property
spring.datasource.initialization-mode=alwaysmeans that Spring Boot will automatically generate a database schema, using theschema.sqlfile that we will create later, each time the server is started. This is great for testing, but remember this will delete your data at each restart, so this shouldn't be used in production!Note
We append
?serverTimezone=UTCto the configuration propertyspring.datasource.url, to tell the JDBC driver to use the UTC date format (or Coordinated Universal Time) when connecting to the database. Otherwise, our Java server would not use the same date format as the database, which would result in an error.Create the database schema.
Spring Boot will automatically execute
src/main/resources/schema.sqlto create a database schema. Create that file, with the following content:DROP TABLE IF EXISTS todo; CREATE TABLE todo (id SERIAL PRIMARY KEY, description VARCHAR(255), details VARCHAR(4096), done BOOLEAN);Code the Java Spring Boot application.
Add the Java code that will use JDBC to store and retrieve data from your MySQL server. Create a new
TodoJava class, next to theDemoApplicationclass, and add the following code:package com.example.springbootmysqlaks; import org.springframework.data.annotation.Id; public class Todo { public Todo() { } public Todo(String description, String details, boolean done) { this.description = description; this.details = details; this.done = done; } @Id private Long id; private String description; private String details; private boolean done; public Long getId() { return id; } public void setId(Long id) { this.id = id; } public String getDescription() { return description; } public void setDescription(String description) { this.description = description; } public String getDetails() { return details; } public void setDetails(String details) { this.details = details; } public boolean isDone() { return done; } public void setDone(boolean done) { this.done = done; } }This class is a domain model mapped on the
todotable that you created before.To manage that class, you'll need a repository. Define a new
TodoRepositoryinterface in the same package:package com.example.springbootmysqlaks; import org.springframework.data.repository.CrudRepository; public interface TodoRepository extends CrudRepository<Todo, Long> { }This repository is a repository that Spring Data JDBC manages.
Finish the application by creating a controller that can store and retrieve data. Implement a
TodoControllerclass in the same package, and add the following code:package com.example.springbootmysqlaks; import org.springframework.http.HttpStatus; import org.springframework.web.bind.annotation.*; @RestController @RequestMapping("/") public class TodoController { private final TodoRepository todoRepository; public TodoController(TodoRepository todoRepository) { this.todoRepository = todoRepository; } @PostMapping("/") @ResponseStatus(HttpStatus.CREATED) public Todo createTodo(@RequestBody Todo todo) { return todoRepository.save(todo); } @GetMapping("/") public Iterable<Todo> getTodos() { return todoRepository.findAll(); } }Create a new Dockerfile in the base directory springboot-mysql-aks and copy this code snippet.
FROM openjdk:8-jdk-alpine
RUN addgroup -S spring && adduser -S spring -G spring
USER spring:spring
ARG DEPENDENCY=target/dependency
COPY ${DEPENDENCY}/BOOT-INF/lib /app/lib
COPY ${DEPENDENCY}/META-INF /app/META-INF
COPY ${DEPENDENCY}/BOOT-INF/classes /app
ENTRYPOINT ["java","-cp","app:app/lib/*","com.example.springbootmysqlaks.DemoApplication"]
Go to the pom.xml file and update the
<properties>collection in the pom.xml file with the registry name for your Azure Container Registry and the latest version ofjib-maven-plugin. Note: If your ACR name contains upper case characters, be sure to convert them to lower case characters.<properties> <docker.image.prefix>mysqlaksdemoregistry.azurecr.io</docker.image.prefix> <jib-maven-plugin.version>3.1.4</jib-maven-plugin.version> <java.version>1.8</java.version> </properties>Update the
<plugins>collection in the pom.xml file so that there is a<plugin>element containing an entry for thejib-maven-plugin, as shown below. Note that we are using a base image from the Microsoft Container Registry (MCR):mcr.microsoft.com/java/jdk:8-zulu-alpine, which contains an officially supported JDK for Azure. For other MCR base images with officially supported JDKs, see the docker hub.<plugin> <artifactId>jib-maven-plugin</artifactId> <groupId>com.google.cloud.tools</groupId> <version>${jib-maven-plugin.version}</version> <configuration> <from> <image>mcr.microsoft.com/java/jdk:8-zulu-alpine</image> </from> <to> <image>${docker.image.prefix}/${project.artifactId}</image> </to> </configuration> </plugin>
Build the image and push to ACR
In the command prompt, navigate to springboot-mysql-aks folder and run the following commands to first set the default name for Azure Container Registry (otherwise you'll need to specify the name in az acr login), build the image and then push the image to the registry.
Ensure that your docker daemon is running while executing this step.
az config set defaults.acr=mysqlaksdemoregistry
az acr login && mvn compile jib:build
Create a Kubernetes cluster on AKS
We'll now create an AKS cluster in the virtual network vnet-mysqlaksdemo.
In this tutorial, we'll use Azure CNI networking in AKS. If you'd like to configure kubenet networking instead, see Use kubenet networking in AKS.
Create a subnet subnet-aks for the AKS cluster to use.
az network vnet subnet create \
--resource-group rg-mysqlaksdemo \
--vnet-name vnet-mysqlaksdemo \
--name subnet-aks \
--address-prefixes 155.55.2.0/24
Get the subnet resource ID.
SUBNET_ID=$(az network vnet subnet show --resource-group rg-mysqlaksdemo --vnet-name vnet-mysqlaksdemo --name subnet-aks --query id -o tsv)Create an AKS cluster in the virtual network, with Azure Container Registry (ACR) mysqlaksdemoregistry attached.
    az aks create \
    --resource-group rg-mysqlaksdemo \
    --name aks-mysqlaksdemo \
    --network-plugin azure \
    --service-cidr 10.0.0.0/16 \
    --dns-service-ip 10.0.0.10 \
    --docker-bridge-address 172.17.0.1/16 \
    --vnet-subnet-id $SUBNET_ID \
    --attach-acr mysqlaksdemoregistry \
    --dns-name-prefix aks-mysqlaksdemo \
    --generate-ssh-keys
The following IP address ranges are also defined as part of the cluster create process:
The --service-cidr is used to assign internal services in the AKS cluster an IP address. You can use any private address range that satisfies the following requirements:
- Must not be within the virtual network IP address range of your cluster
- Must not overlap with any other virtual networks with which the cluster virtual network peers
- Must not overlap with any on-premises IPs
- Must not be within the ranges 169.254.0.0/16, 172.30.0.0/16, 172.31.0.0/16, or 192.0.2.0/24
The --dns-service-ip address is the IP address for the cluster's DNS service. This address must be within the Kubernetes service address range. Don't use the first IP address in your address range. The first address in your subnet range is used for the kubernetes.default.svc.cluster.local address.
The --docker-bridge-address is the Docker bridge network address which represents the default docker0 bridge network address present in all Docker installations. You must pick an address space that does not collide with the rest of the CIDRs on your networks, including the cluster's service CIDR and pod CIDR.
Deploy the application to AKS cluster
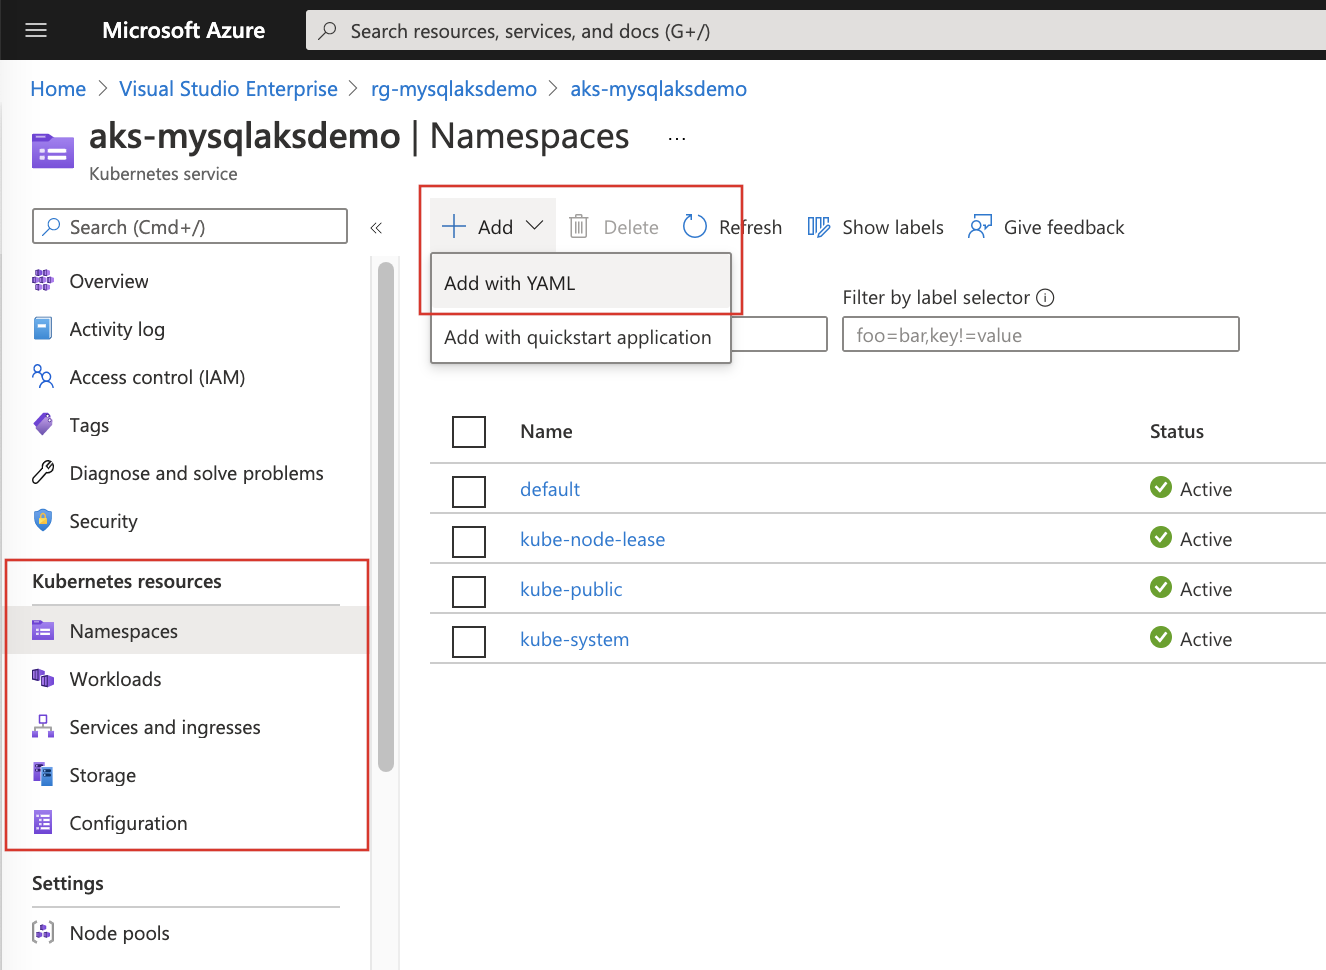
Go to your AKS cluster resource on the Azure portal.
Select Add and Add with YAML from any of the resource views (Namespace, Workloads, Services and ingresses, Storage, or Configuration).

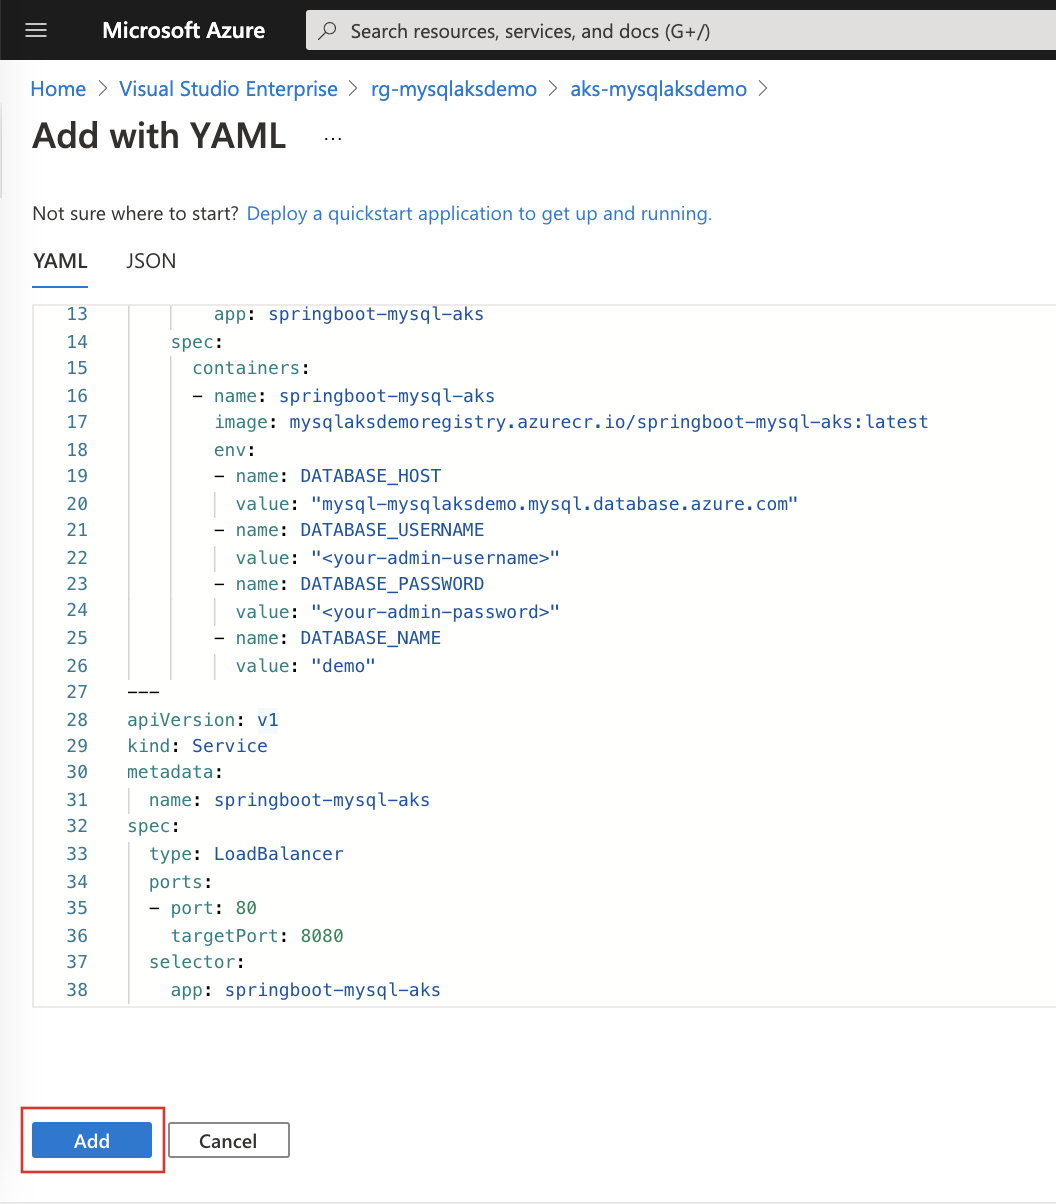
Paste in the following YAML. Replace your values for Azure Database for MySQL flexible server admin username and password.
apiVersion: apps/v1
kind: Deployment
metadata:
  name: springboot-mysql-aks
spec:
  replicas: 1
  selector:
    matchLabels:
      app: springboot-mysql-aks
  template:
    metadata:
      labels:
        app: springboot-mysql-aks
    spec:
      containers:
      - name: springboot-mysql-aks
        image: mysqlaksdemoregistry.azurecr.io/springboot-mysql-aks:latest
        env:
        - name: DATABASE_HOST
          value: "mysql-mysqlaksdemo.mysql.database.azure.com"
        - name: DATABASE_USERNAME
          value: "<your-admin-username>"
        - name: DATABASE_PASSWORD
          value: "<your-admin-password>"
        - name: DATABASE_NAME
          value: "demo"
---
apiVersion: v1
kind: Service
metadata:
  name: springboot-mysql-aks
spec:
  type: LoadBalancer
  ports:
  - port: 80
    targetPort: 8080
  selector:
    app: springboot-mysql-aks
Select Add at the bottom of the YAML editor to deploy the application.

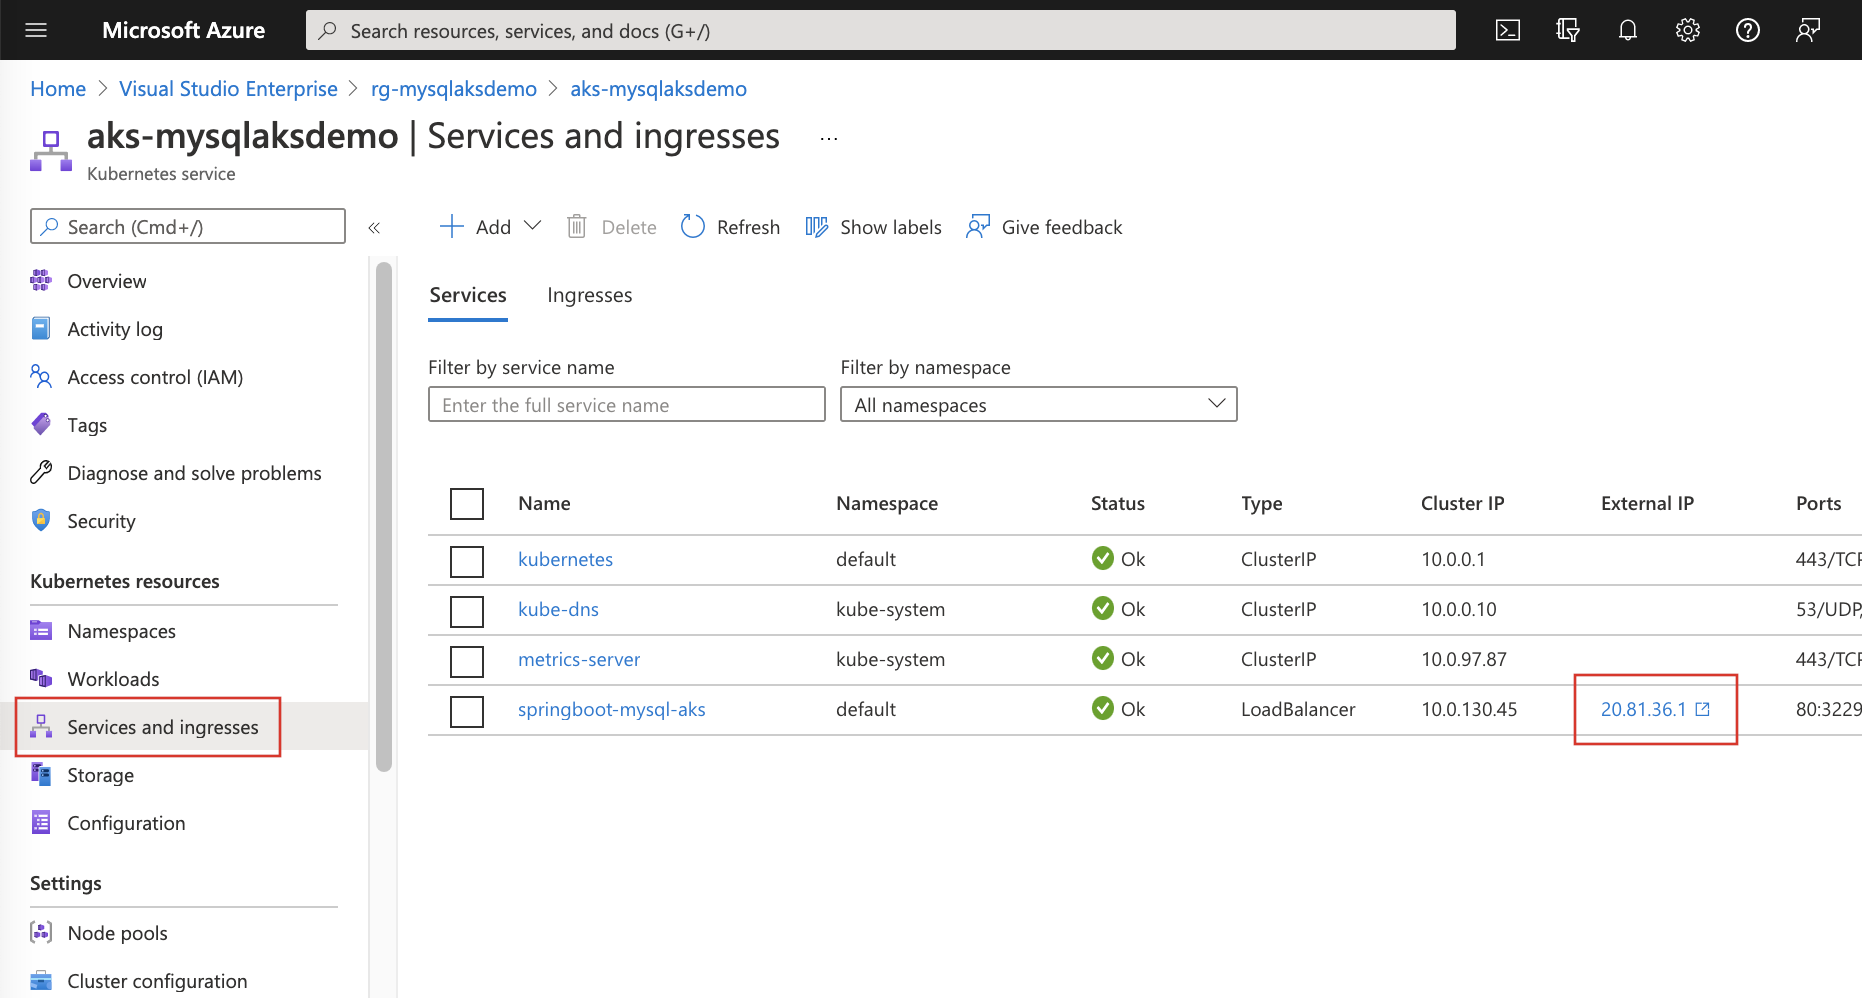
Once the YAML file is added, the resource viewer shows your Spring Boot application. Make a note of the linked external IP address included in the external service.

Test the application
To test the application, you can use cURL.
First, create a new "todo" item in the database using the following command.
curl --header "Content-Type: application/json" \
--request POST \
--data '{"description":"configuration","details":"congratulations, you have deployed your application correctly!","done": "true"}' \
http://<AKS-service-external-ip>
Next, retrieve the data by using a new cURL request, or by entering the cluster External IP in your browser.
curl http://<AKS-service-external-ip>
This command will return the list of "todo" items, including the item you've created.
[{"id":1,"description":"configuration","details":"congratulations, you have deployed your application correctly!","done":true}]
Here's a screenshot of these cURL requests:

You can see a similar output through your browser:

Congratulations! You've successfully deployed a Spring Boot application on Azure Kubernetes Service (AKS) cluster with Azure Database for MySQL flexible server in the backend!
Clean up the resources
To avoid Azure charges, you should clean up unneeded resources. When the cluster is no longer needed, use the az group delete command to remove the resource group, container service, and all related resources.
az group delete --name rg-mysqlaksdemo
Note
When you delete the cluster, the Microsoft Entra service principal used by the AKS cluster is not removed. For steps on how to remove the service principal, see AKS service principal considerations and deletion. If you used a managed identity, the identity is managed by the platform and does not require removal.
Next steps
Feedback
Coming soon: Throughout 2024 we will be phasing out GitHub Issues as the feedback mechanism for content and replacing it with a new feedback system. For more information see: https://aka.ms/ContentUserFeedback.
Submit and view feedback for