Tutorial: Create an ASP.NET Core web service in F#
The Visual Studio Integrated Development Environment (IDE) supports F# for several product types. You can easily create a full web services app.
For more information about coding in F#, see What is F#. To create a Hello World console app, see Get started with F# in Visual Studio.
In this tutorial, you learn how to:
- Create an ASP.NET Core web service.
- Add content to the HttpGet member in F#.
- Build and run your program.
Prerequisites
You need Visual Studio to complete this tutorial. Visit the Visual Studio downloads page for a free version.
You need Visual Studio to complete this tutorial. Visit the Visual Studio downloads page for a free version.
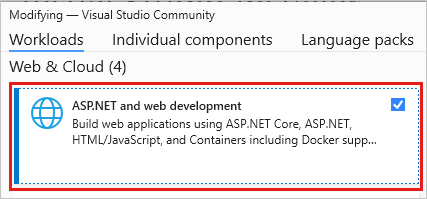
Be sure you have the necessary components installed:
Select the Start Windows icon and type Visual Studio Installer.
Select Modify to see your installed workloads.
Make sure that ASP.NET and web development is selected, or add it.

If you made any changes, select Modify to install the components.
Create an ASP.NET Core web service
In this section, you'll create an ASP.NET Core Web API project. The project type comes with template files that constitute a functional web service, before you've even added anything.
Start Visual Studio.
In the start window, select Create a new project.
On the Create a new project page, type F# web into the search box. Select the ASP.NET Core Web API project template, and then select Next.
In the Configure your new project dialog box, for Project name, enter FSharpTutorial.
In the Additional information dialog box, accept the default version for Framework.
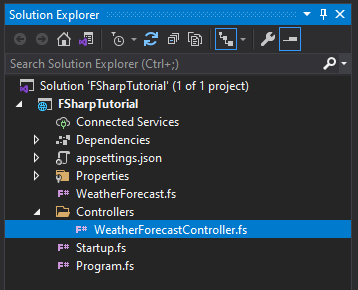
When you select Create, Visual Studio creates the new F# project. You can see the project components in the Solution Explorer window. Visual Studio presents an Overview page.
In the Solution Explorer toolbar, expand the Controllers folder, then choose the WeatherForecastController.fs controller to open the code file in the editor.

Next, modify the
Get()member to be the following code:[<HttpGet>] member this.Get() = let values = [|"Hello"; "World"; "First F#/ASP.NET Core web API!"|] ActionResult<string[]>(values)This code contains an F# array of values that are is bound to the
valuesname. It passes the values to the ASP.NET Core model-view-controller framework as anActionResult. ASP.NET Core takes care of the rest for you.Select the F5 key to run your project. A browser window opens to display your Hello World message.
Note
If you get a message that asks if you want to accept an IIS SSL Express certificate, choose Yes to view the code in a web browser, and then choose Yes if you receive a follow-up security warning message.
Next steps
If you haven't already, check out the Tour of F#. This tour describes the core features of the F# language. It provides an overview of some of the capabilities of F# and code samples that you can run.
See also
Feedback
Coming soon: Throughout 2024 we will be phasing out GitHub Issues as the feedback mechanism for content and replacing it with a new feedback system. For more information see: https://aka.ms/ContentUserFeedback.
Submit and view feedback for