Tutorial: Create a multi-container (preview) app in Web App for Containers
Note
Sidecar containers (preview) will succeed multi-container apps in App Service. To get started, see Tutorial: Configure a sidecar container for custom container in Azure App Service (preview).
Web App for Containers provides a flexible way to use Docker images. In this tutorial, you'll learn how to create a multi-container app using WordPress and MySQL. You'll complete this tutorial in Cloud Shell, but you can also run these commands locally with the Azure CLI command-line tool (2.0.32 or later).
In this tutorial, you learn how to:
- Convert a Docker Compose configuration to work with Web App for Containers
- Deploy a multi-container app to Azure
- Add application settings
- Use persistent storage for your containers
- Connect to Azure Database for MySQL
- Troubleshoot errors
If you don't have an Azure subscription, create an Azure free account before you begin.
Prerequisites
To complete this tutorial, you need experience with Docker Compose.
Download the sample
For this tutorial, you use the compose file from Docker, but you'll modify it to include Azure Database for MySQL, persistent storage, and Redis. The configuration file can be found at Azure Samples. In the sample below, note that depends_on is an unsupported option and is ignored. For supported configuration options, see Docker Compose options.
version: '3.3'

services:
   db:
     image: mysql:5.7
     volumes:
       - db_data:/var/lib/mysql
     restart: always
     environment:
       MYSQL_ROOT_PASSWORD: somewordpress
       MYSQL_DATABASE: wordpress
       MYSQL_USER: wordpress
       MYSQL_PASSWORD: wordpress

   wordpress:
     depends_on:
       - db
     image: wordpress:latest
     ports:
       - "8000:80"
     restart: always
     environment:
       WORDPRESS_DB_HOST: db:3306
       WORDPRESS_DB_USER: wordpress
       WORDPRESS_DB_PASSWORD: wordpress
volumes:
    db_data:
In Cloud Shell, create a tutorial directory and then change to it.
mkdir tutorial

cd tutorial
Next, run the following command to clone the sample app repository to your tutorial directory. Then change to the multicontainerwordpress directory.
git clone https://github.com/Azure-Samples/multicontainerwordpress

cd multicontainerwordpress
Create a resource group
A resource group is a logical container into which Azure resources, such as web apps, databases, and storage accounts, are deployed and managed. For example, you can choose to delete the entire resource group in one simple step later.
In Cloud Shell, create a resource group with the az group create command. The following example creates a resource group named myResourceGroup in the South Central US location. To see all supported locations for App Service on Linux in Standard tier, run the az appservice list-locations --sku S1 --linux-workers-enabled command.
az group create --name myResourceGroup --location "South Central US"
You generally create your resource group and the resources in a region near you.
When the command finishes, a JSON output shows you the resource group properties.
Create an Azure App Service plan
In Cloud Shell, create an App Service plan in the resource group with the az appservice plan create command.
The following example creates an App Service plan named myAppServicePlan in the Standard pricing tier (--sku S1) and in a Linux container (--is-linux).
az appservice plan create --name myAppServicePlan --resource-group myResourceGroup --sku S1 --is-linux
When the App Service plan has been created, Cloud Shell shows information similar to the following example:
{
  "adminSiteName": null,
  "appServicePlanName": "myAppServicePlan",
  "geoRegion": "South Central US",
  "hostingEnvironmentProfile": null,
  "id": "/subscriptions/0000-0000/resourceGroups/myResourceGroup/providers/Microsoft.Web/serverfarms/myAppServicePlan",
  "kind": "linux",
  "location": "South Central US",
  "maximumNumberOfWorkers": 1,
  "name": "myAppServicePlan",
  < JSON data removed for brevity. >
  "targetWorkerSizeId": 0,
  "type": "Microsoft.Web/serverfarms",
  "workerTierName": null
}
Docker Compose with WordPress and MySQL containers
Create a Docker Compose app
In your Cloud Shell, create a multi-container web app in the myAppServicePlan App Service plan with the az webapp create command. Don't forget to replace <app-name> with a unique app name.
az webapp create --resource-group myResourceGroup --plan myAppServicePlan --name <app-name> --multicontainer-config-type compose --multicontainer-config-file docker-compose-wordpress.yml
When the web app has been created, Cloud Shell shows output similar to the following example:
{
  "additionalProperties": {},
  "availabilityState": "Normal",
  "clientAffinityEnabled": true,
  "clientCertEnabled": false,
  "cloningInfo": null,
  "containerSize": 0,
  "dailyMemoryTimeQuota": 0,
  "defaultHostName": "<app-name>.azurewebsites.net",
  "enabled": true,
  < JSON data removed for brevity. >
}
Browse to the app
Browse to the deployed app at (http://<app-name>.azurewebsites.net). The app may take a few minutes to load. If you receive an error, allow a few more minutes then refresh the browser. If you're having trouble and would like to troubleshoot, review container logs.

Congratulations, you've created a multi-container app in Web App for Containers. Next you'll configure your app to use Azure Database for MySQL. Don't install WordPress at this time.
Connect to production database
It's not recommended to use database containers in a production environment. The local containers aren't scalable. Instead, you'll use Azure Database for MySQL which can be scaled.
Create an Azure Database for MySQL server
Create an Azure Database for MySQL server with the az mysql server create command.
In the following command, substitute your MySQL server name where you see the <mysql-server-name> placeholder (valid characters are a-z, 0-9, and -). This name is part of the MySQL server's hostname (<mysql-server-name>.database.windows.net), it needs to be globally unique.
az mysql server create --resource-group myResourceGroup --name <mysql-server-name> --location "South Central US" --admin-user adminuser --admin-password My5up3rStr0ngPaSw0rd! --sku-name B_Gen5_1 --version 5.7
Creating the server may take a few minutes to complete. When the MySQL server is created, Cloud Shell shows information similar to the following example:
{
  "administratorLogin": "adminuser",
  "administratorLoginPassword": null,
  "fullyQualifiedDomainName": "<mysql-server-name>.database.windows.net",
  "id": "/subscriptions/00000000-0000-0000-0000-000000000000/resourceGroups/myResourceGroup/providers/Microsoft.DBforMySQL/servers/<mysql-server-name>",
  "location": "southcentralus",
  "name": "<mysql-server-name>",
  "resourceGroup": "myResourceGroup",
  ...
}
Configure server firewall
Create a firewall rule for your MySQL server to allow client connections by using the az mysql server firewall-rule create command. When both starting IP and end IP are set to 0.0.0.0, the firewall is only opened for other Azure resources.
az mysql server firewall-rule create --name allAzureIPs --server <mysql-server-name> --resource-group myResourceGroup --start-ip-address 0.0.0.0 --end-ip-address 0.0.0.0
Tip
You can be even more restrictive in your firewall rule by using only the outbound IP addresses your app uses.
Create the WordPress database
az mysql db create --resource-group myResourceGroup --server-name <mysql-server-name> --name wordpress
When the database has been created, Cloud Shell shows information similar to the following example:
{
  "additionalProperties": {},
  "charset": "latin1",
  "collation": "latin1_swedish_ci",
  "id": "/subscriptions/12db1644-4b12-4cab-ba54-8ba2f2822c1f/resourceGroups/myResourceGroup/providers/Microsoft.DBforMySQL/servers/<mysql-server-name>/databases/wordpress",
  "name": "wordpress",
  "resourceGroup": "myResourceGroup",
  "type": "Microsoft.DBforMySQL/servers/databases"
}
Configure database variables in WordPress
To connect the WordPress app to this new MySQL server, you'll configure a few WordPress-specific environment variables, including the SSL CA path defined by MYSQL_SSL_CA. The Baltimore CyberTrust Root from DigiCert is provided in the custom image below.
To make these changes, use the az webapp config appsettings set command in Cloud Shell. App settings are case-sensitive and space-separated.
az webapp config appsettings set --resource-group myResourceGroup --name <app-name> --settings WORDPRESS_DB_HOST="<mysql-server-name>.mysql.database.azure.com" WORDPRESS_DB_USER="adminuser" WORDPRESS_DB_PASSWORD="My5up3rStr0ngPaSw0rd!" WORDPRESS_DB_NAME="wordpress" MYSQL_SSL_CA="BaltimoreCyberTrustroot.crt.pem"
When the app setting has been created, Cloud Shell shows information similar to the following example:
[
  {
    "name": "WORDPRESS_DB_HOST",
    "slotSetting": false,
    "value": "<mysql-server-name>.mysql.database.azure.com"
  },
  {
    "name": "WORDPRESS_DB_USER",
    "slotSetting": false,
    "value": "adminuser"
  },
  {
    "name": "WORDPRESS_DB_NAME",
    "slotSetting": false,
    "value": "wordpress"
  },
  {
    "name": "WORDPRESS_DB_PASSWORD",
    "slotSetting": false,
    "value": "My5up3rStr0ngPaSw0rd!"
  },
  {
    "name": "MYSQL_SSL_CA",
    "slotSetting": false,
    "value": "BaltimoreCyberTrustroot.crt.pem"
  }
]
For more information on environment variables, see Configure environment variables.
Use a custom image for MySQL TLS/SSL and other configurations
By default, TLS/SSL is used by Azure Database for MySQL. WordPress requires additional configuration to use TLS/SSL with MySQL. The WordPress 'official image' doesn't provide the additional configuration, but a custom image has been prepared for your convenience. In practice, you would add desired changes to your own image.
The custom image is based on the 'official image' of WordPress from Docker Hub. The following changes have been made in this custom image for Azure Database for MySQL:
- Adds Baltimore Cyber Trust Root Certificate file for SSL to MySQL.
- Uses App Setting for MySQL SSL Certificate Authority certificate in WordPress wp-config.php.
- Adds WordPress define for MYSQL_CLIENT_FLAGS needed for MySQL SSL.
The following changes have been made for Redis (to be used in a later section):
- Adds PHP extension for Redis v4.0.2.
- Adds unzip needed for file extraction.
- Adds Redis Object Cache 1.3.8 WordPress plugin.
- Uses App Setting for Redis host name in WordPress wp-config.php.
To use the custom image, you'll update your docker-compose-wordpress.yml file. In Cloud Shell, open a text editor and change the image: wordpress to use image: mcr.microsoft.com/azuredocs/multicontainerwordpress. You no longer need the database container. Remove the db, environment, depends_on, and volumes section from the configuration file. Your file should look like the following code:
version: '3.3'

services:
   wordpress:
     image: mcr.microsoft.com/azuredocs/multicontainerwordpress
     ports:
       - "8000:80"
     restart: always
Update app with new configuration
In Cloud Shell, reconfigure your multi-container web app with the az webapp config container set command. Don't forget to replace <app-name> with the name of the web app you created earlier.
az webapp config container set --resource-group myResourceGroup --name <app-name> --multicontainer-config-type compose --multicontainer-config-file docker-compose-wordpress.yml
When the app has been reconfigured, Cloud Shell shows information similar to the following example:
[
  {
    "name": "DOCKER_CUSTOM_IMAGE_NAME",
    "value": "COMPOSE|dmVyc2lvbjogJzMuMycKCnNlcnZpY2VzOgogICB3b3JkcHJlc3M6CiAgICAgaW1hZ2U6IG1zYW5nYXB1L3dvcmRwcmVzcwogICAgIHBvcnRzOgogICAgICAgLSAiODAwMDo4MCIKICAgICByZXN0YXJ0OiBhbHdheXM="
  }
]
Browse to the app
Browse to the deployed app at (http://<app-name>.azurewebsites.net). The app is now using Azure Database for MySQL.

Add persistent storage
Your multi-container is now running in Web App for Containers. However, if you install WordPress now and restart your app later, you'll find that your WordPress installation is gone. This happens because your Docker Compose configuration currently points to a storage location inside your container. The files installed into your container don't persist beyond app restart. In this section, you'll add persistent storage to your WordPress container.
Configure environment variables
To use persistent storage, you'll enable this setting within App Service. To make this change, use the az webapp config appsettings set command in Cloud Shell. App settings are case-sensitive and space-separated.
az webapp config appsettings set --resource-group myResourceGroup --name <app-name> --settings WEBSITES_ENABLE_APP_SERVICE_STORAGE=TRUE
When the app setting has been created, Cloud Shell shows information similar to the following example:
[
  < JSON data removed for brevity. >
  {
    "name": "WORDPRESS_DB_NAME",
    "slotSetting": false,
    "value": "wordpress"
  },
  {
    "name": "WEBSITES_ENABLE_APP_SERVICE_STORAGE",
    "slotSetting": false,
    "value": "TRUE"
  }
]
Modify configuration file
In the Cloud Shell, open the file docker-compose-wordpress.yml in a text editor.
The volumes option maps the file system to a directory within the container. ${WEBAPP_STORAGE_HOME} is an environment variable in App Service that is mapped to persistent storage for your app. You'll use this environment variable in the volumes option so that the WordPress files are installed into persistent storage instead of the container. Make the following modifications to the file:
In the wordpress section, add a volumes option so it looks like the following code:
version: '3.3'

services:
   wordpress:
     image: mcr.microsoft.com/azuredocs/multicontainerwordpress
     volumes:
      - ${WEBAPP_STORAGE_HOME}/site/wwwroot:/var/www/html
     ports:
       - "8000:80"
     restart: always
Update app with new configuration
In Cloud Shell, reconfigure your multi-container web app with the az webapp config container set command. Don't forget to replace <app-name> with a unique app name.
az webapp config container set --resource-group myResourceGroup --name <app-name> --multicontainer-config-type compose --multicontainer-config-file docker-compose-wordpress.yml
After your command runs, it shows output similar to the following example:
[
  {
    "name": "WEBSITES_ENABLE_APP_SERVICE_STORAGE",
    "slotSetting": false,
    "value": "TRUE"
  },
  {
    "name": "DOCKER_CUSTOM_IMAGE_NAME",
    "value": "COMPOSE|dmVyc2lvbjogJzMuMycKCnNlcnZpY2VzOgogICBteXNxbDoKICAgICBpbWFnZTogbXlzcWw6NS43CiAgICAgdm9sdW1lczoKICAgICAgIC0gZGJfZGF0YTovdmFyL2xpYi9teXNxbAogICAgIHJlc3RhcnQ6IGFsd2F5cwogICAgIGVudmlyb25tZW50OgogICAgICAgTVlTUUxfUk9PVF9QQVNTV09SRDogZXhhbXBsZXBhc3MKCiAgIHdvcmRwcmVzczoKICAgICBkZXBlbmRzX29uOgogICAgICAgLSBteXNxbAogICAgIGltYWdlOiB3b3JkcHJlc3M6bGF0ZXN0CiAgICAgcG9ydHM6CiAgICAgICAtICI4MDAwOjgwIgogICAgIHJlc3RhcnQ6IGFsd2F5cwogICAgIGVudmlyb25tZW50OgogICAgICAgV09SRFBSRVNTX0RCX1BBU1NXT1JEOiBleGFtcGxlcGFzcwp2b2x1bWVzOgogICAgZGJfZGF0YTo="
  }
]
Browse to the app
Browse to the deployed app at (http://<app-name>.azurewebsites.net).
The WordPress container is now using Azure Database for MySQL and persistent storage.
Add Redis container
The WordPress 'official image' does not include the dependencies for Redis. These dependencies and additional configuration needed to use Redis with WordPress have been prepared for you in this custom image. In practice, you would add desired changes to your own image.
The custom image is based on the 'official image' of WordPress from Docker Hub. The following changes have been made in this custom image for Redis:
- Adds PHP extension for Redis v4.0.2.
- Adds unzip needed for file extraction.
- Adds Redis Object Cache 1.3.8 WordPress plugin.
- Uses App Setting for Redis host name in WordPress wp-config.php.
Add the redis container to the bottom of the configuration file so it looks like the following example:
version: '3.3'

services:
   wordpress:
     image: mcr.microsoft.com/azuredocs/multicontainerwordpress
     ports:
       - "8000:80"
     restart: always

   redis:
     image: mcr.microsoft.com/oss/bitnami/redis:6.0.8
     environment:
      - ALLOW_EMPTY_PASSWORD=yes
     restart: always
Configure environment variables
To use Redis, you'll enable this setting, WP_REDIS_HOST, within App Service. This is a required setting for WordPress to communicate with the Redis host. To make this change, use the az webapp config appsettings set command in Cloud Shell. App settings are case-sensitive and space-separated.
az webapp config appsettings set --resource-group myResourceGroup --name <app-name> --settings WP_REDIS_HOST="redis"
When the app setting has been created, Cloud Shell shows information similar to the following example:
[
  < JSON data removed for brevity. >
  {
    "name": "WORDPRESS_DB_USER",
    "slotSetting": false,
    "value": "adminuser"
  },
  {
    "name": "WP_REDIS_HOST",
    "slotSetting": false,
    "value": "redis"
  }
]
Update app with new configuration
In Cloud Shell, reconfigure your multi-container web app with the az webapp config container set command. Don't forget to replace <app-name> with a unique app name.
az webapp config container set --resource-group myResourceGroup --name <app-name> --multicontainer-config-type compose --multicontainer-config-file compose-wordpress.yml
After your command runs, it shows output similar to the following example:
[
  {
    "name": "DOCKER_CUSTOM_IMAGE_NAME",
    "value": "COMPOSE|dmVyc2lvbjogJzMuMycKCnNlcnZpY2VzOgogICBteXNxbDoKICAgICBpbWFnZTogbXlzcWw6NS43CiAgICAgdm9sdW1lczoKICAgICAgIC0gZGJfZGF0YTovdmFyL2xpYi9teXNxbAogICAgIHJlc3RhcnQ6IGFsd2F5cwogICAgIGVudmlyb25tZW50OgogICAgICAgTVlTUUxfUk9PVF9QQVNTV09SRDogZXhhbXBsZXBhc3MKCiAgIHdvcmRwcmVzczoKICAgICBkZXBlbmRzX29uOgogICAgICAgLSBteXNxbAogICAgIGltYWdlOiB3b3JkcHJlc3M6bGF0ZXN0CiAgICAgcG9ydHM6CiAgICAgICAtICI4MDAwOjgwIgogICAgIHJlc3RhcnQ6IGFsd2F5cwogICAgIGVudmlyb25tZW50OgogICAgICAgV09SRFBSRVNTX0RCX1BBU1NXT1JEOiBleGFtcGxlcGFzcwp2b2x1bWVzOgogICAgZGJfZGF0YTo="
  }
]
Browse to the app
Browse to the deployed app at (http://<app-name>.azurewebsites.net).
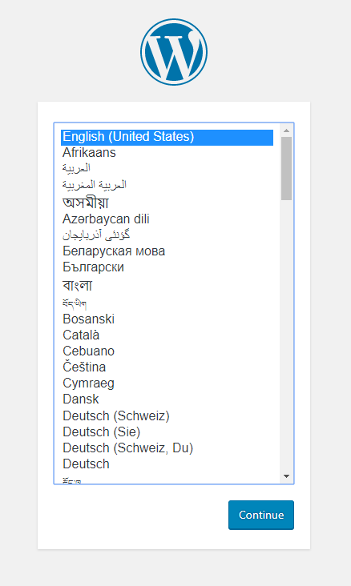
Complete the steps and install WordPress.
Connect WordPress to Redis
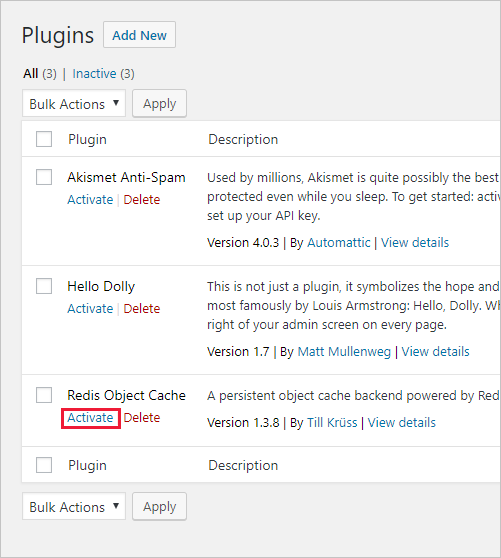
Sign in to WordPress admin. In the left navigation, select Plugins, and then select Installed Plugins.

Show all plugins here
In the plugins page, find Redis Object Cache and click Activate.

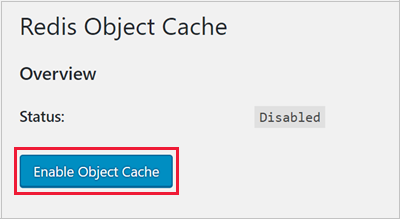
Click on Settings.

Click the Enable Object Cache button.

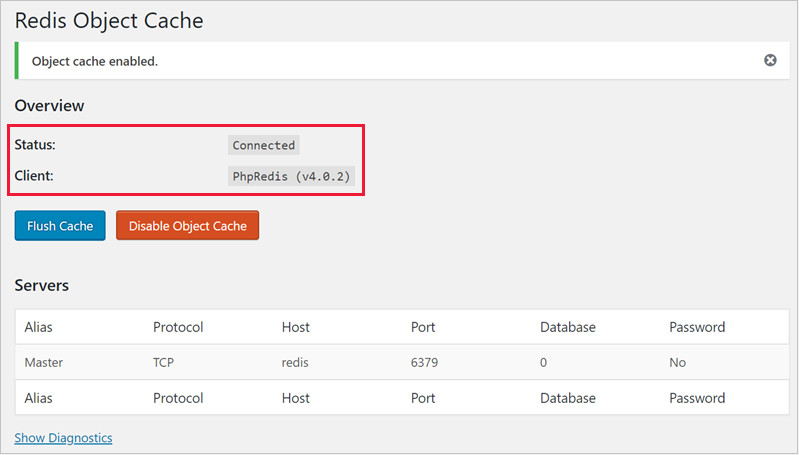
WordPress connects to the Redis server. The connection status appears on the same page.

Congratulations, you've connected WordPress to Redis. The production-ready app is now using Azure Database for MySQL, persistent storage, and Redis. You can now scale out your App Service Plan to multiple instances.
Find Docker Container logs
If you run into issues using multiple containers, you can access the container logs by browsing to: https://<app-name>.scm.azurewebsites.net/api/logs/docker.
You'll see output similar to the following example:
[
   {
      "machineName":"RD00XYZYZE567A",
      "lastUpdated":"2018-05-10T04:11:45Z",
      "size":25125,
      "href":"https://<app-name>.scm.azurewebsites.net/api/vfs/LogFiles/2018_05_10_RD00XYZYZE567A_docker.log",
      "path":"/home/LogFiles/2018_05_10_RD00XYZYZE567A_docker.log"
   }
]
You see a log for each container and an additional log for the parent process. Copy the respective href value into the browser to view the log.
Clean up deployment
After the sample script has been run, the following command can be used to remove the resource group and all resources associated with it.
az group delete --name myResourceGroup
Next steps
In this tutorial, you learned how to:
- Convert a Docker Compose configuration to work with Web App for Containers
- Deploy a multi-container app to Azure
- Add application settings
- Use persistent storage for your containers
- Connect to Azure Database for MySQL
- Troubleshoot errors
Advance to the next tutorial to learn how to secure your app with a custom domain and certificate.
Or, check out other resources:
Feedback
Coming soon: Throughout 2024 we will be phasing out GitHub Issues as the feedback mechanism for content and replacing it with a new feedback system. For more information see: https://aka.ms/ContentUserFeedback.
Submit and view feedback for