Deploy a Node.js + MongoDB web app to Azure
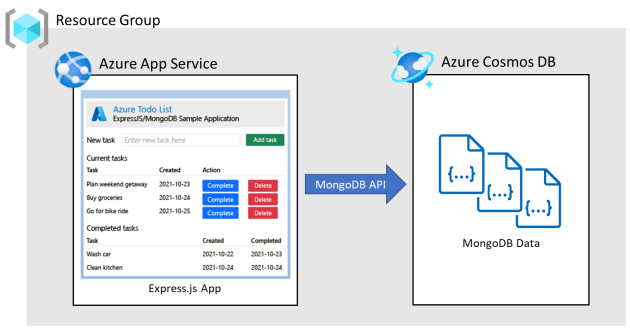
Azure App Service provides a highly scalable, self-patching web hosting service using the Linux operating system. This tutorial shows how to create a secure Node.js app in Azure App Service that's connected to a Azure Cosmos DB for MongoDB database. When you're finished, you'll have an Express.js app running on Azure App Service on Linux.
This article assumes you're already familiar with Node.js development and have Node and MongoDB installed locally. You'll also need an Azure account with an active subscription. If you don't have an Azure account, you can create one for free.
Sample application
To follow along with this tutorial, clone or download the sample application from the repository https://github.com/Azure-Samples/msdocs-nodejs-mongodb-azure-sample-app.
git clone https://github.com/Azure-Samples/msdocs-nodejs-mongodb-azure-sample-app.git
If you want to run the application locally, do the following:
- Install the package dependencies by running
npm install. - Copy the
.env.samplefile to.envand populate the DATABASE_URL value with your MongoDB URL (for example mongodb://localhost:27017/). - Start the application using
npm start. - To view the app, browse to
http://localhost:3000.
1. Create App Service and Azure Cosmos DB
In this step, you create the Azure resources. The steps used in this tutorial create a set of secure-by-default resources that include App Service and Azure Cosmos DB for MongoDB. For the creation process, you'll specify:
- The Name for the web app. It's the name used as part of the DNS name for your webapp in the form of
https://<app-name>.azurewebsites.net. - The Region to run the app physically in the world.
- The Runtime stack for the app. It's where you select the version of Node to use for your app.
- The Hosting plan for the app. It's the pricing tier that includes the set of features and scaling capacity for your app.
- The Resource Group for the app. A resource group lets you group (in a logical container) all the Azure resources needed for the application.
Sign in to the Azure portal and follow these steps to create your Azure App Service resources.
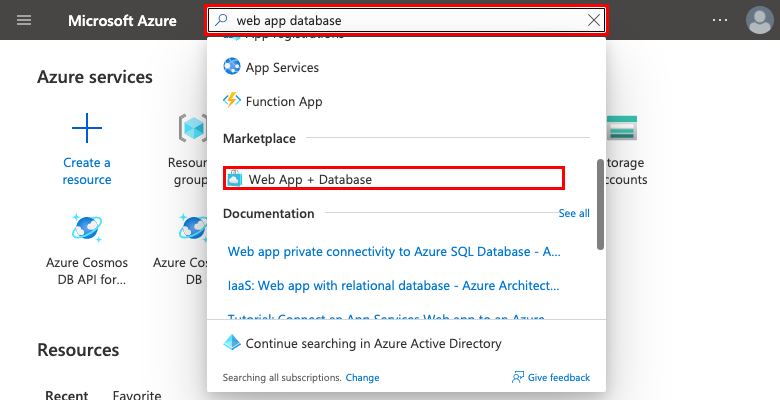
Step 1: In the Azure portal:
- Enter "web app database" in the search bar at the top of the Azure portal.
- Select the item labeled Web App + Database under the Marketplace heading. You can also navigate to the creation wizard directly.
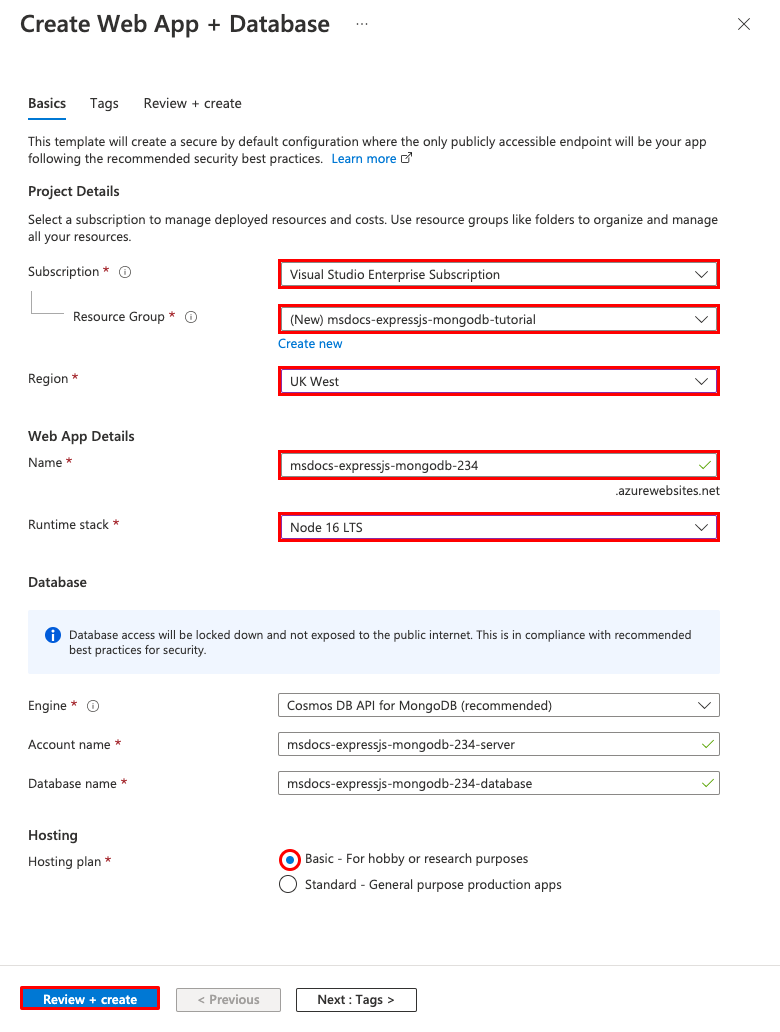
Step 2: In the Create Web App + Database page, fill out the form as follows.
- Resource Group → Select Create new and use a name of msdocs-expressjs-mongodb-tutorial.
- Region → Any Azure region near you.
- Name → msdocs-expressjs-mongodb-XYZ where XYZ is any three random characters. This name must be unique across Azure.
- Runtime stack → Node 16 LTS.
- Hosting plan → Basic. When you're ready, you can scale up to a production pricing tier later.
- Azure Cosmos DB for MongoDB is selected by default as the database engine. Azure Cosmos DB is a cloud native database offering a 100% MongoDB compatible API. Note the database name that's generated for you (<app-name>-database). You'll need it later.
- Select Review + create.
- After validation completes, select Create.
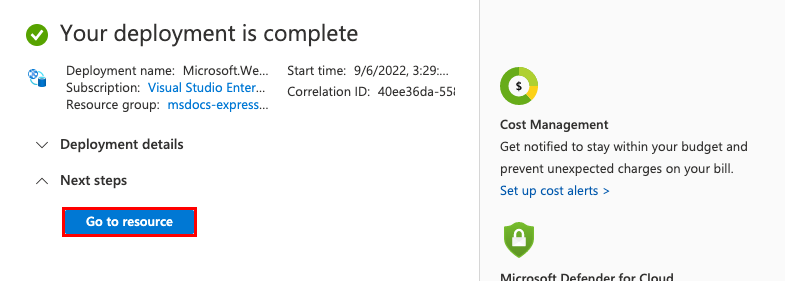
Step 3: The deployment takes a few minutes to complete. Once deployment completes, select the Go to resource button. You're taken directly to the App Service app, but the following resources are created:
- Resource group → The container for all the created resources.
- App Service plan → Defines the compute resources for App Service. A Linux plan in the Basic tier is created.
- App Service → Represents your app and runs in the App Service plan.
- Virtual network → Integrated with the App Service app and isolates back-end network traffic.
- Private endpoint → Access endpoint for the database resource in the virtual network.
- Network interface → Represents a private IP address for the private endpoint.
- Azure Cosmos DB for MongoDB → Accessible only from behind the private endpoint. A database and a user are created for you on the server.
- Private DNS zone → Enables DNS resolution of the Azure Cosmos DB server in the virtual network.
2. Set up database connectivity
The creation wizard generated the MongoDB URI for you already, but your app needs a DATABASE_URL variable and a DATABASE_NAME variable. In this step, you create app settings with the format that your app needs.
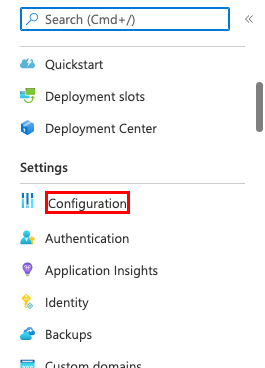
Step 1: In the App Service page, in the left menu, select Configuration.
Step 2: In the Application settings tab of the Configuration page, create a DATABASE_NAME setting:
- Select New application setting.
- In the Name field, enter DATABASE_NAME.
- In the Value field, enter the automatically generated database name from the creation wizard, which looks like msdocs-expressjs-mongodb-XYZ-database.
- Select OK.
Step 3:
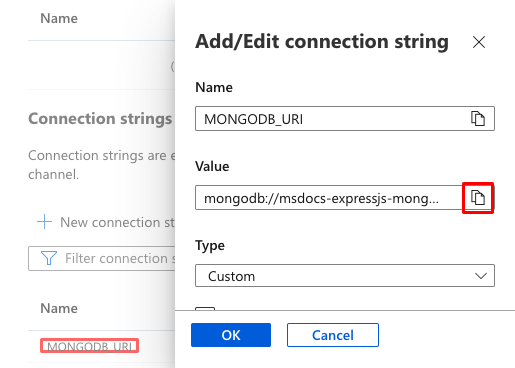
- Scroll to the bottom of the page and select the connection string MONGODB_URI. It was generated by the creation wizard.
- In the Value field, select the Copy button and paste the value in a text file for the next step. It's in the MongoDB connection string URI format.
- Select Cancel.
Step 4:
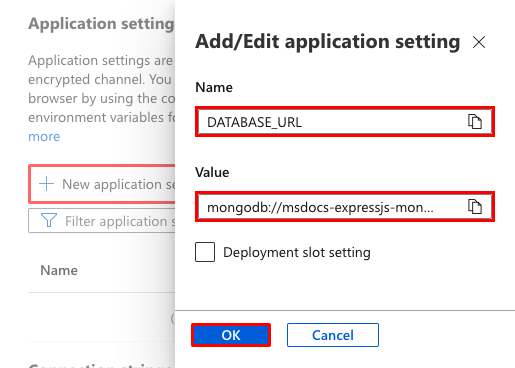
- Using the same steps in Step 2, create an app setting named DATABASE_URL and set the value to the one you copied from the
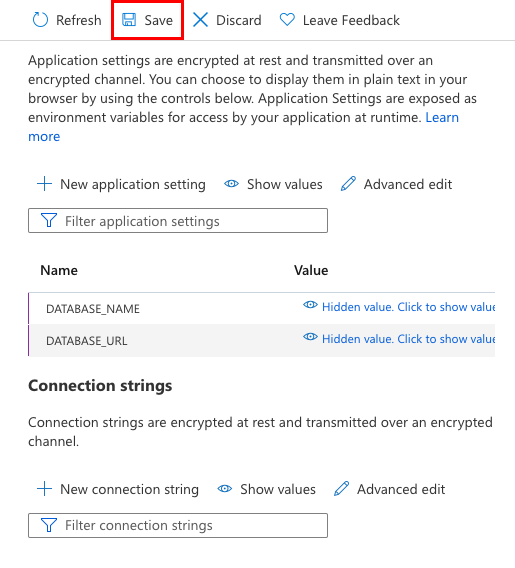
MONGODB_URIconnection string (i.e.mongodb://...). - In the menu bar at the top, select Save.
- When prompted, select Continue.
3. Deploy sample code
In this step, you'll configure GitHub deployment using GitHub Actions. It's just one of many ways to deploy to App Service, but also a great way to have continuous integration in your deployment process. By default, every git push to your GitHub repository will kick off the build and deploy action.
Step 1: In a new browser window:
- Sign in to your GitHub account.
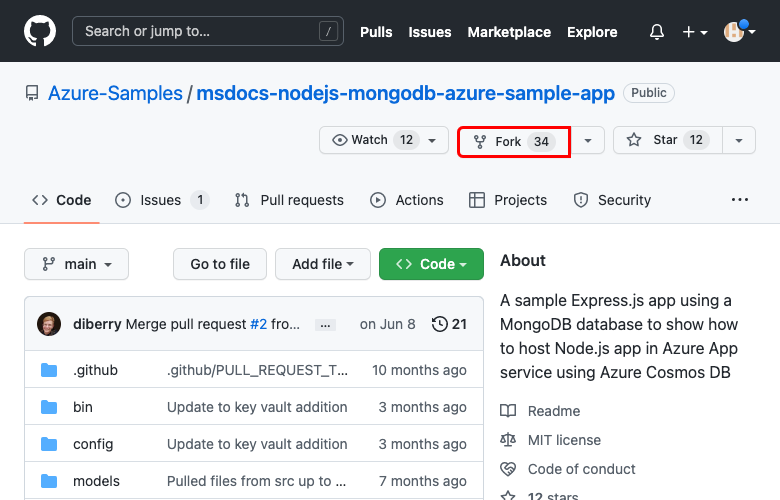
- Navigate to https://github.com/Azure-Samples/msdocs-nodejs-mongodb-azure-sample-app.
- Select Fork.
- Select Create fork.
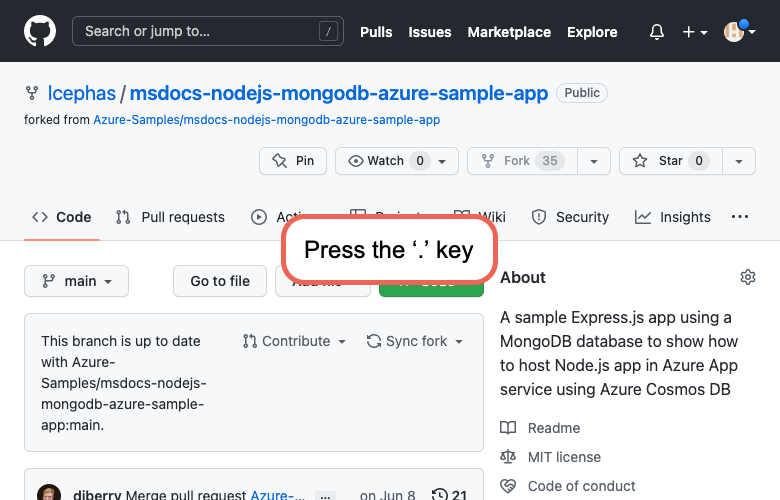
Step 2: In the GitHub page, open Visual Studio Code in the browser by pressing the . key.
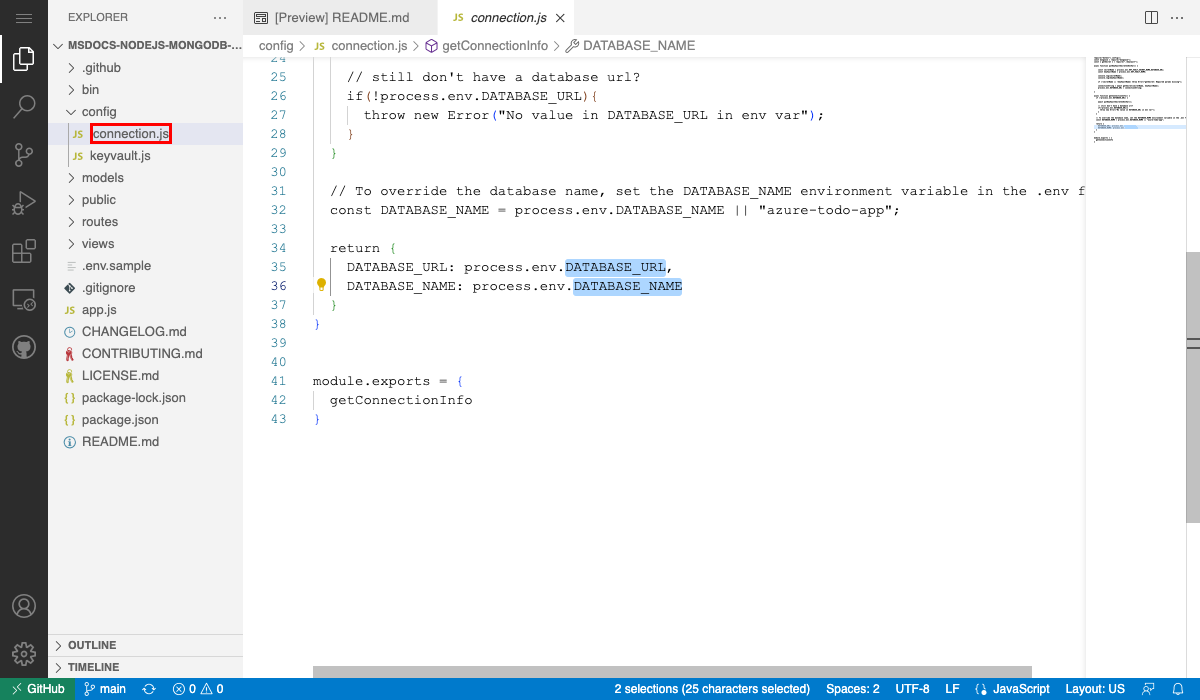
Step 3: In Visual Studio Code in the browser, open config/connection.js in the explorer.
In the getConnectionInfo function, see that the app settings you created earlier for the MongoDB connection are used (DATABASE_URL and DATABASE_NAME).
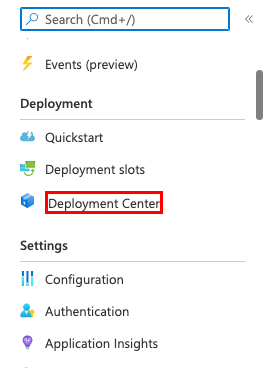
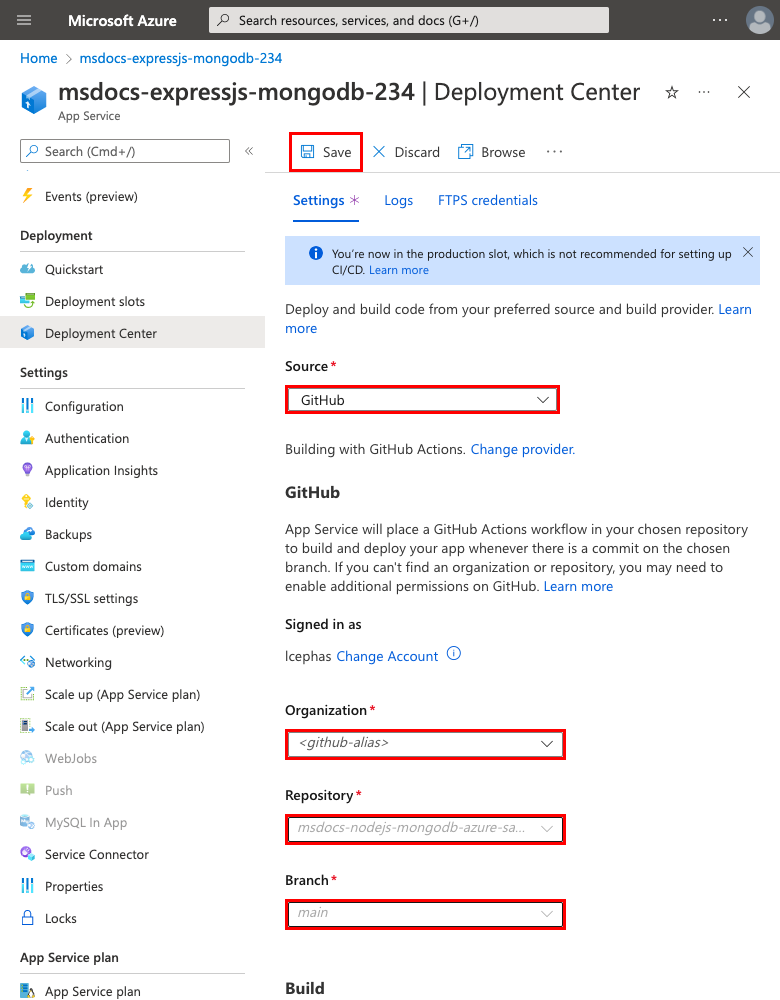
Step 4: Back in the App Service page, in the left menu, select Deployment Center.
Step 5: In the Deployment Center page:
- In Source, select GitHub. By default, GitHub Actions is selected as the build provider.
- Sign in to your GitHub account and follow the prompt to authorize Azure.
- In Organization, select your account.
- In Repository, select msdocs-nodejs-mongodb-azure-sample-app.
- In Branch, select main.
- In the top menu, select Save. App Service commits a workflow file into the chosen GitHub repository, in the
.github/workflowsdirectory.
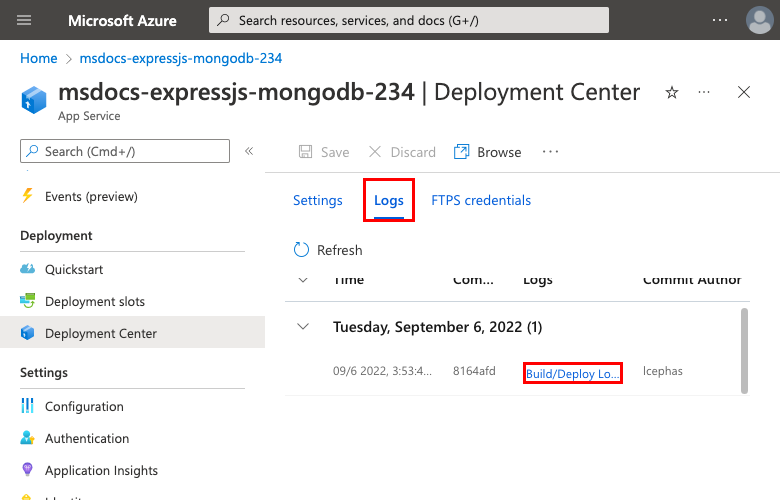
Step 6: In the Deployment Center page:
- Select Logs. A deployment run is already started.
- In the log item for the deployment run, select Build/Deploy Logs.
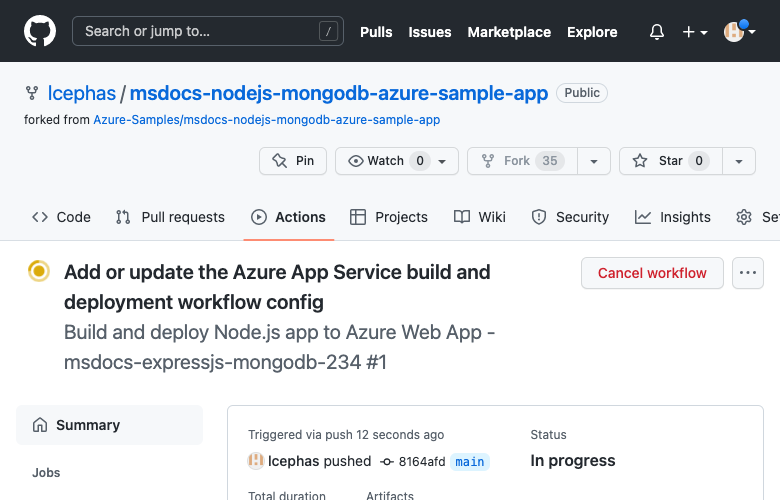
Step 7: You're taken to your GitHub repository and see that the GitHub action is running. The workflow file defines two separate stages, build and deploy. Wait for the GitHub run to show a status of Complete. It takes about 15 minutes.
4. Browse to the app
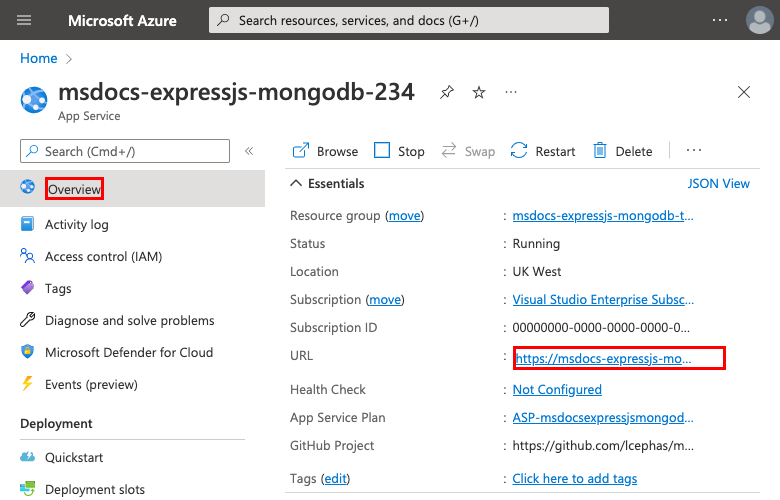
Step 1: In the App Service page:
- From the left menu, select Overview.
- Select the URL of your app. You can also navigate directly to
https://<app-name>.azurewebsites.net.
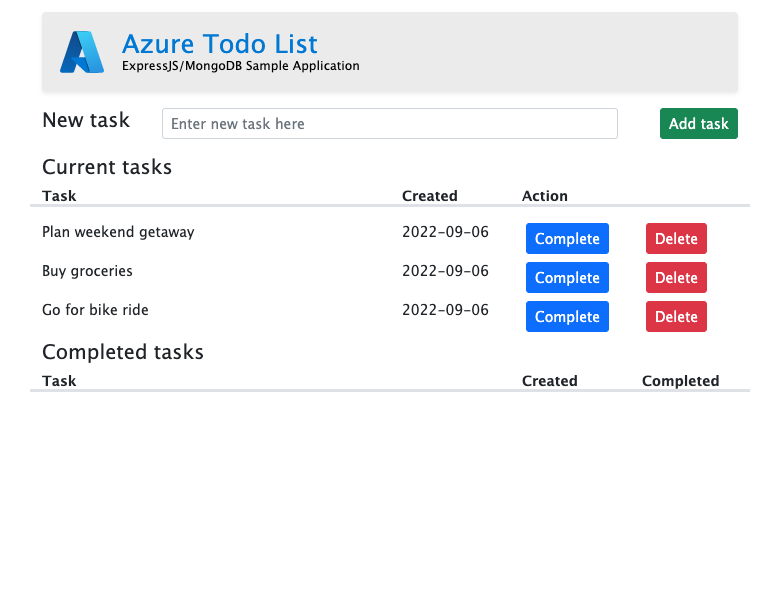
Step 2: Add a few tasks to the list. Congratulations, you're running a secure data-driven Node.js app in Azure App Service.
5. Stream diagnostic logs
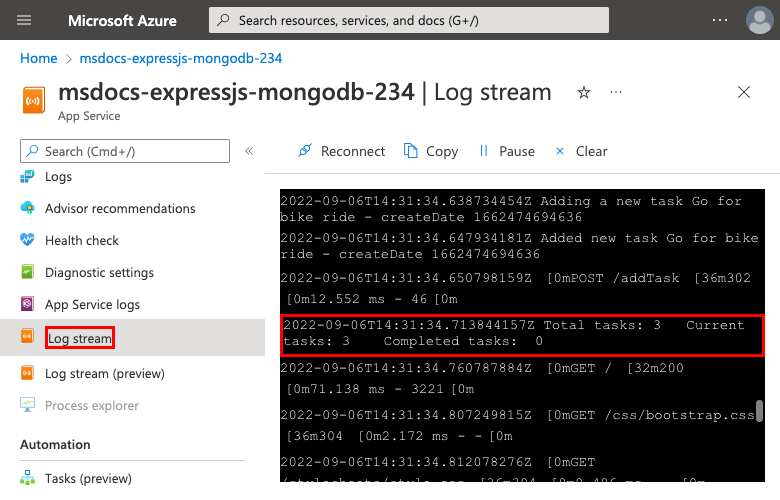
Azure App Service captures all messages logged to the console to assist you in diagnosing issues with your application. The sample app outputs console log messages in each of its endpoints to demonstrate this capability. For example, the get endpoint outputs a message about the number of tasks retrieved from the database and an error message appears if something goes wrong.
router.get('/', function(req, res, next) {
  Task.find()
    .then((tasks) => {
      const currentTasks = tasks.filter(task => !task.completed);
      const completedTasks = tasks.filter(task => task.completed === true);

      console.log(`Total tasks: ${tasks.length}   Current tasks: ${currentTasks.length}    Completed tasks:  ${completedTasks.length}`)
      res.render('index', { currentTasks: currentTasks, completedTasks: completedTasks });
    })
    .catch((err) => {
      console.log(err);
      res.send('Sorry! Something went wrong.');
    });
});
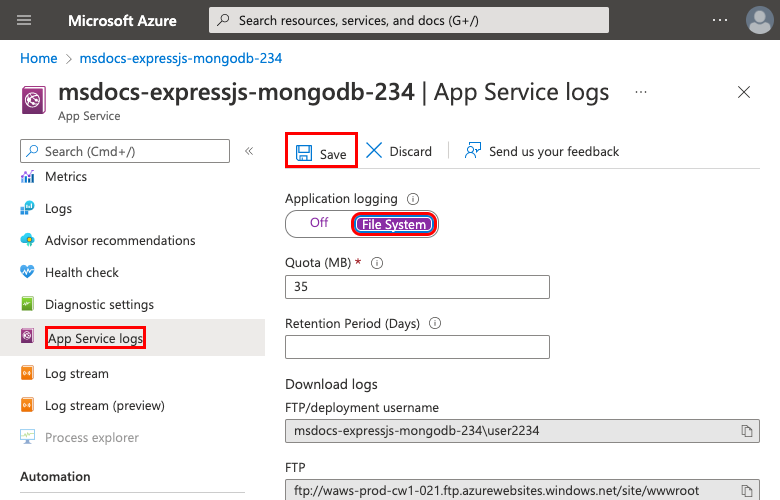
Step 1: In the App Service page:
- From the left menu, select App Service logs.
- Under Application logging, select File System.
Step 2: From the left menu, select Log stream. You see the logs for your app, including platform logs and logs from inside the container.
6. Inspect deployed files using Kudu
Azure App Service provides a web-based diagnostics console named Kudu that lets you examine the server hosting environment for your web app. Using Kudu, you can view the files deployed to Azure, review the deployment history of the application, and even open an SSH session into the hosting environment.
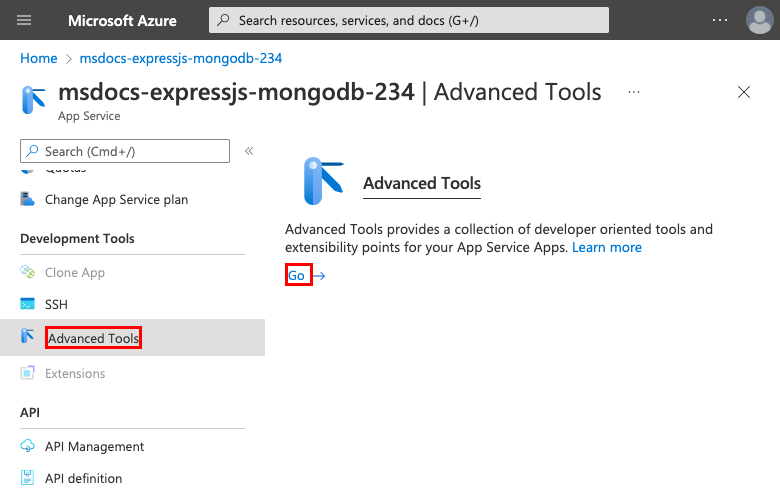
Step 1: In the App Service page:
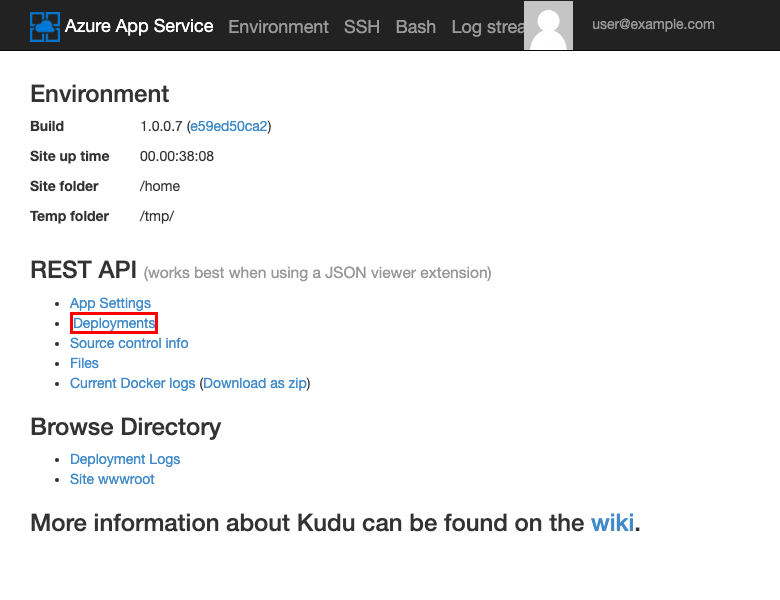
- From the left menu, select Advanced Tools.
- Select Go. You can also navigate directly to
https://<app-name>.scm.azurewebsites.net.
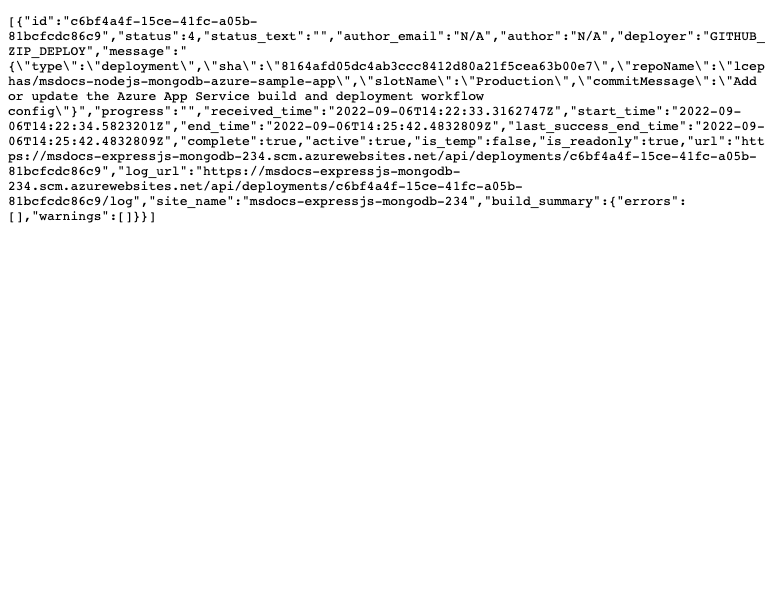
Step 2: In the Kudu page, select Deployments.
If you have deployed code to App Service using Git or zip deploy, you'll see a history of deployments of your web app.
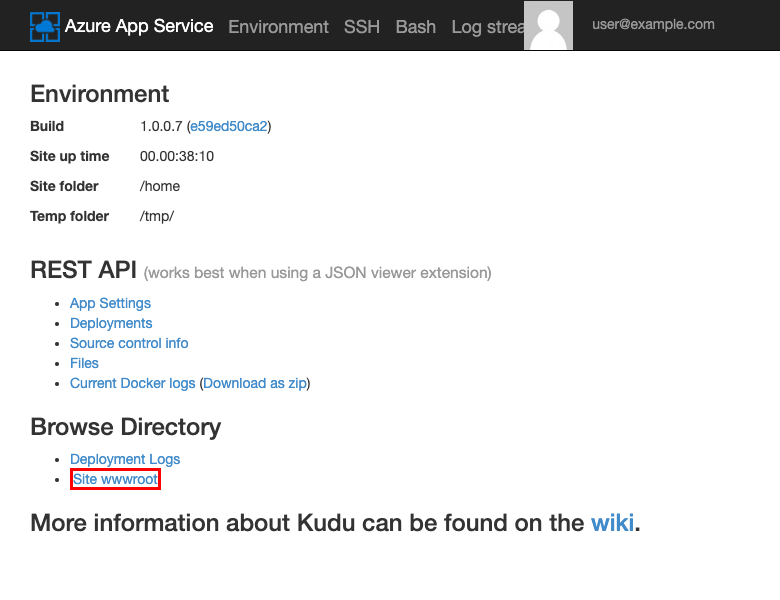
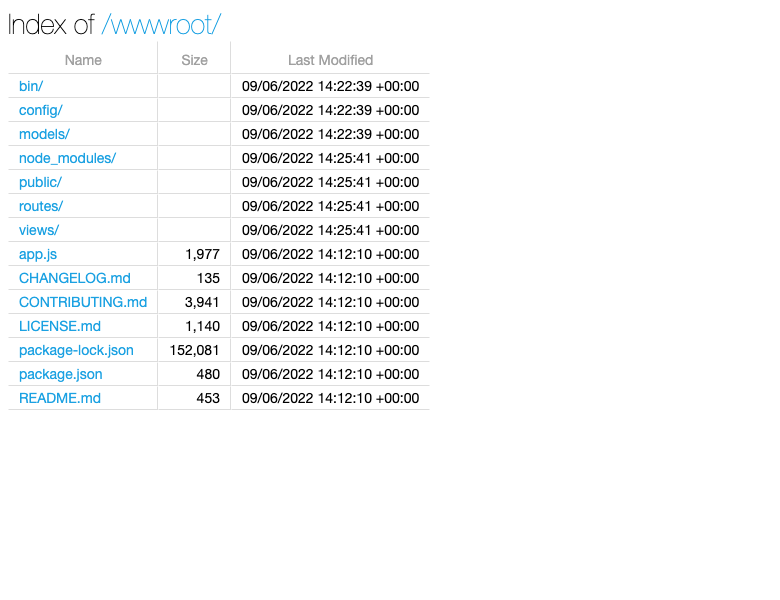
Step 3: Go back to the Kudu homepage and select Site wwwroot.
You can see the deployed folder structure and click to browse and view the files.
7. Clean up resources
When you're finished, you can delete all of the resources from your Azure subscription by deleting the resource group.
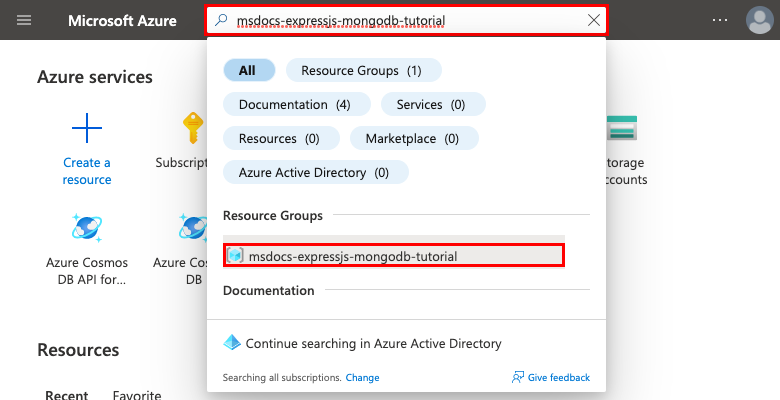
Step 1: In the search bar at the top of the Azure portal:
- Enter the resource group name.
- Select the resource group.
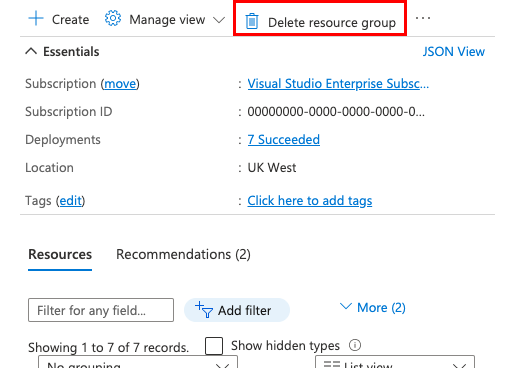
Step 2: In the resource group page, select Delete resource group.
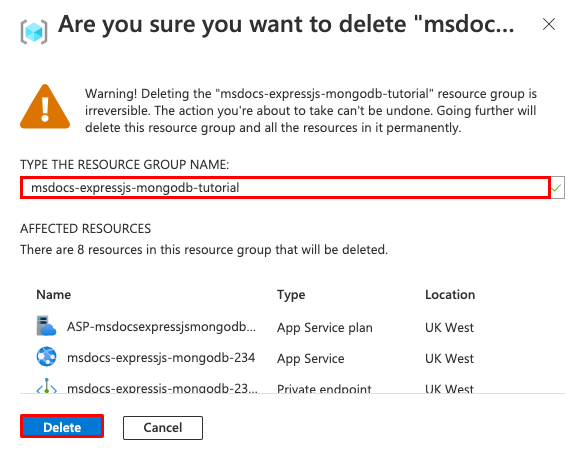
Step 3:
- Enter the resource group name to confirm your deletion.
- Select Delete.
Frequently asked questions
- How much does this setup cost?
- How do I connect to the Azure Cosmos DB server that's secured behind the virtual network with other tools?
- How does local app development work with GitHub Actions?
- Why is the GitHub Actions deployment so slow?
How much does this setup cost?
Pricing for the create resources is as follows:
- The App Service plan is created in Basic tier and can be scaled up or down. See App Service pricing.
- The Azure Cosmos DB server is created in a single region and can be distributed to other regions. See Azure Cosmos DB pricing.
- The virtual network doesn't incur a charge unless you configure extra functionality, such as peering. See Azure Virtual Network pricing.
- The private DNS zone incurs a small charge. See Azure DNS pricing.
How do I connect to the Azure Cosmos DB server that's secured behind the virtual network with other tools?
- For basic access from a command-line tool, you can run
mongoshfrom the app's SSH terminal. The app's container doesn't come withmongosh, so you must install it manually. Remember that the installed client doesn't persist across app restarts. - To connect from a MongoDB GUI client, your machine must be within the virtual network. For example, it could be an Azure VM that's connected to one of the subnets, or a machine in an on-premises network that has a site-to-site VPN connection with the Azure virtual network.
- To connect from the MongoDB shell from the Azure Cosmos DB management page in the portal, your machine must also be within the virtual network. You could instead open the Azure Cosmos DB server's firewall for your local machine's IP address, but it increases the attack surface for your configuration.
How does local app development work with GitHub Actions?
Take the autogenerated workflow file from App Service as an example, each git push kicks off a new build and deployment run. From a local clone of the GitHub repository, you make the desired updates push it to GitHub. For example:
git add .
git commit -m "<some-message>"
git push origin main
Why is the GitHub Actions deployment so slow?
The autogenerated workflow file from App Service defines build-then-deploy, two-job run. Because each job runs in its own clean environment, the workflow file ensures that the deploy job has access to the files from the build job:
- At the end of the
buildjob, upload files as artifacts. - At the beginning of the
deployjob, download the artifacts.
Most of the time taken by the two-job process is spent uploading and download artifacts. If you want, you can simplify the workflow file by combining the two jobs into one, which eliminates the need for the upload and download steps.
Next steps
Feedback
Coming soon: Throughout 2024 we will be phasing out GitHub Issues as the feedback mechanism for content and replacing it with a new feedback system. For more information see: https://aka.ms/ContentUserFeedback.
Submit and view feedback for
